


|


|

|

|

$200 Leica BP-SCL6 Lithium-Ion Battery (8.4V, 2200mAh) BACK IN STOCK in Accessories: Batteries and Power
|

|
Diffraction Example Using 10MP Canon 1D Mark III
Related: Canon 1D Mark III, depth of field, diffraction
This article is a companion article to Diffraction—A Technical Challenge. A “real” image is presented, one that shows how even f/8 and f/11 differ significantly, a finding which might surprise many photographers.

Example
For the example image seen at the top of this page, sufficient depth of field was desired to render a crisp foreground, but not necessarily a crisp background. More depth of field draws the eye around the frame differently; for this image that was not the goal; such decisions are purely artistic in nature.
Foreground comparison
The actual-pixels crop below is from the foreground, where optimal sharpness is desired. The lens was focused on the red leaf.
The f/11 crop shows less crispness, a “graying” of overall contrast that yields a dullness and flatness to the image not seen at f/8, most noticeable in the veins of the leaf at top. This is a reduction in contrast, and it’s what is lost when the lens is stopped down too far. How much is “too far” depends on the size of the photosites of the digital camera’s sensor. It also depends on the lens; a lens with poor contrast to begin with might look the same at f/8 and f/11. In this example, the Zeiss ZF 85mm f/1.4 Planar has outstanding contrast (MTF) at f/8.

This effect is consistent; you will see it with any good lens between f/8 and f/11 on the Canon 1D Mark III. Other cameras will see the effect sooner or later, depending on whether they have smaller or larger sensor photosites.
Background comparison
The actual-pixels crop below is from the background. The f/11 crop hows noticeably more detail. The choice is between maximum crispness in the foreground at f/8, or reduced crispness in the foreground and increased detail in the background at f/11. The results at f/16 would simply continue the trend, draining the “sparkle and pop” from the foreground.

Sharpening is not a panacea
Sharpening (“unsharp masking” in Photoshop) can compensate for the lowered contrast caused by diffraction, but it cannot add detail that is not present. Too much sharpening reduces the subtlety of tonal transitions, and can look unnatural.
The image below shows the f/11 actual-pixels crop taken sharpened with a large-radius at {10,50,0} in Adobe Photoshop. Mouse over the image to see the unsharpened original seen earlier above. While there is clear improvement in contrast, the overall tonal relationships also change, something which might or might not be desirable for the image as a whole. The f/8 image is superior, higher quality to begin with, with both sharpness and subtle tonal transitions.

(mousing over shows unsharpened image)
Aperture rules
Understand the effects resulting from the choice of aperture:
- Stopping down increases depth of field and improves optical performance until the optimal aperture is reached, typically f/5.6 - f/8.
- Stopping down beyond the optimal aperture continues to increase depth of field, but quickly reduces optical performance (first contrast, then sharpness) everywhere in the image.
For the 10.1-megapixel Canon EOS 1D Mark III, the optimal aperture for a good lens is typically from f/5.6 - f/8. Peak performance might be reached earlier (eg f/4 or f/2.8) with outstanding lenses, and might require f/11 with marginal lenses. The foregoing refers to quality across the entire frame with respect to sharpness and contrast.
A few very rare lenses might be diffraction limited wide-open, or just one stop down from maximum aperture.
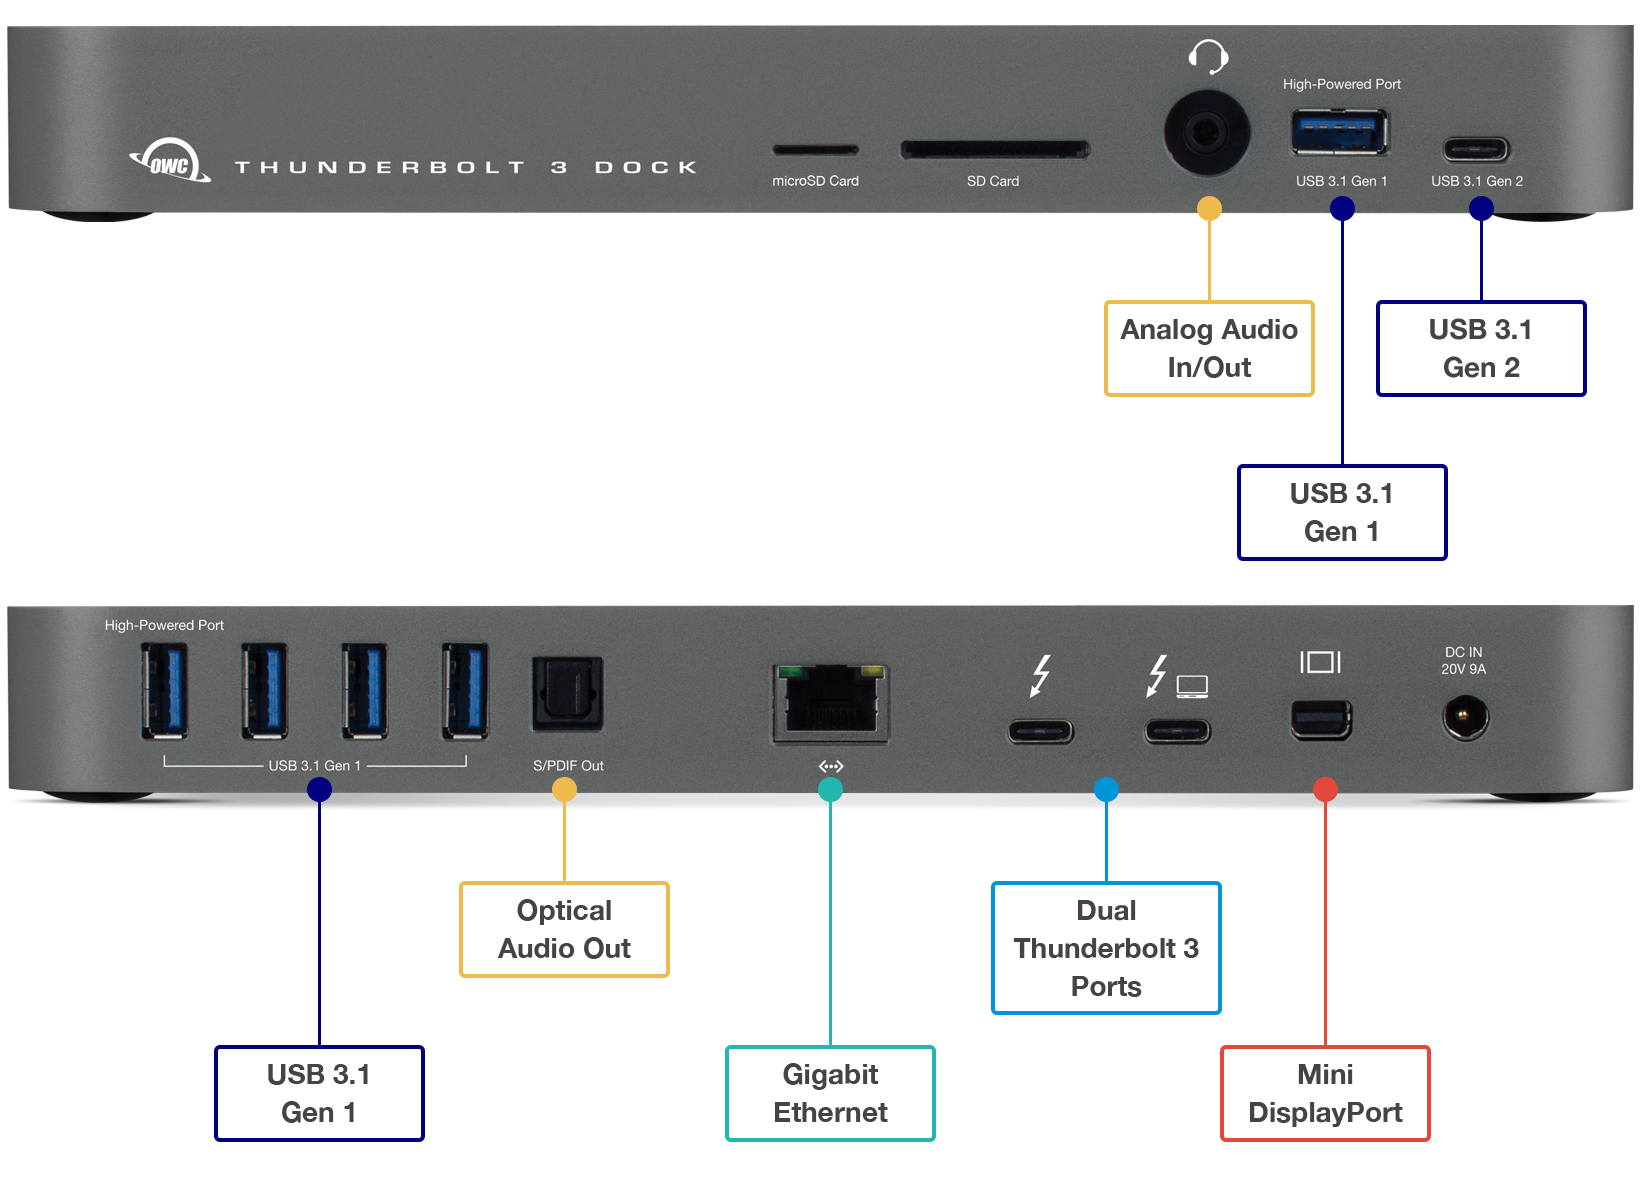
Ideal for any Mac with Thunderbolt 3
Dual Thunderbolt 3 ports
USB 3 • USB-C
Gigabit Ethernet
5K and 4K display support plus Mini Display Port
Analog sound in/out and Optical sound out
Works on any Mac with Thunderbolt 3
Depth of field calculators
We think it’s a waste of time to bother with a depth of field calculator, which calculates based on ideal lenses, which don’t exist. Calculations can be misleading to anyone but experts; real-world factors intrude and make the calculation non-actionable when actual photos are taken with real lenses. Reasons for this include varying performance across the image area, curvature of field, astigmatism, spherical aberration, color aberrations, and the critical loss of contrast due to diffraction and other factors. Not to mention focus error in placing the ideal plane of focus. Know thine own lens(es), lest ye be misled!
Contrast—resolution numbers have limited meaning without a contrast figure. Yet that is precisely what depth of field calculators proffer to the unwitting—resolution that lacks a measure of quality eg contrast. Resolution with specified contrast is called MTF (Modulation Transfer Function), and is the scientifically-valid way to discuss resolution (wavelength and distance from optical center must also be specified, as well as sagittal and tangential resolution). See the Sept 17 blog entry for example MTF charts ( Zeiss ZF 28mm f/2 Distagon).
Human perception reacts strongly to contrast, particularly accutance (edge contrast), and reacts to it in a non-linear and subjective manner. Depth of field calculators don’t quantify the subjective difference between high contrast at high resolution, and low contrast at high resolution. A low-contrast but high-resolution image will look “soft” and generally be unappealing for most subject matter.
Perceived sharpness can depend on a few key item(s) in the frame. Consider a portrait in which the entire head, face, hair, etc are (on the whole) “reasonably” sharp. Now consider the same portrait with a critically-sharp eye and eyelashes, with considerably less sharpness elsewhere. Can you guess which image will be perceived as sharper? The same holds even for landscape photographs; provided that key elements (typically those in the foreground) are critically sharp, the remainder of the frame can be less sharp. Making everything “reasonably” sharp kills the image as a whole.
Conclusions
There is no free lunch. Choose your aperture carefully based on artistic considerations, depth of field requirements, and the knowledge of what happens to image contrast and sharpness on your particular camera as the aperture varies.
Ultra-high performance across entire capacity, outperforms the competition.
Tiny, bus-powered, rugged, compact!


