


Need Advice/Help with Phase One Capture One Pro Sharpening Tools (UPDATE with reader comments)
Related: Chris R, diffraction, display connectivity, How-To, John G, Lightroom, noise, Phase One, Phase One 28mm f/4.5 AF Aspherical, Phase One Capture One, Photoshop, post processing, reader comment, Sebastian B
Update: this video is worth watching for understanding what follows:
Capture One Pro 10 Webinar | Three Stage Sharpening with Proof View.
Update 2: I’ve worked out a protocol for sharpening that I am reasonably happy with, what with the C1 Pro Sharpening palette offering only Unsharp Mask facilities, which I consider crude/coarse here in 2019. My initial approach uses a modest amount of sharpening in C1Pro along with C1Pro Diffraction Correction, followed by Smart Sharpen in Photoshop, and (sometimes) localized contrast enhancement. A more rewarding approach might be to use Topaz Labs Sharpen AI, but that is so time consuming that it is not practical for my work plus I am seeing it generate unacceptable color noise that isn’t there to start with!
I’m flummoxed by how to best sharpen images in Phase One Capture One Pro. Oh, how I long for ACR with which I am expert. The acutance and micro contrast are poor at f/8 and f/11 using the default settings—indistinct and mushy—not unexpected since the pixel size of the IQ4 is the same as the Sony A7R IV and Fujifilm GFX100, which show the same losses from diffraction. I know how to deal with that in ACR. but not in C1 Pro.

Capture One Pro has three different panels for things that sharpen, which is confusing for C1 Pro newbies like me. Contact me if you have useful suggestions for how best to use these three panels.
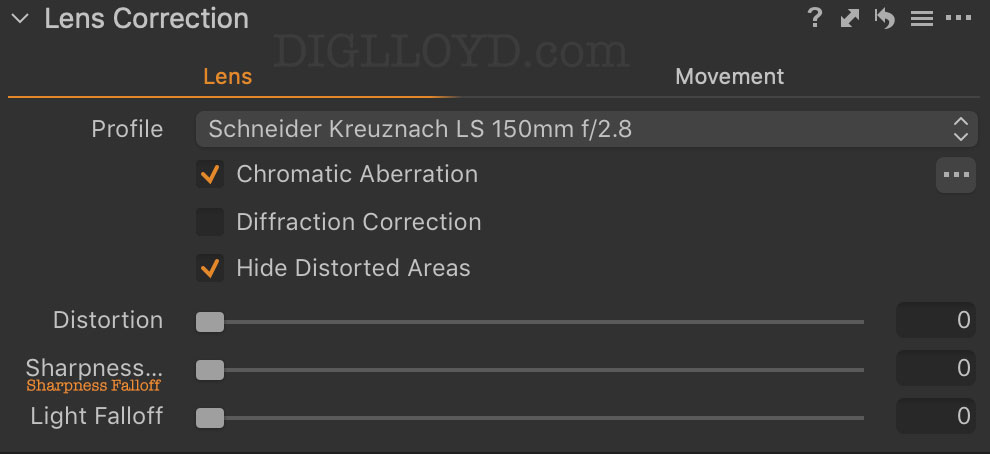
- The panel, with and options. [Update: I’m told that “Sharpening…” in the Lens Corrections palette is actually Sharpness Falloff, so C1 Pro has a bug in displaying the label properly. Even if I make that palette very wide, it still reads “Sharpness…”. See Capture One: Correcting soft corners.].
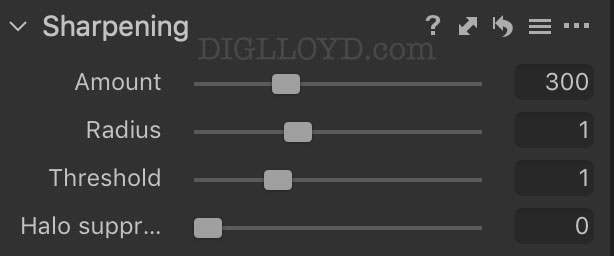
- The , which appears to be a form of unsharp mask sharpening (which I gave up on years ago for fine detail rendition—it doesn’t suffice).
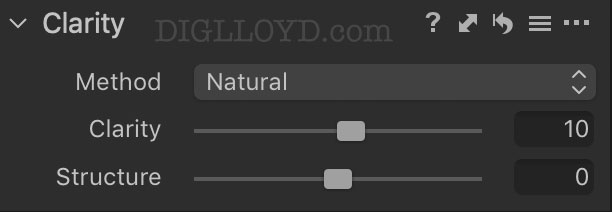
- The with its and settings, which appear to be some form of wide radius unsharp mask.
Diffraction correction is not a lens correction issue, so it has no logical business being in the Lens Correction palette. Diffraction depends on the pixel size and aperture used, not the lens! Sharpness in the Lens Correction panel is arguable, depending on what is meant (in terms of lens performance).
The main thing is that separating three forms of sharpening into 3 different panels is confusing for someone new to Capture One Pro, and not helpful even for the experienced, what with having to bounce between the three.
David R writes:
Saw you are checking out the IQ4150 and Capture One. I’m a hobbyist photographer (in the Bay Area) that uses both these tools.
I have a few tips from the past few years of working to get the best out of these tools. First off, not sure what lenses you ended up getting, but if you need to borrow something, let me know. I have the 80, 35, and 240 blue ring lenses (and 120 older version).
You’ll find that focus is absolutely critical, and often a pain to achieve with this camera. Focus trim, wait-for-vibrations shot mode, thinking about field curvature (e.g. 35mm), atmospheric distortion (e.g. 240!) etc. needs to all be just right; I think you more than most will understand the issues!
Also, handholding needs to be done (for me) at 1/ 4x-8x focal length to avoid blur due to shake.
You mention f8 and f11 in your blog. In my experience f8 is losing the finest detail and f11 is really losing it with the 150MP back (the 100 was a bit more forgiving). If you are going for maximum resolution I think that f5.6 is where you want to be.
I find that the “diffraction correction” setting is a good way to win back some of the diffraction loss, and I just keep that setting on. Just don’t expect it to work miracles at f16 or anything—you are absolutely not getting the 150MP at those f-stops.
The main C1 “sharpness” tool, as you perhaps are discovering, is OK, but not the most amazing. The default value is 185 (I think) and I find that much sharpening overkill if you have gotten everything else right at capture time. (I find a good litmus test for if I have really nailed sharpness is that a sharpening value of around 50 looks natural to me.)
All this said, if I’m going to be printing large on my 44” Canon, I will leave diffraction correction on then turn off the normal C1 sharpening and export to Photoshop. There you can upres (if necessary, not usually) and use smart sharpen to taste. Let me know if you have other questions. These are somewhat fidgety tools. And good luck with the ~9-watt-continuous power draw in the field :)
DIGLLOYD: I completely agree that f/8 is already losing fine detail and micro contrast, and f/11 is quite bad. This is true also of the Sony A7R IV and the Fujifilm GFX100, both of which have the same pixel pitch.
I was trying f/11 for focus stacking, knowing I would be losing stuff, but it was a first learning attempt. The automated stacking tool on the IQ4 is the most tedious and difficult implementation of it that I have ever encountered—you have to work in MCUs (micro focus units) and there is no actual focusing allowed in the usual sense, as with every other camera I've used. It’s so tedious and difficult that I will probably just shoot all my stacks manually.
So far, as far as I can tell, none of the tools in Capture One Pro are capable of rendering ultra fine detail as can be done in Adobe Camera Raw. I wish very much to be wrong on this point and am hoping to get a call from Phase One in Denmark soon. If not, I’ll use Photoshop Smart Sharpen which is decent but so-so versus the results I am seeing with Topaz Labs Sharpen AI.
Power draw is going to be a major headache in that it takes a lot of time in Live View to get focus right, and it’s a molasses-slow thing for focus stacking. While Phase One was kind enough to supply me with 8 batteries, a pair of them is required to operate, and I find what with all the fiddly and highly modal controls I drain the entire pair (6800 mAh!) in about an hour. It’s going to be rough on batteries in sub-freezing temperatures, so I hope that the Anker PowerCore 21000 can power the camera. Still, as large as that battery is, it's only equivalent to six of the Phase One batteries—and it’s awkward powering externally in the field. But... I have three of them, and I might have to just 'deal'.
My biggest concern with the IQ4 is that it is oriented heavily for touch-screen use, which is extremly painful for my fingers in the cold, as I know from this fall. So I may end up down in Death Valley or Alabama Hills to avoid it. Readers know that I dislike cameras without an EVF such as the otherwise superb Nikon D850, but a camera that all but requires using the touchscreen is far more troublesome as it both requires a loupe which must constantly be used on/off the LCD, plus gloves off. I hope I can make it all work without utter frustration.
Another practical problem is that none of my packs can fit the large-diameter Schneider Kreuznach LS lenses along with the camera. So I will have to use a hardcase to travel with the lenses, it also means any hiking will be camera + one lens + batteries, two max and that will be tough. I do have an older and larger pack, but its zipper is broken so I can use it for storage perhaps, but not for lugging.
John G writes:
If you go beyond the basics and learn how to edit in Capture One or Lightroom, you can make your photos look similar to what can be achieved in C1—and do so more efficiently. Having worked extensively in Capture One, I have full confidence in the program’s image-editing controls, just as I have in Lightroom. I can effectively edit in both programs but have come to prefer C1 for several reasons.
Capture One outshined Lightroom in many respects. The color editing sliders offer better fine-tuning control, particularly for skin tones. The ability to create and label adjustment masks is far superior to LR's approach. Similarly, with the C1 masks, all of C1's controls are available, not just the limited and truncated list of controls for LR masks. The Shadows and Highlights sliders have a greater range of tone control when editing regular dynamic range images. The Luma Curve is more useful for precise control of luminance and color contrast than any equivalent in LR. The global moiré removal is faster and leaves fewer artifacts. The black-and-white conversion process is better than LR at suppressing halos along with areas of color contrast. Similarly, C1 leaves fewer artifacts in most areas of processing. Once you get used to the controls, C1 preserves and recovers highlight and shadow detail more effectively over LR.
Lightroom, meanwhile, does have some extra controls to fine-tune sharpening and noise reduction. Also, the Vibrance slider offers better control over color saturation globally. GPU support means Lightroom’s Develop sliders are more responsive and faster, which itself is reason enough to stick with LR. LR also has fully integrated DNG support to enable things such as Panorama and HDR Photo Merges.
For the most part, both programs can produce equally good results. The most significant difference between the two programs, though, is a difference in philosophy. In Capture One Pro, you can customize the panels and the tools within them such that they make sense to you. This level of UI optimization far surpasses anything LR can offer. So, for example, if you think that the three different tools that deal with sharpening should be proximate to one another, you can easily place those tools in the same stack, adjacent to each other, and under the same corresponding panel. This, of course, is not possible in LR. And, in their tool panel, those same tools are not proximate either. Like all software, Capture One requires a learning curve to use it well. For one, unlike LR, the C1 user interface is not module based. LR has separate modules for Library, Develop, etc. This single difference in the style of the UI makes the learning curve that much steeper and more frustrating. However, there are several UI advantages to C1, most of which have to do with customizability.
As far as sharpening, once you understand how to use each of the sharpening tools in C1, you can achieve similar results. However, the tools function differently, and you may decide the way ARC and LR function in this one capacity suits your approach better.
DIGLLOYD: IQ4 files are not support by ACR, so I have no means to compare the two for IQ4 files. However, that may change now that I have sent raw files of each IQ4 file format to Adobe.
I doubt that the same sharpening results can be achieved in Capture One Pro, because as far as I can tell, it's sharpening is simple Unsharp Mask, whereas ACR include deconvolution sharpening, which is far more effective with micro contrast. I had this conclusion years ago about sharpening, and sharpening seems to have remained unchanged. However, this Phase One video states that the in the palette uses deconvolution sharpening.
While I understand that some pros find the appeal of C1Pro to be very high for color rendition and so on, the workflow in C1 Pro is ill-suited for my usage. However, I can deal with that on a short term, and must given the lack of ACR support.
I have some mosaic aperture series from the IQ4 as of today, and they will be excellent for assessing sharpening.
Chris R writes:
I’ve been using Capture One Pro for many years now as it is way better for colour and Raw conversion than Adobe or Lightroom I find, it’s mainly with skin tones for me with my Canon gear, and for commercial commissions it’s been invaluable.
Ok, sharpening and to get the best from the settings
Lens Correction - Basically leave this at it’s default setting, you only really need to use this for non marque lenses, only if you want to do certain adjustments to change such as ‘Light fall off’ remove CA etc.
Clarity - this is personal to the particular image, but I tend to leave it on ’Natural’ then leave the clarity and structure at ‘0’ unless you have a slightly soft image, then Clarity adds a touch of contrast without losing highlights, Structure is good for making an image slightly crisper, play around with them to get you desired look, but generally leave them at their default zero setting.
Sharpening - As you can see from the drop down menu within the sharpening box, there are several presets, however what I recommend you do is to create your own, so maybe load one of your Nikon raw files that you are really happy with the pre set sharpening that you created in the Adobe ACR, then adjust the Amount, Radius, threshold in C1Pro to look the same, then create and save the result as a preset, it’s easy to do, and that will give you a good basis to work from.
So in a nutshell, just use the ’Sharpening’ box to do your main sharpening, leave the others alone for now.
Here’s another nice tip for improving the sharpness, if you go to the ‘Magnifying glass’ symbol on the browser there adjust the Luminance to ‘0’ I find that sometimes C1Pro averages out some things to make an image less grainy but this is at the expense of the image clarity, you’ll notice it more on older RAW files where you may have shot at higher iso’s.
DIGLLOYD: I’m told that “Sharpening…” in the Lens corrections tab is actually , so C1 Pro has a bug in displaying the label properly. See Capture One: Correcting soft corners.
Sebastian B writes:
– The "Sharpness..." slider in Lens Corrections is actually "Sharpness Falloff". It is supposed to counter corner-falloff in sharpness. You'll most likely want to leave it disabled.
– "Clarity" is basically the same as in Lightroom/ACR, a very large radius unsharp mask. Won't impact pixel-level sharpness in any way.
– "Structure" I find kind of a devil. It seems to affect contrast of small details, though not as small as pixels. It produces a very impressionable effect that is very easily overdone. (Possibly some kind of edge-sharpen algorithm, though I'm not sure.) Also, what seems right (or "good") at 100 % or 200 % often produces a grossly unnatural ultra-sharpness look at lower magnifications. I'd largely avoid that too, too finicky to get right at all image sizes and not much in the way of producing natural results (unless, perhaps, your lenses suck so badly they need such a kick-in-the-ass type of post processing).
– The only actual pixel-level sharpening mechanism in C1 is indeed the "Sharpening" tool. That works pretty much like in ACR, though again I find that you can overshoot much more easily.
– I don't know if this is the case with Phase One's own cameras also, but with most other cameras (including modern low-noise cameras like the Nikon Z6), C1 employs luminance noise reduction by default. Make sure this isn't the case and set the default to 0 via the "•••" button in the "Noise Reduction" tool. Otherwise this can prevent exactly the kind of finest-level detail that you are looking for. (C1 generally seems to favor noise reduction and sharpening used in tandem, and both harmonize much better than they do in ACR, at least to my eyes. But of course you'll never get that last bit of pixel-level sharpness if any form of whole-image noise reduction is present.)
– Lastly, as a word of caution, my #1 killer problem with C1 is that images can be rendered differently depending on viewing size. Specifically, on some images, zooming in will produce shifts in color and contrast, sometimes going so far as to require different white balance and tonal adjustments at 100 % than in fit-image-to-screen view. (Though the extent of the difference is dependent on the size and resolution of your screen – on a 15-inch MBP with Retina Display, it can be very pronounced.) This seems to be most prominent when there are significant levels of noise, but I've come not to trust the software in general because of that – it seems to be a general trait that only becomes more visible with increasing noise. What's more, exported images do not show this shift upon zooming in – they look basically like the whole-image preview within C1, regardless of magnification, not like what you see at 100 % in C1. (Or anyway, that's my experience with three different cameras, so I'd really urge caution in this respect – make sure whole-image + pixel-level view in C1 + exported image all actually look the same with your own images. (And yes, this effect is exclusive to C1, I don't see it in Lightroom with the same images. I once wrote to Phase One support about this, which acknowledged the effect and informed me this was "normal" and "due to mathematical facts". Well, no, no such problem in ACR/Lightroom...))
Anyway, that's what I've learned in my limited time with Capture One. Maybe other more seasoned users can chime in or have knowledge on how to deal with these issues. (I'd be interested myself.)
DIGLLOYD: the C1Pro Sharpening palette seems to use simple Unsharp Mask, but that might not be correct. However, if it is, then it cannot compete with the more advanced sharpening in Adobe Camera Raw, which is really a hybrid shaprening consistent of both Unsharp Mask and deconvolution sharpening—and the latter is crucial for micro contrast on very fine details. However, this Phase One video states that the in the palette uses deconvolution sharpening.
I almost always turn off noise reduction, unless a file is plagued with noise.