

EXCERPT page containing first few paragraphs. 2024-04-26 21:52:14
UA_SEARCH_BOT_compatible_botmozilla/5.0 applewebkit/537.36 (khtml, like gecko; compatible; claudebot/1.0; +claudebot@anthropic.com) @ 18.224.38.3
For full access, subscribe here. Or click title to login. ![]()
When to use Frame Averaging
This is a rough in-progress DRAFT, to be expanded and to include pictures and more later.
The primary purpose of frame averaging is to retain all highlight detail while simultaneously minimizing noise in dark shadow area. Since most images do not fall into that category, it is a specialty technique to “raise your game”—images can be made which are otherwise impossible, or would have poor quality, either by blowing highlights, or unacceptable noise levels.
Many modern digital cameras have poor auto exposure for raw shooters (being designed as if JPEG were the output). They frequently give up a full stop of exposure latitude, and often more, a fact proven by examining the RawDigger histograms for raw files.
Article continues for subscribers...
Diglloyd Making Sharp Images is by yearly subscription. Subscribe now for about 13 cents a day ($50/year).
BEST DEAL: get full access to ALL 8 PUBLICATIONS for only about 75 cents a day!
Diglloyd Making Sharp Images articulates years of best practices and how-to, painstakingly learned over a decade of camera and lens evaluation.
Save yourself those years of trial and error by jump-starting your photographic technical execution when making the image. The best lens or camera is handicapped if the photographer fails to master perfect shot discipline. High-resolution digital cameras are unforgiving of errors, at least if one wants the best possible results.
- Eases into photographic challenges with an introductory section.
- Covers aspects of digital sensor technology that relate to getting the best image quality.
- Technique section discusses every aspect of making a sharp image handheld or on a tripod.
- Depth of field and how to bypass depth of field limitations via focus stacking.
- Optical aberrations: what they are, what they look like, and what to do about them.
- MTF, field curvature, focus shift: insight into the limitations of lab tests and why imaging performance is far more complex than it appears.
- Optical aberrations: what they are, what they look like, and what to do about them.
- How to test a lens for a “bad sample”.
Intrigued? See Focusing Zeiss DSLR Lenses For Peak Performance, PART ONE: The Challenges, or (one topic of many) field curvature.
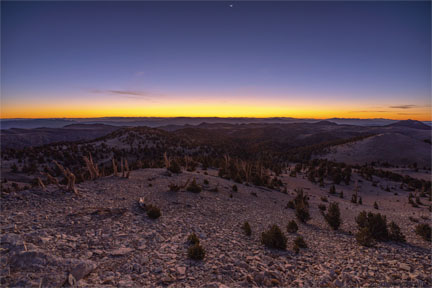
Sony A7R IV + Sigma FE 14-24mm f/2.8 DG DN Art @ 14mm
ENV: Patriarch Grove, altitude 11600 ft / 3536 m, 33°F / 0°C
RAW: LACA corrected, push 1.3 stops, +100 Shadows, -69 Highlights, +40 Whites, Chroma NR {10,50,50}, USM {10,50,0}
[low-res image for bot]