


$220 SAVE $130 = 37.0% Western Digital 16.0TB Western Digital Ultrastar DC HC550 3.5-in… in Storage: Hard Drives
|

|

|

|

|

|
Astrophotography Tips, Especially with Zeiss Otus 28mm f/1.4 APO-Distagon
Related: apochromatic, astrophotography, chroma noise, digital sensor, distortion, exposure, external articles by Lloyd, field curvature, filters, focusing, How-To, long exposure, long exposure noise reduction, noise, optics, raw file processing, tripods and support, vignetting, Zeiss, Zeiss APO, Zeiss Distagon, Zeiss DSLR Lenses, Zeiss Lenses, ZEISS Lenspire, Zeiss Milvus, Zeiss Otus, Zeiss Otus 28mm f/1.4 APO-Distagon
See best Zeiss lenses wish list and Nikon wish list and Canon wish list at B&H Photo.
Search this site for: Zeiss Otus, Zeiss Milvus, Zeiss Loxia, Zeiss Batis
Star images should be viewed at full size in order to see the differences discussed (open in a separate browser window). On a Retina or HiDPI display, the images should be scaled appropriately so that actual pixels is viewed; otherwise they will appear blurred by being viewed at 2X scaling.
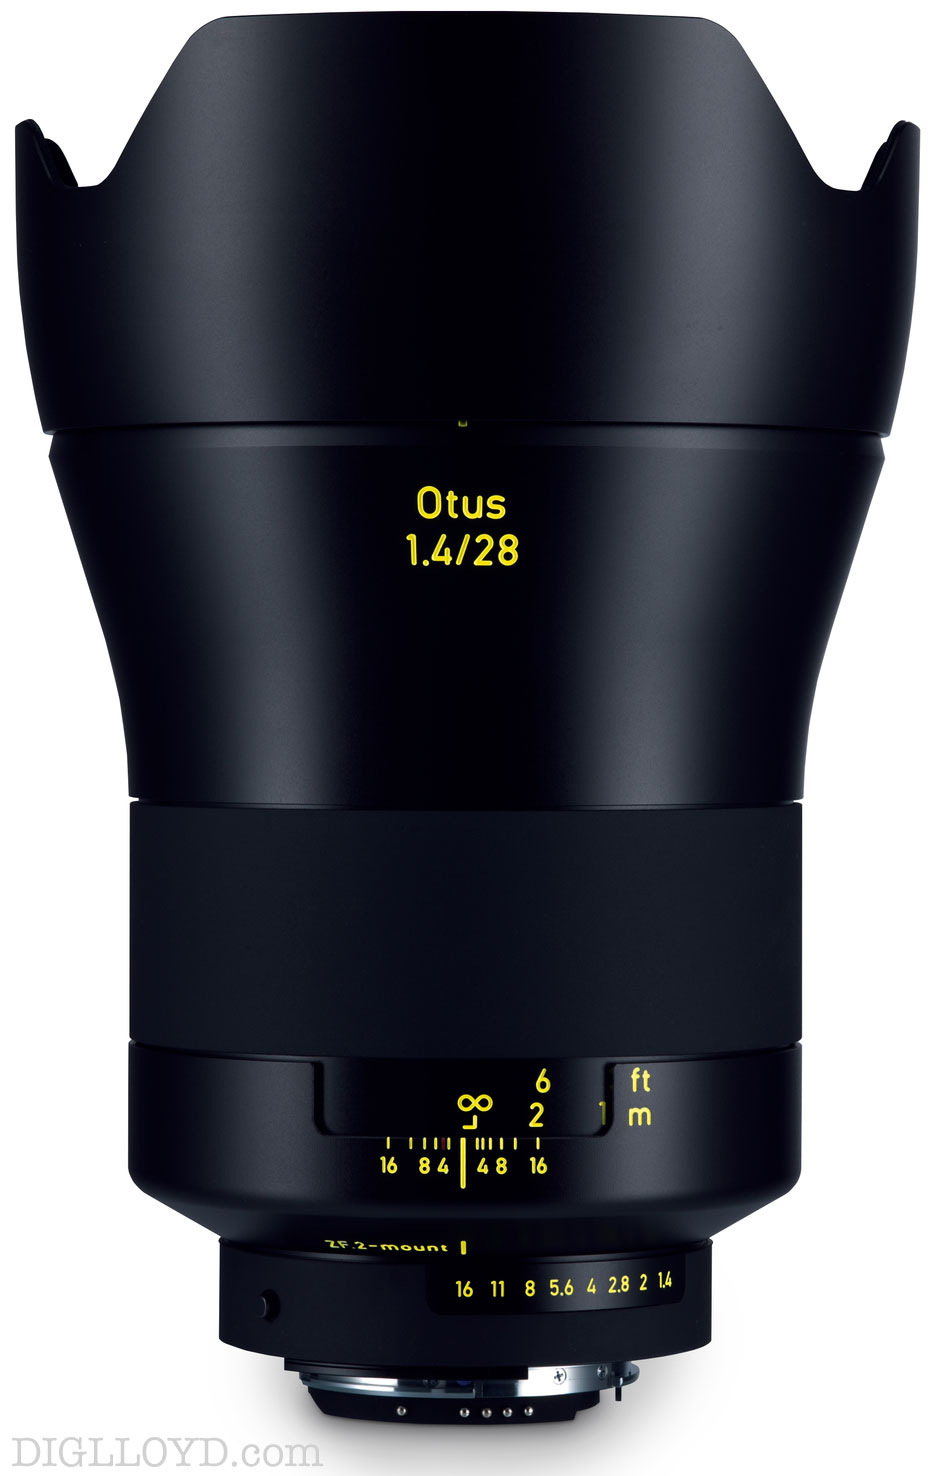
This article discusses practical astrophotography, using the Zeiss Otus 28/1.4 APO-Distagon as the idealized lens example. Focusing technique, choice of aperture, exposure time and ISO considerations, moonlight, and other practical considerations are discussed, and apply to any camera or lens.
Lens selection matters a great deal: an f/1.4 lens allows for shorter exposures, but most f/1.4 lenses have haze or halo or coma-like problems wide open as well as field curvature (uneven sharpness across the frame). Lenses with f/2 or f/2.8 apertures require longer exposures and still often have similar optical limitations. Under many conditions, lenses with f/4 maximum apertures (such as Canon’s 11-24mm f/4L) are problematic to work with, because the stars are not bright enough versus the sky.
As an ideal lens example, the Zeiss Otus 28mm f/1.4 Distagon is highly corrected, thus making it ideal for astrophotography: strict control over aberrations, very low field curvature, no haze or halo effects, and with a reasonably wide field of view. The other Zeiss Otus lenses also work well for astrophotography, due to their very high level of optical correction. A dark sky with bright stars affords the opportunity for working with/2 or f/2.8 lenses as well; the following Zeiss lenses are suggested:
- Zeiss 15mm f/2.8 Distagon
- Zeiss Milvus 21mm f/2.8
- Zeiss ZF.2 25mm f/2.8 Distagon (Nikon mount, usable with adapter on Canon)
- Zeiss Milvus 50/1.4 and 85/1.4 (also the Otus 55/1.4 and 85/1.4)
- Zeiss 135mm f/2 APO-Sonnar (particularly good for shots including the moon at dusk).
Astrophotography conditions
Conditions for astrophotography vary widely. While preparing images for this article, many nights were unsuitable due to cloud cover, or even a passing cloud which can obscure stars long enough to form a hazy area. Windy days raise dust, so that when the moon is out, any dust or haze in the air makes for a sky that will not remain black. In such conditions, an f/1.4 lens can help by allowing for shorter exposures (longer exposures yield a too bright sky).
Light pollution from cities is often an issue, even cities quite far away. In my own San Francisco Bay Area, it frequently obliterates most stars even some miles from population centers (fog is another problem, as it diffuses light everywhere). Even in the Eastern Sierra Nevada and White Mountains of California, light pollution can be a factor: it forms a background light level (if only in one direction) that makes long exposures difficult, since the sky grows increasingly bright as the exposure lengthens. Over the past 30 years of my experience in these mountain areas, conditions have steadily degraded for astrophotography. So one has to be flexible and opportunistic:
- Weather conditions in which cold rainstorms/snowstorms clear the air reduce light scattering; watch for the clear conditions that follow.
- Shooting later in the season when dust tends to be less and forest fires have died out can leave clear air (as well as having a much earlier sunset later in the year).
- High altitude is much more favorable (e.g. 10,000' elevation in Eastern Yosemite, versus 4000' elevation in Yosemite Valley with its attendant artificial lighting).
- Wait until at least 90 minutes after sunset to allow the sky to go dark for good star trails. However, attractive images can be made in early night for a colorful mix of a deep blue sky with the first bright stars.
- Shoot in a direction away from cities. Shoot in canyons which block the low horizon.
- While the moon introduces atmospheric diffuse lighting (dust, etc), it also (like the sun) makes for a blue sky—with stars! It can also be used to illuminate trees or buildings along with stars.
- Airplanes streaks are almost impossible to eliminate in the areas I frequent with longer exposures; I’ve learned to live with them. Sometimes military jets add a bit of interest with arcs that swoop.
- Specialty “cut” filters can reduce some types of artificial light pollution, but most of these are bandpass filters and introduce a strong off-center color cast on wide-angle lenses, and are thus problematic on a 28mm lens.
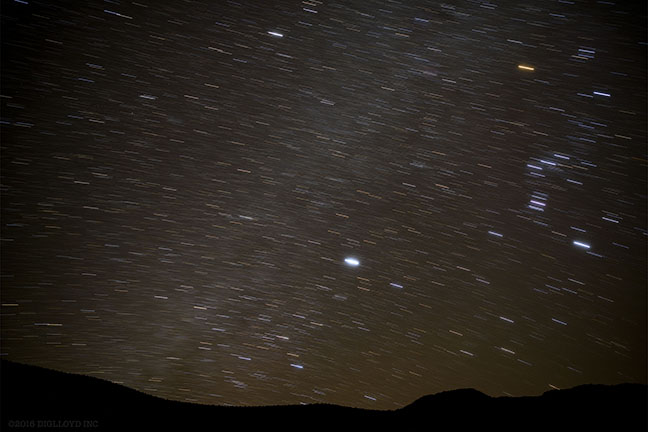
Below: even in remote areas, it is difficult to make an exposure without airplane lights!
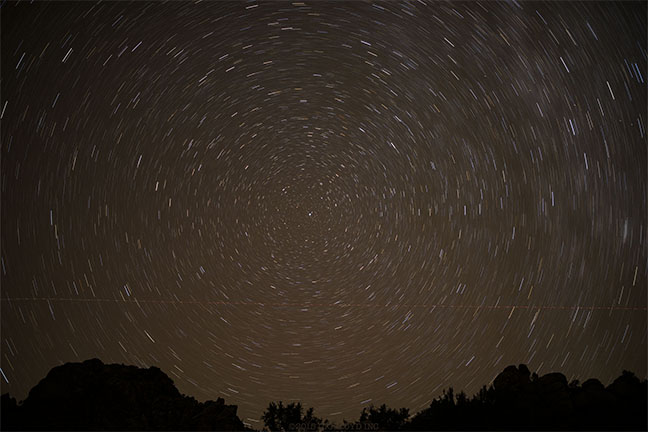
NIKON D810 + Zeiss Otus 28mm f/1.4 APO-Distagon
[low-res image for bot]
Camera and shooting ips for astrophotography
- The Otus 28/1.4 is a heavy lens, so take care to lock down tripod heads, including geared heads, because over longer exposures, some tripod heads might “creep” slightly. Ditto for locking tripod legs, and even the ground (soft mud or similar).
- Beware of dew; keep the lens capped until it is time to begin the exposure. If the dew point is unfavorable, it may be wise to shield the lens from above to avoid condensation on the front element.
- Full-frame cameras generally perform better because of improved noise characteristics. Recent models also tend to avoid pattern or banding noise that is problematic to remove.
- Specialty cameras such as the Nikon D810a have an infrared spectral pass/cut filter for astrophotography of nebula, as well as having special manual exposure time features. The regular-model D810 can be used in Timed mode (manual open/close shutter, timed by user), or with the multi-function remote Nikon MC-36A.
- Consider a 2nd camera body so that while one body is performing long exposure noise reduction, another body can be used for shooting. And/or more than one 'take' at a time.
- Avoid the use of filters of any kind for night shooting (excepting those specifically for spectral purposes). While a very high quality filter that is spotless will likely be OK, it is best to eliminate the issue entirely; even a top-grade filter can reduce quality.
Eight-bay Thunderbolt 3 high-performance storage for photo and video.
Hard drives or SSDs.
Non-RAID or RAID-0/1/4/5/10.
Capacities up to 144 Terabytes!
Focusing
Careful focus is essential for crisp stars across the frame. As shown in the images, the Otus 28/1.4 is capable of beautifully crisp star trails—but only if the focus is exactly right. It is possible to focus off-center and induce a slight blur in central areas, and vice versa. That’s because while the Otus 28/1.4 has outstanding correction for field curvature at infinity, there is nonetheless a low-level amount remaining. Thus a small focus error can throw off focus. Other lenses are even more problematic in that regard. Tips for focusing:
- Choose the brightest star, focusing on it in the center of the frame at full aperture or one stop down (recompose after). The center is brightest, thus helping to reduce focusing errors. Also, using the center helps minimize any field curvature issues and thus maximizes sharpness over the frame.
- Focus in Live View at maximum magnification using a high quality focusing loupe like the Zacuto Z-Finder 3X. Ensure that the star forms a tight point (critical focus). Even with “young eyes” that can focus on the rear LCD with acuity, it is unwise to focus by unaided eye because very small focus deviations look almost the same as perfect focus.
- Focus in the center, but as a cross-check, examine the corner areas to verify there also (as a sanity check), recognizing that definition in the corners will be slightly less good, and with a faint amount of coma-like aberration. While it is possible to improve the corners by focusing for the corners, this is likely to result in blurred stars in the central portion of the frame. With some lenses it just won’t be possible to have sharpness at center and in the outer zones; that’s why the Otus 28/1.4 is highly recommended in this article (from experience!).
- If pre-focusing, beware of pronounced temperature changes. For example, if the lens is prefocused at 50°F in a mountain canyon, the temperature could drop below freezing as early night brings settling cold air; this just slightly changes the refraction of the lens elements and can potentially affect focus for high-res digital (the same reason there is no hard infinity stop on the lens).
Vignetting
The Zeiss Otus 28/1.4 APO-Distagon is a fast wide angle lens of choice, but similar issues discussed here apply to all lenses. The optical design of the Otus 28/1.4 has moderately strong vignetting wide open at f/1.4. This can be a desirable and pleasing effect under some circumstances. However, exposure needs to be adequate for the corners (exposure above pure black), particularly if long exposure noise reduction is used.
Vignetting correction during raw conversion can address vignetting, but when shooting stars this creates its own issues with noise in the corners. It is thus important to expose enough for the corners if vignetting correction is planned.
The best solution when feasible is to stop down one stop for much more even illumination. For the Otus 28/1.4, the use of f/2 substantially evens-out illumination over the frame; while there is residual vignetting at f/2, it is more amenable to correction, and less noticeable. The use of f/2.8 is ideal, and f/4 is a nudge better when the sky conditions offer sufficient contrast to allow longer exposures.
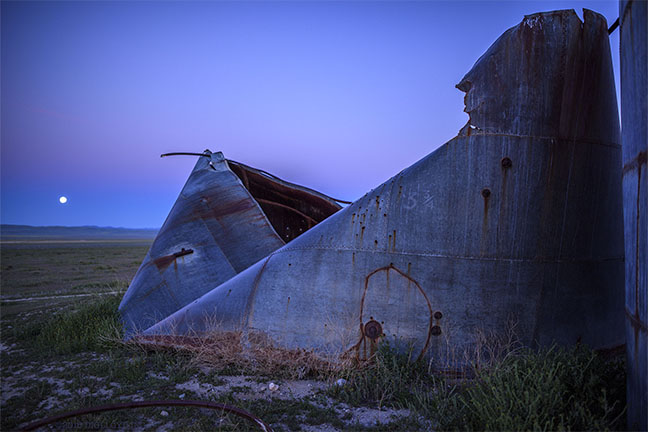
Below, vignetting is self evident at f/1.4, but in this case it is acceptable. The main thing with an image like this is that one can have either sharp stars or sharp subject, with about f/6.3 required for depth of field near to far (next image).
(distortion and vignetting not corrected)
NIKON D810 + Zeiss Otus 28mm f/1.4 APO-Distagon
[low-res image for bot]
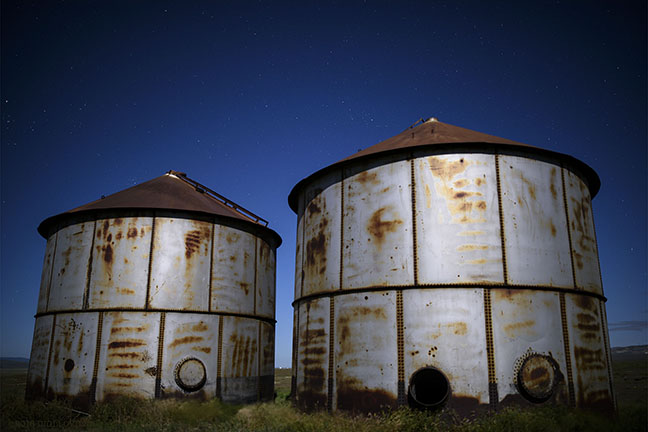
Below, raising the ISO to 3200 allows a short 4-second exposure and the use of f/6.3, which renders both the storage bins and the stars sharp, at a cost of increased noise (chroma noise reduction used here). No vignetting correction is used for this image because stopping down delivers uniform illumination across the frame.
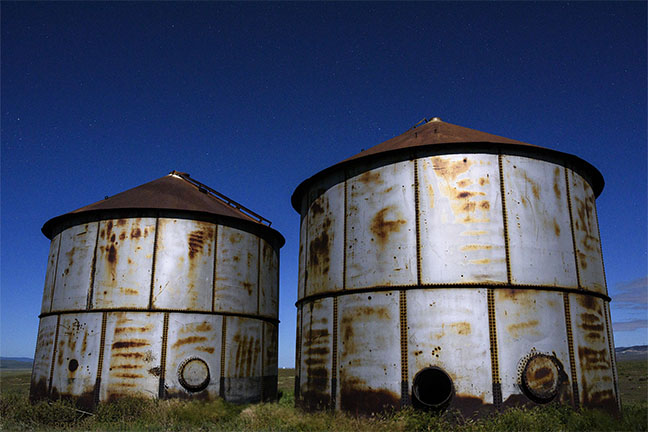
(distortion and vignetting not corrected)
NIKON D810 + Zeiss Otus 28mm f/1.4 APO-Distagon
[low-res image for bot]
So-called sagittal coma flare
The point spread function describes what happens to a point of light imaged by the lens: how much does a point deviate from a point? All sorts of smearing and other effects are possible, particularly in the corners of the frame. For example, there exists no production f/1.4 wide angle lens entirely free of so-called “sagittal coma flare” aka “bird-wings”. The Otus 28/1.4 APO-Distagon minimizes this and other aberrations to very low levels, low enough that star trails/arcs show no effects. Moreover there is no halo or haze effect around stars with the Otus 28/1.4.
As shown in the crop below, pinprick stars in the corner areas at f/1.4 and f/2 will show some “bird-wings” aberration, but this is as good as it gets for a production 28mm f/1.4 lens. Below, the 4-second exposure makes slightly streaked stars slightly streaked, so the effect as seen is not entirely the PSF, but also a slightly movement of the stars (semi horizontal movement here).
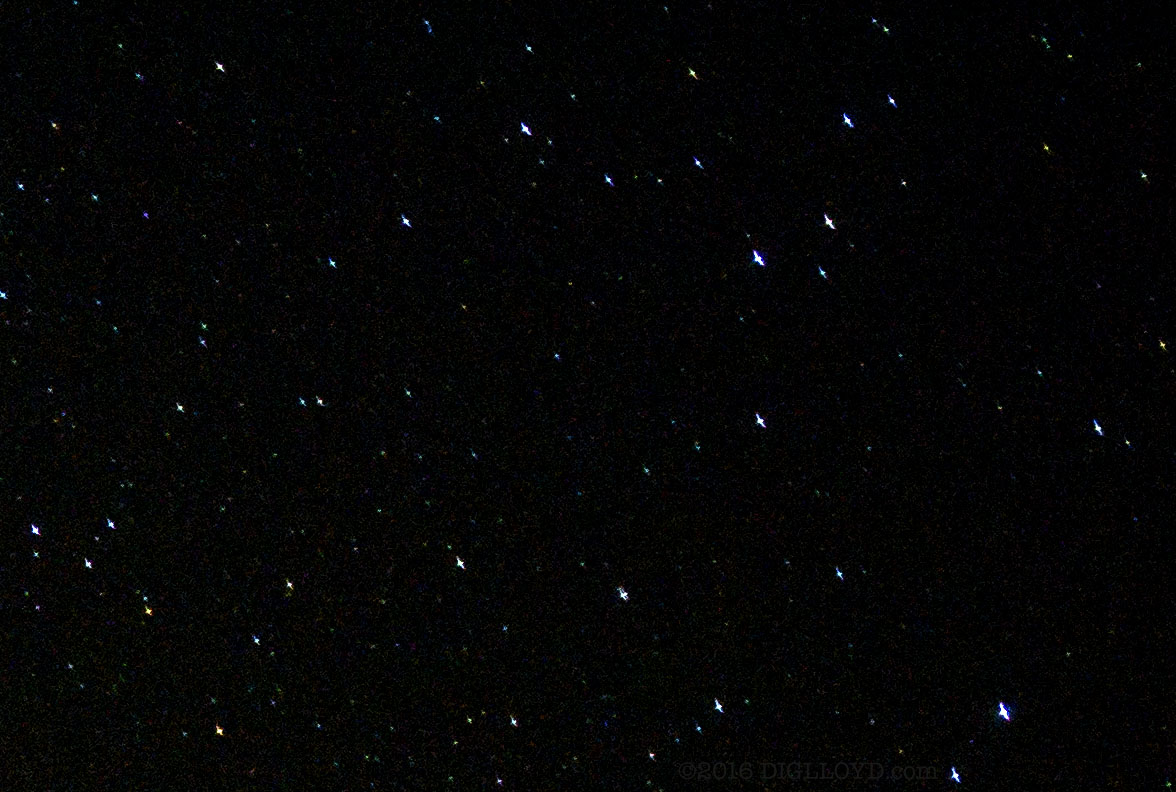
NIKON D810 + Zeiss Otus 28mm f/1.4 APO-Distagon
[low-res image for bot]
Choice of ISO
Why not just raise the ISO? Indeed, many modern cameras perform very well at higher ISO values and this is just fine for compositions including part of the landscape. But if one wishes for stars and only stars in the sky (not dots of noise), shoot test exposures with your own particular camera in order to determine the range of ISO values that are acceptable for your own purposes. It is also advisable to shoot with and without long exposure noise reduction, to see the effects upon faint stars, which may be particularly important for a nebula or gaseous cluster. [Some astrophotographers shoot many frames and combine them later in the computer, which preserves the actual stars and cancels out random noise; the camera must cooperate by not wiping out faint stars by its internal algorithms].
Below, this 6-second image at ISO 800 with +1.85 push in raw conversion yields a fairly noisy image (see brighter area near bottom), even with chroma noise reduction. It looks OK at smaller size, but enlarged the noise is more visible. The 6-second exposure renders stars as pinpricks, but the effective ISO is ~2500 to achieve it. Pulling down the blacks helps to suppress the noise floor as was done here. The apparently large stars are emphasized due to raw processing (atmospheric flare brightened up).

( vignetting corrected)
NIKON D810 + Zeiss Otus 28mm f/1.4 APO-Distagon
[low-res image for bot]
Below, this 6-second image at ISO 800 with +2.75 push in raw conversion yields a noisy image, even with chroma noise reduction. At this effective ISO of ~5000, noise begins to intrude strongly. Yet a fast enough exposure may require high ISO if/when the stars are not bright enough. Stars brightness vs background sky can vary by as much as 3-4 stops (dust, haze, moon, light pollution, etc). Here, the sky in the bottom half of the frame is bright, perhaps city lights to the south, or the moon below the horizon.
(distortion and vignetting not corrected)
NIKON D810 + Zeiss Otus 28mm f/1.4 APO-Distagon
[low-res image for bot]
Star movement vs exposure time
A star-tracking device can be used which keeps the camera/lens tracking the star rotation (Some Pentax DSLRs do this with built-in GPS and sensor movement!). This is an advanced technique requiring special gear, but it is unsuitable when a fixed object like a tree or mountain is part of the composition (since the tracking will blur the fixed objects).
Assuming a star-rotation tracking device is not in use, there are two viable approaches to imaging stars:
- Shoot exposures short enough to keep stars as points, or
- Shoot exposures long enough to render star the classic star-trail arcs.
The issue is that exposures of an intermediate exposure time look blurred because they are neither crisp points nor elongated star trails; see image below. The Otus 28/1.4 helps with this via its f/1.4 aperture which makes shorter exposure times more viable.
To keep the stars looking like sharp pinpricks depends on magnification (focal length), the size of the sensor photosites, and exposure time. For long exposures (several minutes and longer), none of that matters, since the eye easily accepts star trails.
The acceptable exposure time varies slightly with camera resolution: the higher the resolution, the more visible a slight blur (star movement). For our purposes here, we’ll assume a 36-megapixel full-frame sensor (24/36/50 megapixels will be close) and a 28mm focal length. There is wiggle room in what might be considered acceptable, depending on how large the image will be printed/displayed.
Stars as pinpricks: no more than 8-10 seconds on a 36MP sensor @ 28mm focal length
Star trails: 90 seconds or longer @ 28mm focal length
From about 15 to 60 seconds with a 28mm lens, the points become short streaks and these look blurred to the eye. Aim for 8 seconds or shorter or 90 seconds or longer for a 28mm lens on full frame. For other focal lengths, multiply these times by the focal length ratio. For example, using the Zeiss 55mm f/1.4 APO-Distagon, multiply the exposure time by the ratio 28/55, yielding 4-5 seconds. This is one reason why a wide angle is preferred; longer exposure times are possible before stars appear blurred.
Below, this 30-second exposure looks blurred; the exposure time makes neither pinpricks nor long enough star trails, so the eye sees it as blurry (view at actual pixels to see the short streaks). Being static, the mountains have fine details rendered crisply.
(distortion and vignetting not corrected)
NIKON D810 + Zeiss Otus 28mm f/1.4 APO-Distagon
[low-res image for bot]
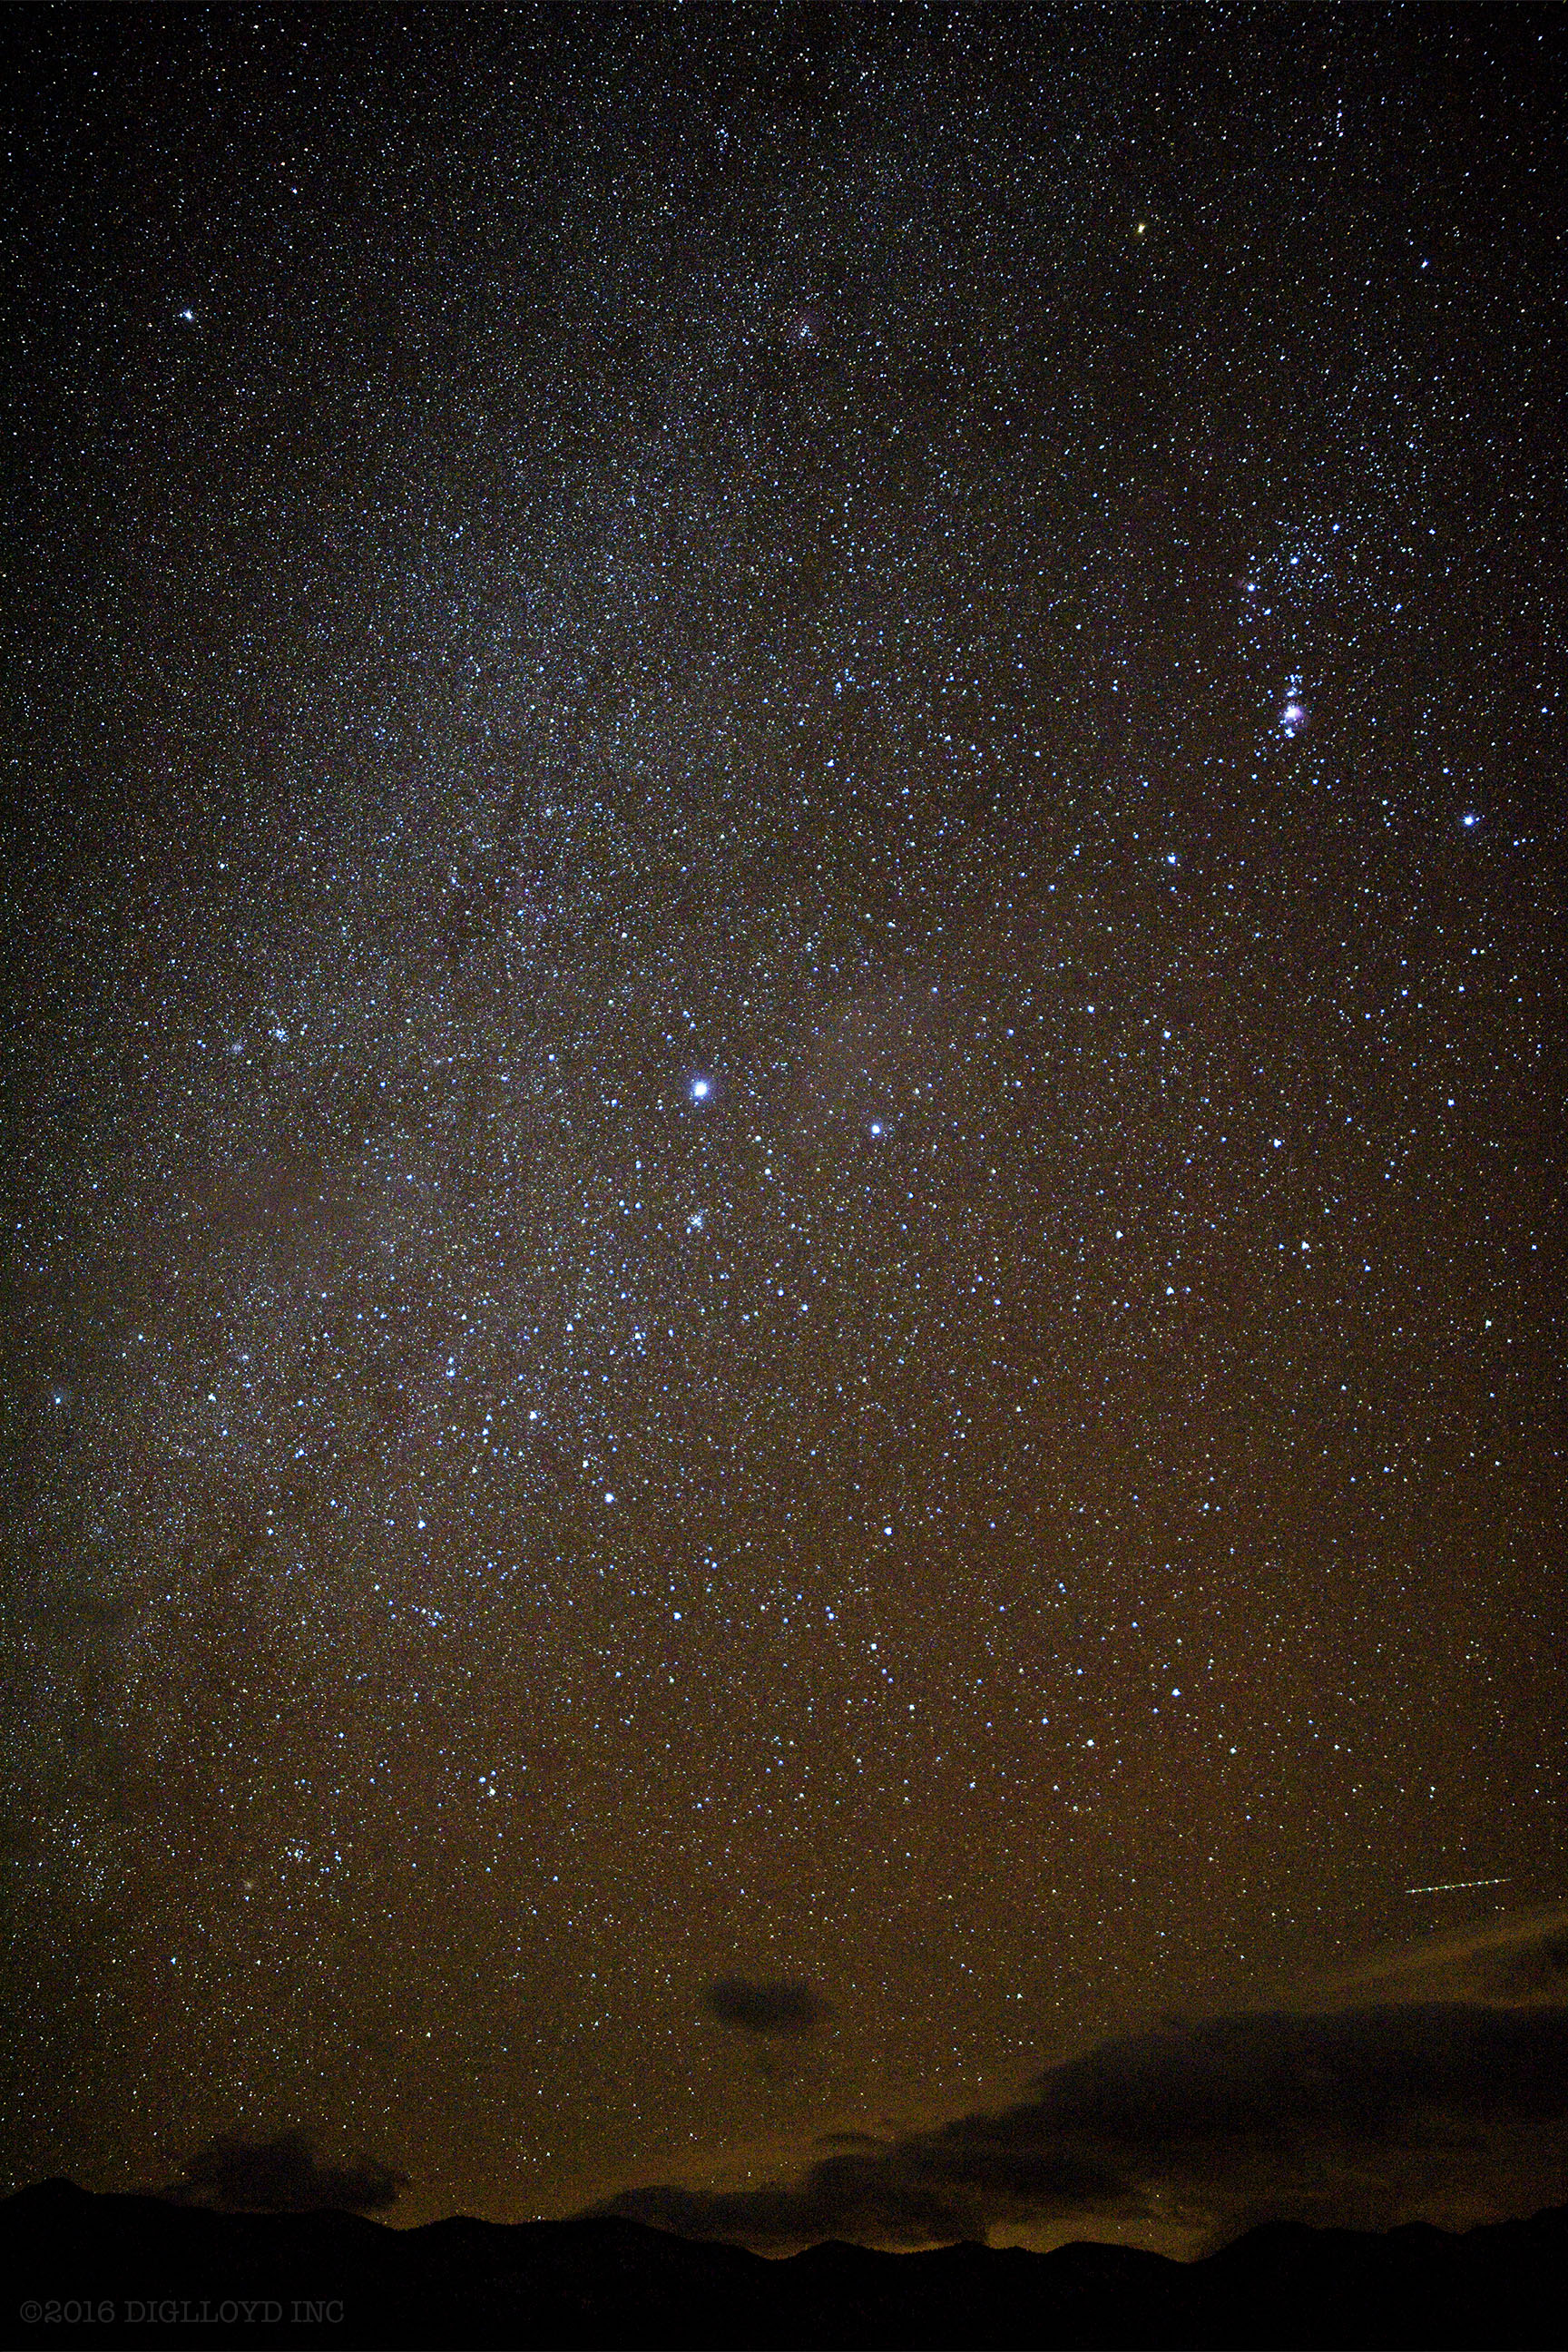
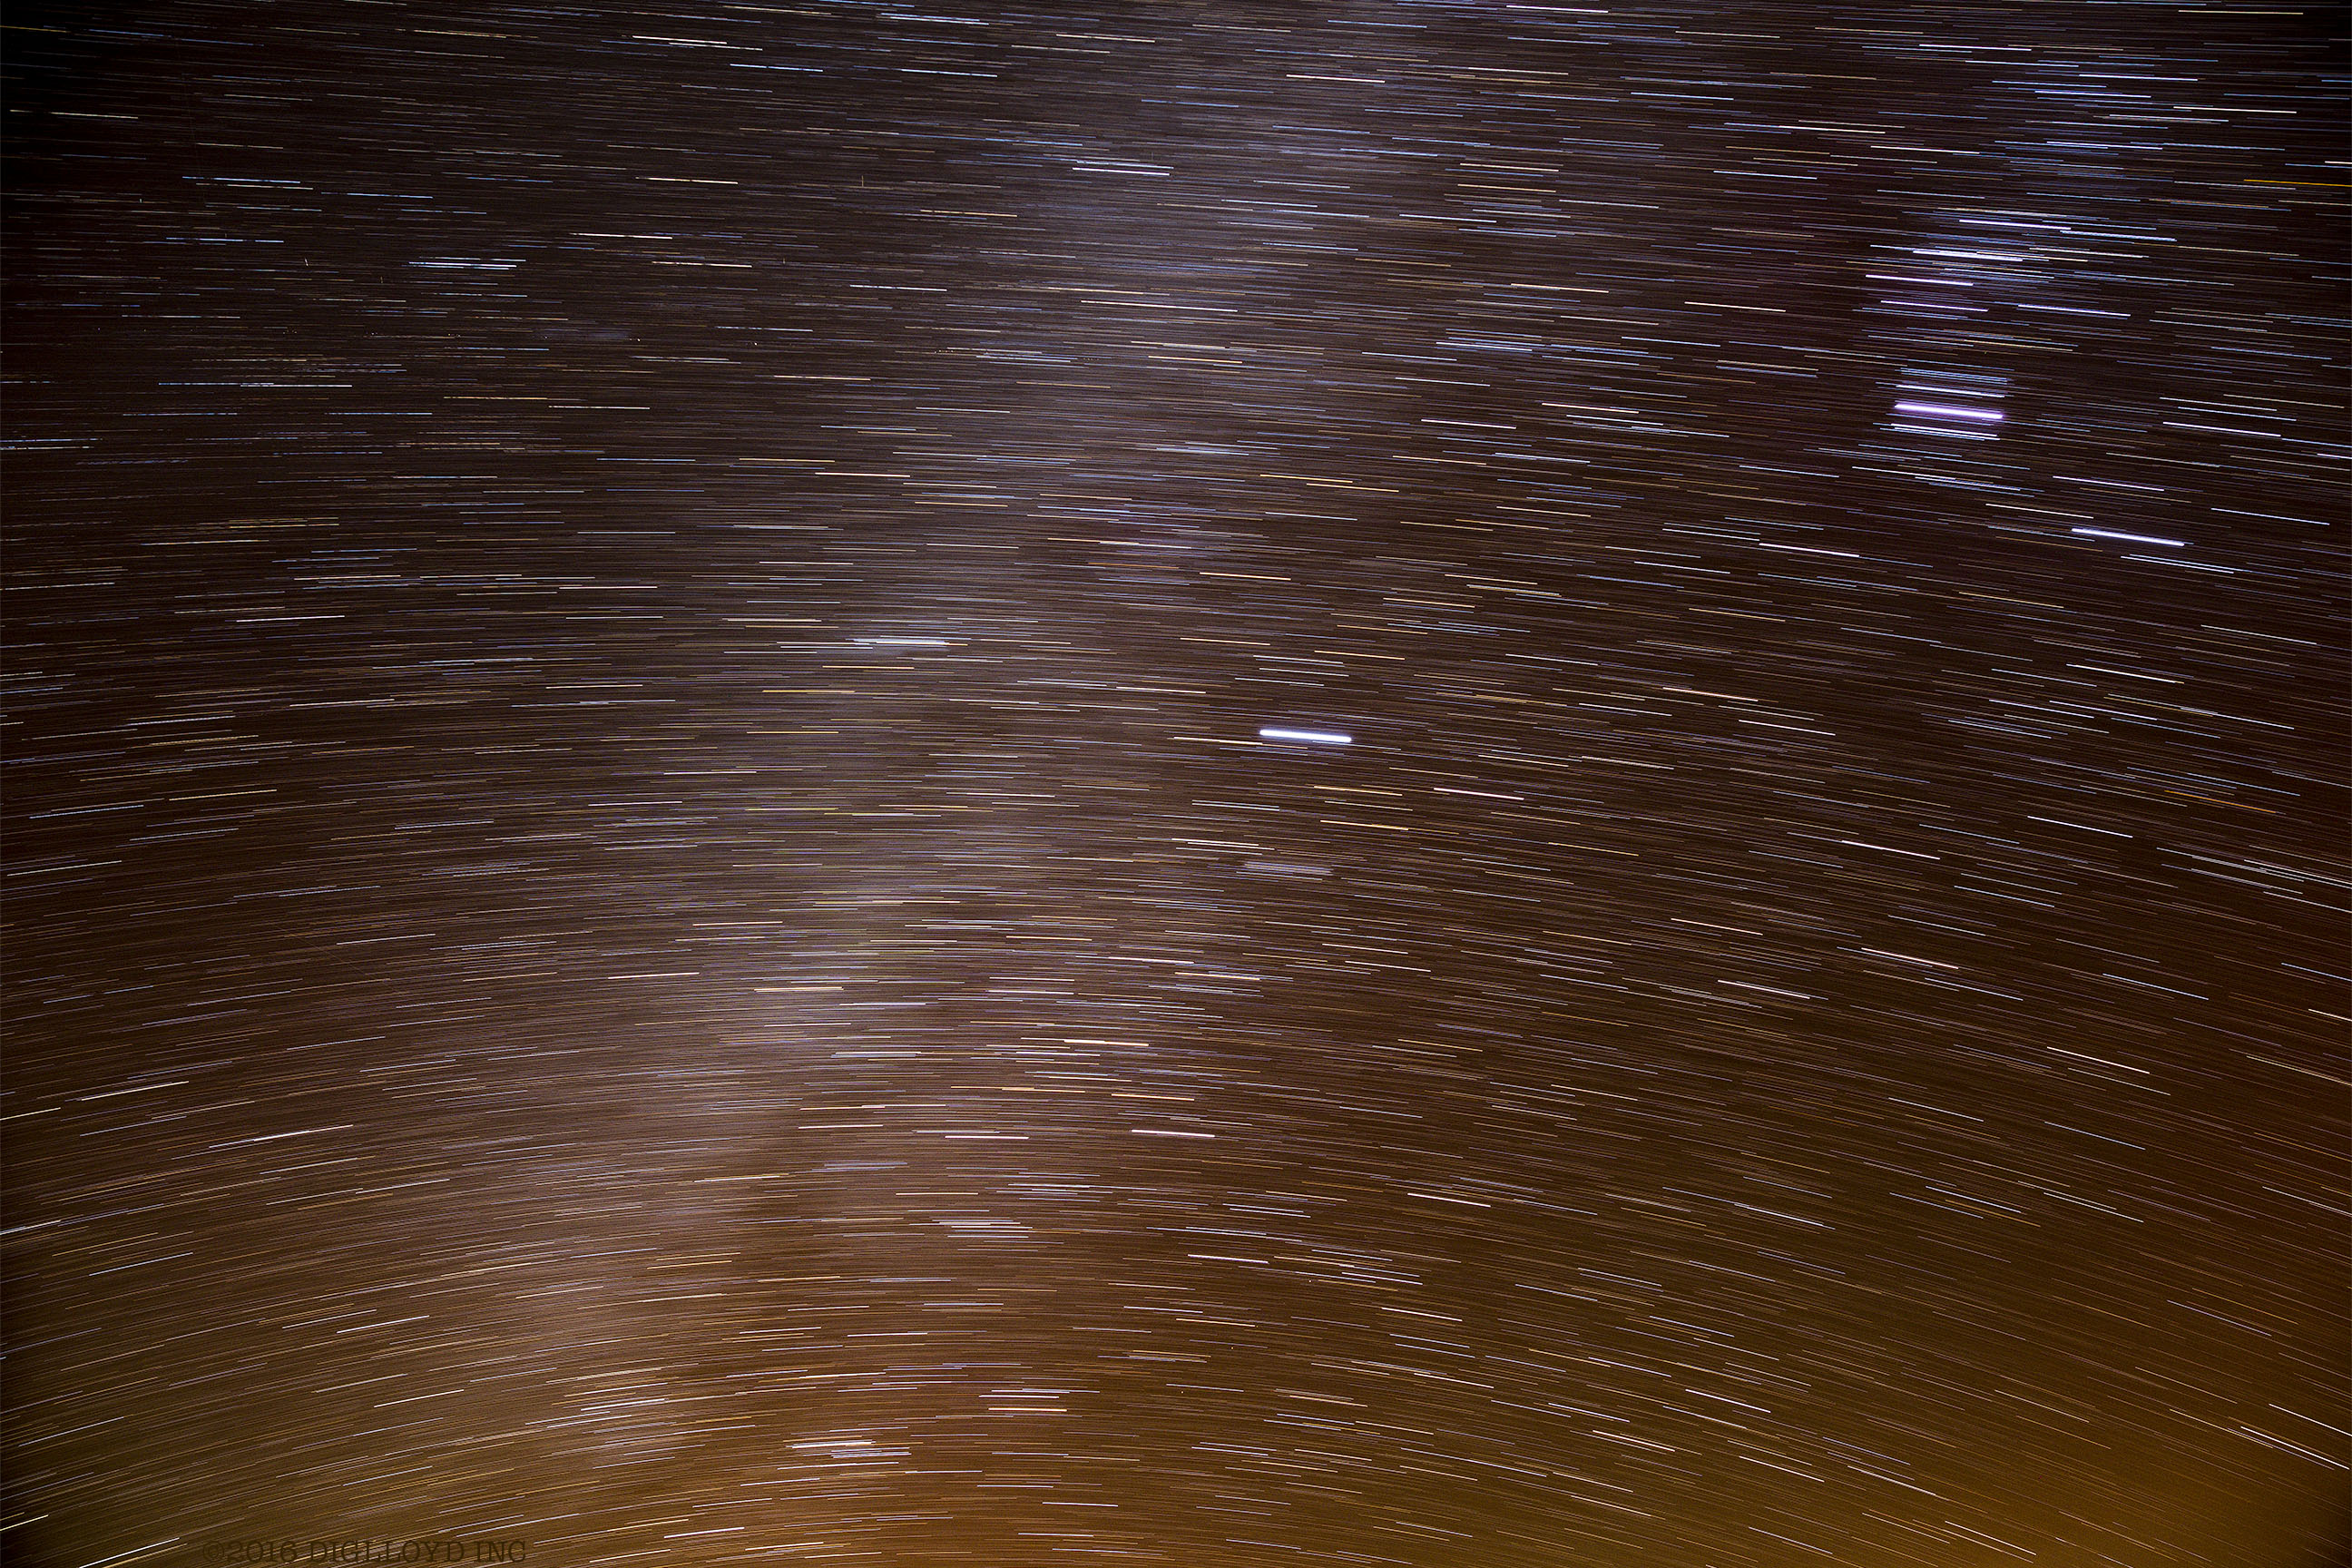
Below, the glow on the brighter stars is generally not the lens; processing to increase contrast can exaggerate the glow around stars, which can be faint atmospheric haze. A 6-minute exposure with a 28mm lens makes reasonably long star trails.
(distortion and vignetting not corrected)
NIKON D810 + Zeiss Otus 28mm f/1.4 APO-Distagon
[low-res image for bot]
Below, the curved arc is a fighter jet from a southern California military base; these fly near Death Valley. Other commercial jets leave trails, and faint meteor streaks can also be seen as fine 'scratches'. Half an hour exposure yields classic long star trails. In the areas I shoot in, the background sky brightness frequently does not allow for much longer exposure (not enough contrast between stars and sky).
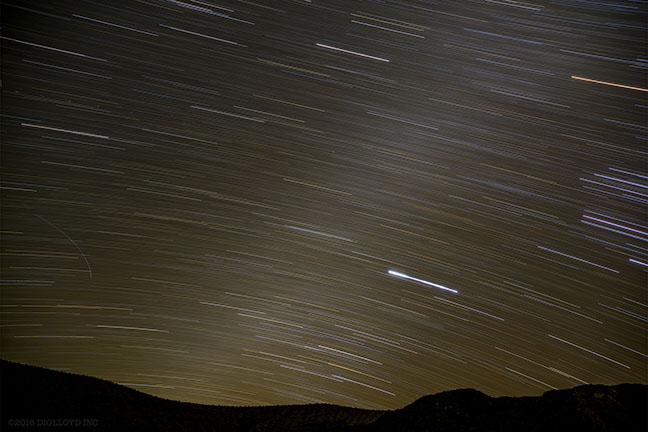
(distortion and vignetting not corrected)
NIKON D810 + Zeiss Otus 28mm f/1.4 APO-Distagon
[low-res image for bot]
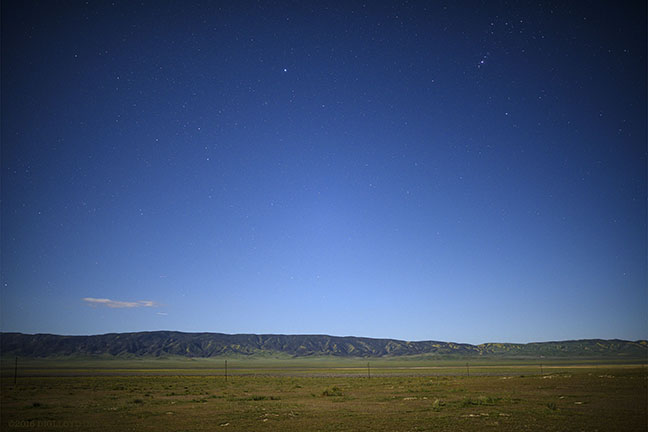
Moonlit nights
Moonlight nights afford opportunities for blue skies and stars together, as well as well-illuminated and well exposed landscapes. The Otus 28/1.4 is beautifully sharp wide open so distance shots work out well.
Below, the use of f/1.4 shows vignetting, which could be corrected given the ample exposure (0.9 EV pull was used).
(distortion and vignetting not corrected)
NIKON D810 + Zeiss Otus 28mm f/1.4 APO-Distagon
[low-res image for bot]
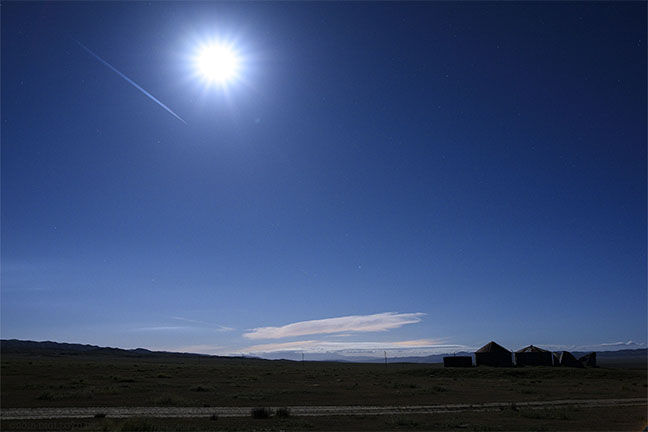
Below, the use of f/5.6 generates a moonstar, similar to a daytime sunstar. The image can be brightened to be as bright as day if desired. Contrails from airplanes are generally disagreeable, but it works out well here for this moonshot.
(distortion and vignetting not corrected)
NIKON D810 + Zeiss Otus 28mm f/1.4 APO-Distagon
[low-res image for bot]
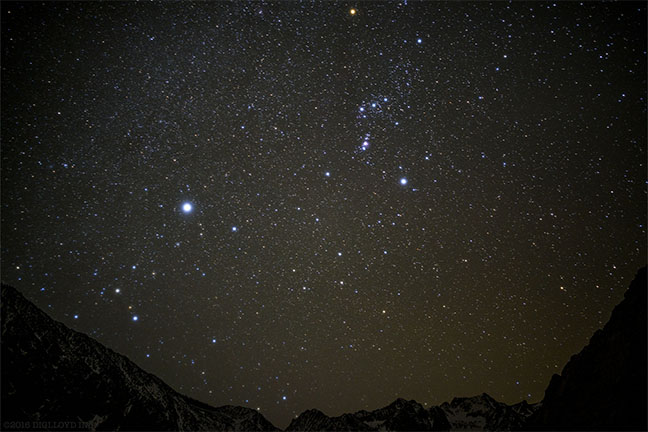
It doesn’t all have to be stars: moonset as here works well, and sometimes a few bright stars cooperate with the earth shadow (though not this morning and direction). The exceptional correction for color aberrations of the Otus 28/1.4 APO-Distagon means that the moon (while blown-out) is free of any distracting out-of-focus color blurs.
(distortion and vignetting not corrected)
NIKON D810 + Zeiss Otus 28mm f/1.4 APO-Distagon
[low-res image for bot]
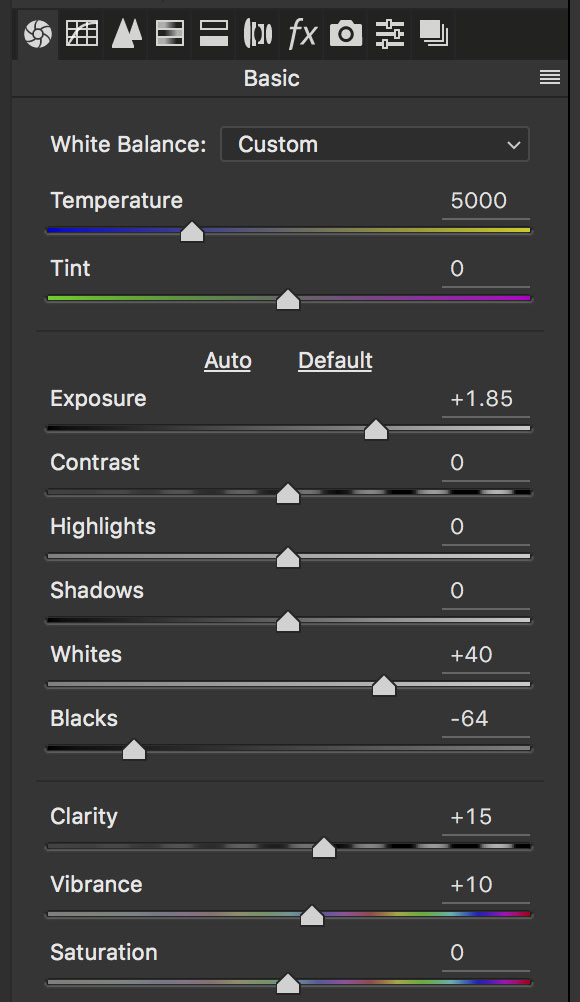
Processing images in Adobe Camera Raw
To get the “pop” out of night-time images, it may take some effort with raw conversion settings to achieve an appealing result. Color balance can be a matter of taste (and in some cases correction for light pollution). Adjusting the black and white points and contrast and so on may be needed to achieve desirable contrast. These operations are often aggressive, and might require an exposure boost as well—a compelling reason to shoot RAW (definitely not JPEG). Chroma noise reduction may also be needed for higher ISO values particularly if an exposure boost (“push”) is needed.
Shown below are some Photoshop/ACR controls, including Exposure, Contrast, Whites, Blacks, Highlights, Shadows. Experiment to see what works well for any particular image. Controls like Blacks can help pull down the background to suppress a base level of noise while Whites can help “pop” the stars. The best way to learn is to play: try all kinds of variations to see the effects.
As shown below, a too bright sky near the horizon is a common challenge. Often the color is different near the horizon and so white balance and tint may have to be “season to taste”. The dominant semi-vertical streak is the Milky Way. Various adjustments were made to achieve the desired contrast.
(distortion and vignetting not corrected)
NIKON D810 + Zeiss Otus 28mm f/1.4 APO-Distagon
[low-res image for bot]
Conclusion
The Zeiss Otus 28mm f/1.4 is ideal for astrophotography and night-time photography due to its high level of optical correction, color correction, and fast f/1.4 aperture.
The tips in this article should shorten the learning cycle, but some experimentation is still advised: test your own camera to determine its acceptable ISO range and noise behavior, as well as exposure timing options, focusing accuracy in Live View, etc. Spending a few hours one night with a laptop computer nearby to verify and check results is a confidence-building exercise for ensuring optimal results when committing to longer exposures that cannot be repeated on that special night when conditions are just right.
Lloyd’s photography blog is found at diglloyd.com; it covers many brands, lenses, cameras. See diglloyd Making Sharp Images for much more. In-depth review coverage of the Zeiss DSLR lenses for Canon and Nikon is found in Guide to Zeiss. By subscription.

Seagate 22TB IronWolf Pro 7200 rpm SATA III 3.5" Internal NAS HDD (CMR)
SAVE $100