


|

$220 SAVE $130 = 37.0% Western Digital 16.0TB Western Digital Ultrastar DC HC550 3.5-in… in Storage: Hard Drives
|

|

|

|

|
Vignetting—Drawback or Artistic Feature?
Updated: August 14, 2008
Lens testers often bemoan the fact that a lens exhibits vignetting, as if it were a flaw without redeeming value. While there are minor downsides, vignetting can be a useful tool in making more compelling images, especially with “fast” lenses (maximum aperture of f/1.2 - f/2).
Vignetting is most pronounced with the lens shot at maximum aperture. This is due to normal “mechanical vignetting”; areas of the frame away from the center see an ovalized light beam, instead of a circular one; this directly reduces the amount of light delivered to the sensor. By stopping down, these areas soon begin to “see” the same circular hole (lens diaphragm) across the entire sensor. You can see this yourself with any lens having a manual aperture ring; simply look through the lens at an angle and observe when the full circular lens diaphragm can be seen—usually about 2 stops from maximum aperture.
There is also increased reflectivity (loss of light) with increased angles to the sensor; this has largely been eliminated with some modern lenses designs using “retrofocus” optics which project the image at a close-to-90° angle to the entire sensor—even for wide angle lenses.
The typical maximum amount of vignetting is between 1 and 2 stops from center to extreme corners. Lens design vary considerably here with “fast” lenses and wide angle lenses generally showing the most vignetting. See the Relative Illumination graph for the Coastal Optics 60/4 for an example of a lens with minimal vignetting; about 1 stop wide-open; stopping down to f/5.6 reduces that to less than 1/3 stop.
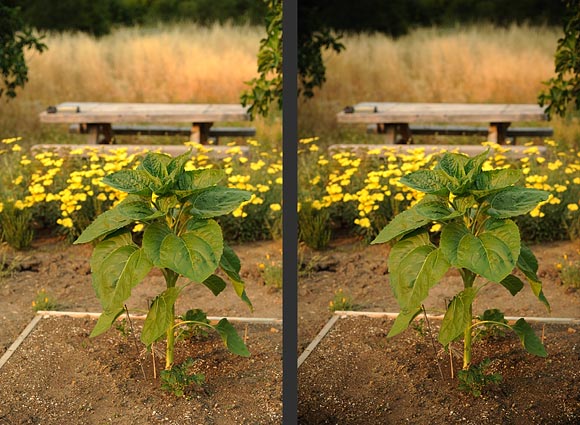
Example — f/1.4 (wide open) vs f/2.8
This example shows the same image taken at f/1.4 vs f/2.8. Which do you prefer? Depth of field and even central brightness comes into play of course, so it’s not completely apples-to-oranges, but the effect should be clear. The f/1.4 image directs attention to the center of the frame (the sunflower plant), and some additional work to lighten this area would be highly effective.
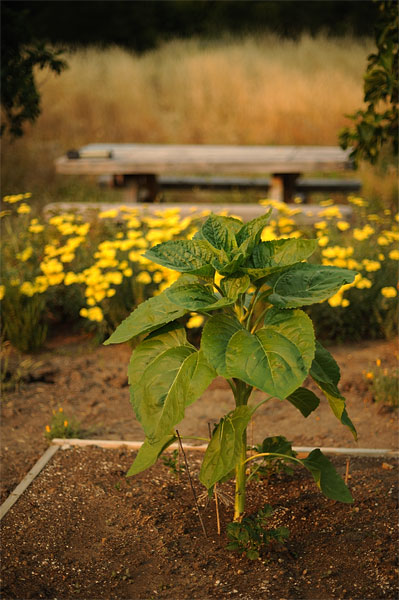
Example — f/2.8 vs f/2.8
In this example, vignetting was artificially induced using -100% vignetting control in Nikon Capture NX 2. Since vignetting is largely gone at f/2.8 with the lens used, this processing technique is what is often called “burning the corners”. It is highly effective in focusing attention on the central portion of the image.

Negative affects of vignetting
Vignetting is not without downsides. For example, naturally-dark corners could be turned to pure black, making it difficult to extract image detail in post-processing and/or creating more digital ”noise” when doing so. On the flip side, naturally bright corners are “toned down” by the presence of vignetting, for example a bright patch of sky at the edge or corner of the frame. This can be used to advantage.
Color accuracy and vignetting
Nikon Capture NX and other RAW-file converters offer features to compensate for vignetting. For example, Nikon Capture NX 2 offers the following control:
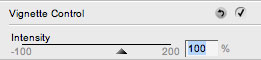
An intensity in the 50% range is often a good choice; correcting vignetting to 100% is not necessarily the most natural-looking. A negative value “burns” the corners, a technique preferred by many photographers for focusing attention on the main area of the image.
An image editor such as Photoshop can also be used (a gradient mask along with a Levels or Curves layer).
Example — Nikon 24-70/2.8
Vignetting is exceptionally well-controlled with the Nikon 24-70, but even so the vignetting can be significant when shot wide open at f/2.8. The blue-sky examples below make this obvious. Luminance (brightness) values drop off from 61 in the center to the 30's in the extreme corners. Note that blue sky never offers a perfectly uniform scene, but real-world examples are persuasive, and the overall effect is still clear.
The top row is as-shot; the bottom row is with Vignette Control at 100%. An interesting result is observed: the Capture NX vignetting control feature equalizes not just brightness, but color accuracy as well (details below)! (The high-altitude clouds and sunlight striking them does cause some non-uniformity, this is to be ignored).
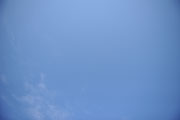


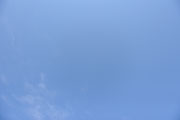
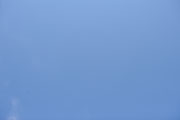

Bottom row is corrected at 100% in Nikon Capture NX 2
Placing three Photoshop CS3 measurement points on the 70mm image, the following Lab* values were observed. Note how the near-corner has had its color shifted to match the rest of the scene much more closely (a/b values shift by -5/+2). The overall effect is of a uniformly blue sky of the same brightness and color, or at least very close. Whether this behavior is true of other RAW-file converters is unknown at the time of this writing; it certainly will not be true when using a gradient/mask in Photoshop, one benefit of compensating for vignetting in the Nikon Capture NX.
Center: {60, -3, -32} ===> {60, -2, -32}
Middle: {55, -3, -32} ===> {62, -2, -32}
Near-corner: {41, 2, -35} ===> {59, -3, -33}
* Lab values consist of Luminance (L), magenta/green (a), and blue/yellow (b). Lab is used internally in Photoshop for all color conversions and mapping. The separation of color from brightness (luminance) is often very useful for post-processing.
This finding suggests that using Vignette Control might be useful where color accuracy is desired; the corners could be “burned” (luminosity only) as a post-processing step.
Conclusions
Vignetting is not necessarily an undesirable lens feature. It can be used to emphasize the subject matter, and indeed many photographers deliberately introduce vignetting by “burning the corners” of an image. Its real downside is when dark corners are further darkened and when detail in those corners is desirable for the image. In most cases, that problem can be compensated for in RAW-file conversion and/or post-processing.

Seagate 22TB IronWolf Pro 7200 rpm SATA III 3.5" Internal NAS HDD (CMR)
SAVE $100