


|

$220 SAVE $130 = 37.0% Western Digital 16.0TB Western Digital Ultrastar DC HC550 3.5-in… in Storage: Hard Drives
|

|

|

|

|
Autofocus Accuracy—Canon EOS 1Ds Mark II / 85mm/f1.2L II USM
This is one of several articles on focus accuracy, please see the main page, Focus Accuracy.
Test setup
For this test, I used the 16.7-megapixel Canon EOS 1Ds Mark II together with the Canon EF 85mm/f1.2L II USM prime lens to examine the consistency of focus and how it affects image sharpness. I no longer own a Canon EOS 1Ds Mark II, but plan to own its successor sometime soon (hurry, Canon!).
Shots were taken at maximum aperture (f1.2), so as to minimize depth-of-field, thus revealing as clearly as possible any back-focus or front-focus issues.
A Gitzo 1548 tripod was used (see The Sharpest Image) with a Really Right Stuff BH-55 tripod head, together with mirror lockup and Canon Remote Switch RS-80N3.
I created a custom target to aid in accurate estimation of the amount of backfocus (actual focus behind the desired plane of focus). The custom target has patches at varying depths, with duplicate target patches at increasing distances. There is also a single patch 15mm closer than the target patch, to detect focus error in front of the target (“front-focus”). The target patches were cut out of a Charles Sleicher Resolution Chart and affixed to multiple layers of 5mm Gatorfoam, a rigid material.
A total of 11 frames were taken at a distance of about 5' 3" (to the front of the lens). This is roughly equivalent to a head and torso shot with the 85mm.
Focusing procedure
1. Force misfocus by placing a hand about 1 foot in front of the lens and initiating autofocus.
2. Remove hand, then focus on target in single-shot focus mode (using remote release).
3. Using the remote release, raise the mirror, pause, then release to take the frame.
Repeat steps 1, 2, 3 for all frames.
Interpreting the frames
Use of the custom-made target assists greatly in seeing the differences between critical focus and back-focus and front-focus.
Assuming no other technical errors (eg camera movement), a critically-focused image will exhibit the following properties:
- maximal resolution achievable for that particular lens and sensor combination;
- high contrast (relative to non critical-focus frames);
- minimal discoloration of neutrals, such as black or gray bars.
Due to aliasing (non-real detail) caused by digital camera interpolation of sensor data, distinguishing the critical focus frame requires careful inspection—other frames might appear to have the same resolution, but might also have greater discoloration and/or slightly lower contrast. See the examples that follow.
It is not uncommon to observe purple fringing (or green) for slightly out-of-focus areas with some modern telephoto lenses. For example, the Canon EF 85mm/f1.2L II USM displays purple fringing when used on the Canon EOS 1Ds Mark II digital body.
Examples—progressively increasing out-of-focus areas
The examples below are displayed at 200% actual pixels for ease of viewing. Your browser should display them sized most of the width of this text.
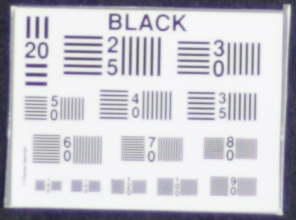
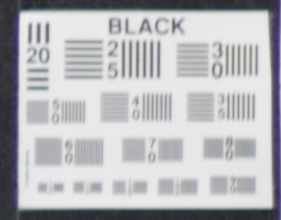
Canon EOS 1Ds Mark II + 85mm/f1.2L II USM
This was the best of 11 frames. Note that even with critical focus, there is still a small amount of residual discoloration around some of the black areas, and a faint purple halo around the white square.
Possibly focus is still off a millimeter or two, and a slightly better result might be possible with a very fine focus adjustment. Only laborious focus-bracketing could decide this question with certainty. Also, there is no guarantee that the target/lens/sensor were in perfect alignment (parallel to each other).
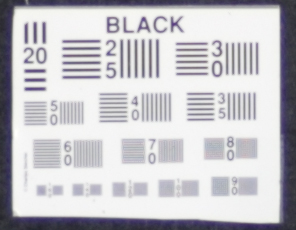
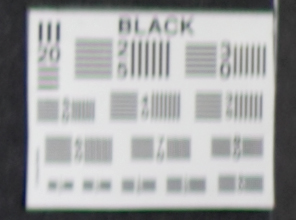
Canon EOS 1Ds Mark II + 85mm/f1.2L II USM
This patch was located 5mm behind the target. It has essentially the same resolution, with less purple discoloration. Some black bars are 1 to 2 points darker than the target patch, and some are 1 to 2 points lighter than the target patch.
The patch is also oriented slightly differently, which could introduce differences due to astigmatism, and of course it’s not the same exact patch (though it was cut from the same poster). If a winner must be chosen, I would choose this patch, which would mean a 5mm back-focus.
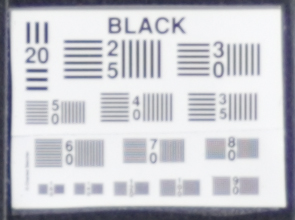
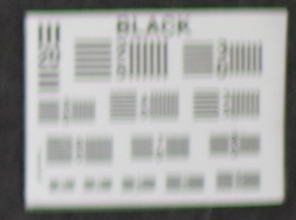
Canon EOS 1Ds Mark II + 85mm/f1.2L II USM
This patch was located 10mm behind the target. The “50” bars are slightly blurred compared to the -5mm patch above, and the black bars are less black by several points.
This patch was located 10mm behind the target. The “50” bars are slightly blurred compared to the -5mm patch above, and the black bars are less black by several points.
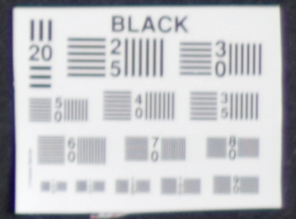
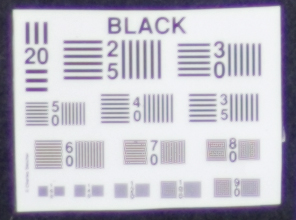
Canon EOS 1Ds Mark II + 85mm/f1.2L II USM
At 20mm behind the target, the “50” bars are obviously blurred.
This patch was about 40% of the distance from the optical center to the edge of the frame, so optical performance is likely declining away from the optical center, as it usually does. The first signs of astigmatism are evident: observe that the “30” bars are sharper in the vertical direction than the horizontal direction.
Canon EOS 1Ds Mark II + 85mm/f1.2L II USM
Astigmatism increases. This patch is halfway between the optical center and the edge of the frame.
Canon EOS 1Ds Mark II + 85mm/f1.2L II USM
Astigmatism further increases. Alternately, the uneven horizontal/vertical resolution might be the result of another optical aberration. We see the beginning of a magenta/green double-image, a type of chromatic aberration. This is not atypical for moderate telephotos—the Nikon 85mm/f1.4D Nikkor shows similar color fringing in out of focus areas.
Canon EOS 1Ds Mark II + 85mm/f1.2L II USM
The magenta/green double image is now plainly apparent. Is this normal behavior for this lens, or does it indicate an optical problem with my particular copy? Unfortunately, this means I’ll have to borrow or rent a 2nd copy to verify this behavior.
Canon EOS 1Ds Mark II + 85mm/f1.2L II USM
This patch was located 15mm (1.5cm) in front of the target patch. Note the purple discoloration of the black bars, and the increased purple halo around the white square.
Contrast is also lower, with the black bars a bit less black.
Ultra-high performance across entire capacity, outperforms the competition.
Tiny, bus-powered, rugged, compact!

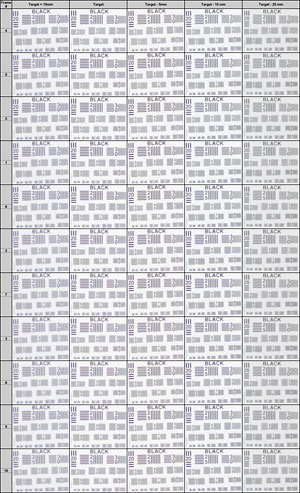
Focus Consistency
Since a total of 11 frames were taken, we can compare them to see how consistently focus was achieved. A lens/camera combination that produces intermittent errors is a serious problem for that “special moment”, whether it be a personal snapshot, or a“money job”.
There is clearly focus-variation occurring. The range of accuracy seems to be ±10 millimeters, or about a 20mm (2 centimeter) range, with a tendency to back-focus by about 5mm. My general shooting experience with other lenses suggests that this is an outstanding performance.
However, without performing the same test using the custom target with other “fast” lenses (eg the 24mm/f1.4L, the 35mm/f1.4L, the 50mm/f1.2L, and the 135mm/f2L), it’s unclear if this is just good performance, or unusually good performance.
Crops from the 11 frames are arranged in a large table. Focus variation may be observed by noting the increased or decrease sharpness of the +15mm crop versus the -25mm crop, relative to the target (+0mm) crop.
Click the image below to view the full table at actual pixels.
Conclusions
Conclusions apply to the Canon EF 85mm/f1.2L II USM on the Canon EOS 1Ds Mark II digital body. A different sample of the lens and/or body might produce slightly different results. For that matter, a lower contrast target or different lighting might shift the results slightly, or degrade focusing accuracy considerably—this was not investigated.
Focus accuracy was remarkably consistent—with a high-contrast target the 1Ds Mark II can achieve critical focus 90% of the time with the 85mm/f1.2L II USM.
At a distance of about 5 feet, the acceptable focus error to achieve optimal sharpness is approximately 5 millimeters (0.5 centimeter), for a total “zone” of 10 millimeters (5 front/5 back). Some argument can be made that this zone might actually be as deep as 20mm, but when the images are examined with a critical eye, particularly if layered in Photoshop, clicking a layer on/off reveals the subtle differences.
Eyes: Since an eyebrow or eyelash can be 5-10 millimeters in front of the ocular surface, focusing on eyebrows or eyelashes instead of the eye itself is likely to yield unacceptable blur, because the focus error is on the order of 5-10 millimeters at 5 feet.
Stopping down the lens to f2 would likely mitigate any focus error significantly, but this was not tested.
Bottom line: choose your focus point very carefully when shooting at f1.2, and test your camera/lens combination to verify that it can produce consistent and accurate focus.

Seagate 22TB IronWolf Pro 7200 rpm SATA III 3.5" Internal NAS HDD (CMR)
SAVE $100