


$220 SAVE $130 = 37.0% Western Digital 16.0TB Western Digital Ultrastar DC HC550 3.5-in… in Storage: Hard Drives
|

|

|

|

|

|
Harnessing Wide Angle Lenses: Perspective and Impact
Related: Cerro Gordo, depth of field, distortion, external articles by Lloyd, field of view, focus stacking, How-To, Inyo National Forest, optics, peak bagging, sunstar, White Mountains, wide angle, Zeiss, Zeiss 15mm f/2.8 Distagon, Zeiss 18mm f/2.8, Zeiss 21mm f/2.8 Distagon, Zeiss Batis, Zeiss Distagon, ZEISS Lenspire, Zeiss Loxia, Zeiss Milvus
by Lloyd Chambers, diglloyd.com
Wide angle lenses are usually conceived of for their essential function of “fitting more in”, since some spaces and places afford no viable alternative. Yet one of the hardest things to do with a wide angle lens is to fit in only what is needed, that is, to take out as much as possible, but not too much.
And so while fitting more in is a key function of a wide angle lens, a primary creative and expressive function of a wide angle lens is to control the relative size and perceived spacing of subject matter within the composition. Because of the wide angle of view, images are often made at closer range for a key element, which results in exaggerated perspective (for images shot at the same distance, perspective is identical for all focal lengths). With a 'normal' or telephoto lens, images are usually made farther away, and so relative size differences are minimized, an effect seen in spades with a super telephoto lens.
Thus getting closer with a wide angle lens is a powerful tool for changing subject matter relationships because for the same subject size (magnification), the relationships are exaggerated, as shown with the pine cone below.
Shot at very close range, this pine cone looks huge compare to the trees; a wide angle at close range allows steep perspectives, making nearby objects much larger, by the inverse square law. If desired, focus stacking could have been used here to make a sharp image to the distance.

Sony A7R II + Zeiss Loxia 21mm f/2.8 Distagon
[low-res image for bot]
Angle of view
For still photography, a wide angle lens is generally taken to mean a diagonal field of view of about 63° or wider (55° horizontally), which on a 35mm full frame DSLR means a 35mm lens. But while a 35mm is by convention a wide angle, 35mm tends to feel like a slightly wide 'normal' lens, that is, one that feels about the same as what the human eye sees. Its images feel natural and proportional, with relatively subtle stretching and perspective effects. Thus the 35mm focal length is a crossover focal length to wider angle lenses having more “wide angle effect” all the way to a wild angle lens (15mm or so).
Extreme Wide Angle        Wide Angle           Normal          Telephoto
11mm, 15mm, 18mm,   21mm, 25mm, 28mm, 35mm,   40mm, 50mm, 55mm,  75mm, ...
(for rectilinear optical designs on 35mm full-frame camera)
Focal length for a wide angle depends on the format size. For example, on a 4X5 view camera, a 105mm lens is similar in angle of view to a 35mm lens on full frame DSLR. In this article, focal length refers to 35mm full frame cameras having a 36 X 24mm imaging area.
- Zeiss 15mm f/2.8 Distagon: 110° (images 5.4X the area of a 35mm lens)
- Zeiss Batis 18mm f/2.8 Distagon: 99° (images 3.8X the area of a 35mm lens)
- Zeiss Loxia 21mm f/2.8 Distagon: 91°
- Zeiss Batis 25mm f/2 Distagon: 82° (images 2X the area of a 35mm lens)
- Zeiss Otus 28mm f/1.4 Distagon: 75°
- Zeiss Milvus 35mm f/2: 62°
Perspective
Perspective (the relative size of objects in relation to each other) is governed only by the distance to the subject; it has nothing to do with the focal length or angle of view. The confusion arises because we tend to choose the shooting distance based on the angle of view of the lens—closer for a wide angle lens. Since a wide field of view exaggerates the relative sizes of items in the composition, it is why such images may not be admissable as evidence in a court of law, and it is why a close range portrait is often unacceptable: it makes whatever is closest look grossly out of proportion e.g., an oversize nose.
Since one cannot get closer to infinity, the key choice is how close to get to nearby elements and how closely to group elements at different distance by choosing focal length. When shooting with a wide angle lens, move closer, then closer still, then get closer—at least as a means of exploring a subject.
The inverse square law says that (for example) an object at 2 meters distance will be 1/4 as large in area as an identical object only 1 meter distant (1/2^2 = 1/4). To some extent our eyes/brain compensate for this by visual cues; an object twice as far away does not appear 1/4 as large. But a camera truthfully records image size.
Steep perspectives at close range
Because wide angle lenses usually focus to very close range, 'steep' perspectives are possible, as in the pine cone image and the others below. Relative size and distance relationships are exaggerated, with nearby objects appearing huge, and far larger objects at distance appearing relatively small.
It can be fun to play with size relationships. For example, an 18mm lens at very close range renders very small objects at close range at relatively huge size. Even the ant is relatively large—see the ant.
A mini tripod like the Really Right Stuff TFA-01 Ultra Pocket Pod is handy for images like this.

Sony A7R II + Zeiss Batis 18mm f/2.8
[low-res image for bot]
Perspective Distortion
Wide angle lenses commonly have some degree of optical distortion, a warping of straight lines caused by the lens itself (one of many tradeoffs in optical design). But much of what is called distortion with wide angle lenses has nothing to do with the lens and is instead perspective distortion: the relative size of objects caused due to camera to subject distance. When these objects have certain shapes, they look distorted to us: faces, circles, rectangular solids, buildings, etc.
Below, the image has been corrected for optical distortion. Yet the mailbox looks much larger at the front than at the rear, a direct result of the inverse square law: the mailbox is much closer to the camera.
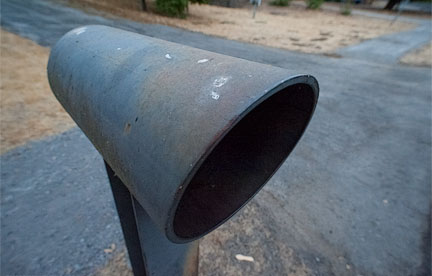
NIKON D3 + lensNA @ 18mm
[low-res image for bot]
Converging verticals
When a wide angle lens is pointed up or down, the effect is to make parallel lines converge. That behavior is sometimes acceptable (or desirable) as in the image below, but beware of tilting the camera up when photographing buildings or similar: it is often better to use a wider lens, or to back up, to avoid having the building seem to tilt over backwards.
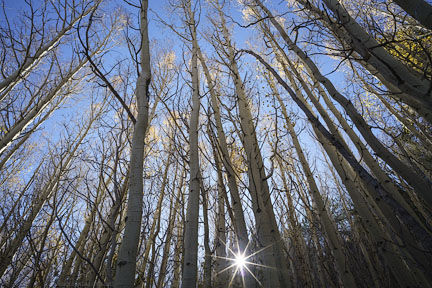
Sony A7R II + Zeiss Loxia 21mm f/2.8 Distagon
[low-res image for bot]
Sunstars
Wide angle lenses tend render attractive sunstars, unlike most 'normal' or telephoto lenses.
Below, the 18-spoke sunstar results from the 9-blade lens diaphragm in the Batis 25mm f/2. In Aspen Trunks as Converging Verticals above, the sunstar has 10 spokes from the 10 blades in the Loxia 21/2.8.
Sony A7R + Zeiss Batis 25mm f/2
[low-res image for bot]
Polarization
Maximum polarization occurs at 90° to the sun down to no polarization at 0° to the sun. When using wide angle lenses with a polarizing filter, pay close attention: polarization can be uneven, and too much polarization can make a scene look lifeless. Even at 35mm, polarization of the sky can be an issue as shown in the image below.
- The wider the lens, the less polarization that should be used. A polarizer need not be used at full strength because it can make a scene go lifeless (no sparkle), even if the polarization is uniform.
- Review the image after shooting to check for a dark band, or dark side of frame.
- When the sky is omitted, a polarizer can work well even on a 15mm lens in some circumstances, such as for leaves or a small area of water.
- On cloudy days polarization can be useful for cutting through reflections on water, but beware of deadening the feel of the image by removing reflections, which may be the main attraction.
Sony A7R + Zeiss Loxia 35mm f/2 Biogon
[low-res image for bot]
Below, I wanted to cut through sheen on the water of Greenstone Lake to show the lake bottom. The side effect was a dark blue sky at far right, which I feel is acceptable. One trick that sometimes works (but is not used here) is to correct for vignetting in order to reduce the relative brightness difference in the sky.
NIKON D810 + Zeiss Distagon T* 2.8/21 ZF.2 @ 21mm
[low-res image for bot]
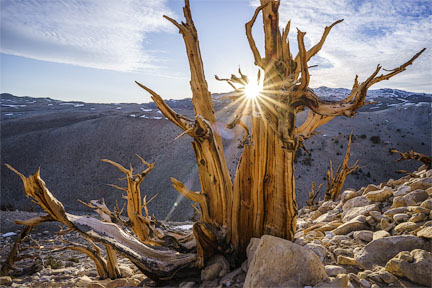
Creating a feeling of wide space
For an expansive feeling of space, a 15mm or 18mm lens in close to the subject elongates shapes for a dramatic wide-open feel. Here the Zeiss 15mm f/2.8 Distagon yields a feeling of having the tree branches arch overhead. Note how leading branches have size that is a good fraction of the main trunk because they are closer to the camera. Here that effect is not an issue.
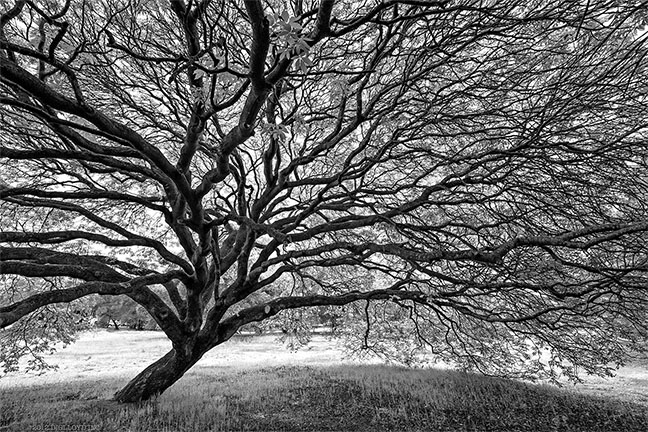
NIKON D3X + Zeiss Distagon T* 2.8/15 ZF.2 @ 15mm
[low-res image for bot]
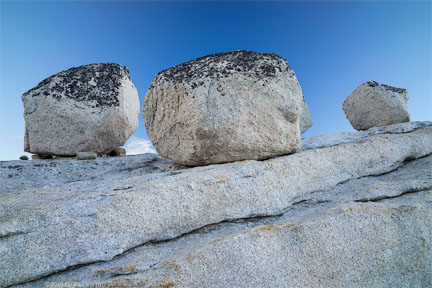
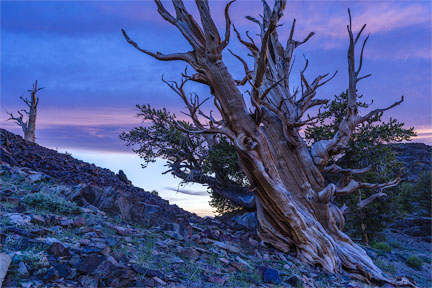
Sometimes it is desirable to have a very wide field of view that looks nearly as natural as a 'normal' lens. This can be done even with a 15mm. Below, that meant keeping the camera level and framing these Ancient Bristlecone Pines just-so. The rapidly receding perspective of the trees leads the eye into the scene but there is no obvious elongation of any particular element. A longer focal length would not have been able to capture the surrounding area to the extent I wished, and it would have compressed the trees together while omitting most of the young upstarts. And while empty sky is often a weakness, here that blankness is key to the scene. Shot this way, a 15mm shows no obvious ultra wide angle look. A key difficulty in a scene like this is to avoid overlapping items; for the result here I had to work hard to find a shooting spot that would minimize the overlap of the trees.
In Ancient Bristlecone Pines, White Mountains image at 15mm, f/11 was needed for sharpness to the far distance, yet focus is a good 10 feet / 3 meters away
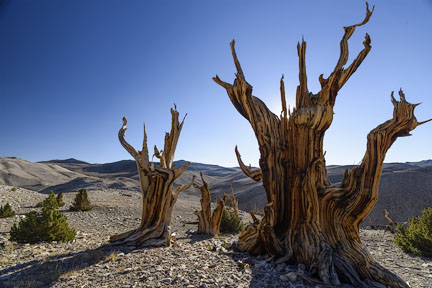
Vignetting and Distortion corrected
NIKON D810 + Zeiss Distagon T* 2.8/15 ZF.2 @ 15mm
[low-res image for bot]
Going wide but looking natural
A 21mm lens can feel relatively normal if the subject matter is not too close and the camera is kept level. In this sense it is the “fit more in” approach. But equally significant is the difference in scale between objects near and far that draws the eye into the scene.
Canon EOS 5DS R + Zeiss Distagon T* 2.8/21 ZE @ 21mm
[low-res image for bot]
Sometimes steep or difficult terrain makes it difficult or impossible to frame the subject with anything but a small range of focal lengths. Here at 25mm, a key exercise is keeping the trees from overlapping each other while still retaining a pleasing arrangement. The camera is slightly angled up which makes the trees lean over backwards somewhat, but that effect works well here.
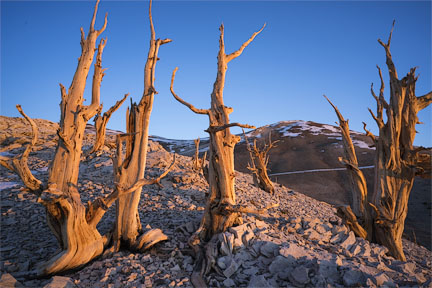
Sony A7R + Zeiss Batis 25mm f/2
[low-res image for bot]
A wide angle lens adds drama, but go too wide and the subject becomes too small. I like to carry 18/21/25mm lenses together because sometimes the rugged terrain often makes it difficult to find footing. Here 25mm allowed the right distance while capturing a wide arc of the beautiful sky.
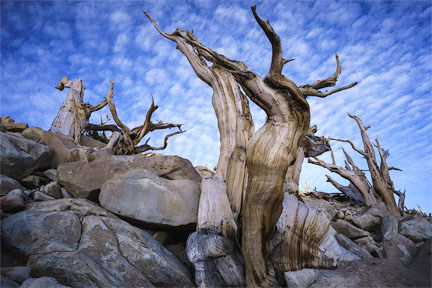
Sony A7R + Zeiss Batis 25mm f/2
[low-res image for bot]
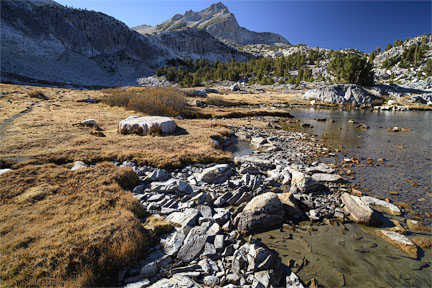
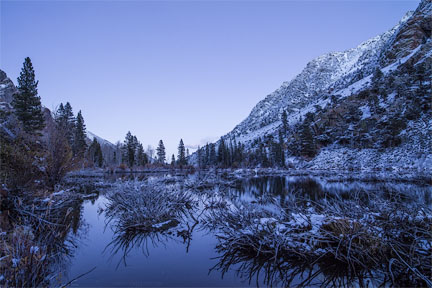
The 25mm focal length offers an ideal blend of wide angle perspective in which distant objects are not too small. Using a 15mm or 18mm here would have emphasized the foreground overly much, and made both White Mountain Peak and the water reflections too small.
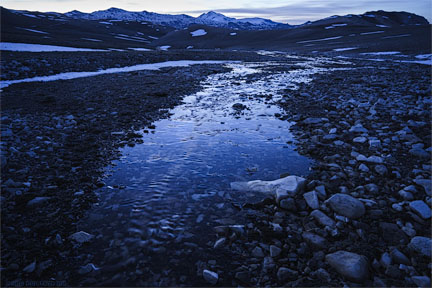
Sony A7R + Zeiss Batis 25mm f/2
[low-res image for bot]
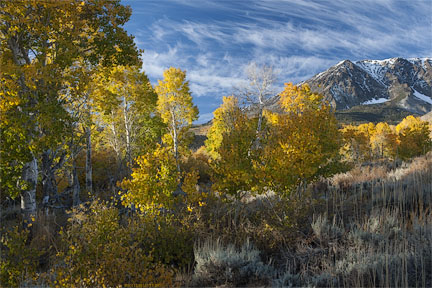
The use of 28mm maintains relative sizes more than wider lenses, delivering relatively natural proportions—not quite so 'normal' as a 35mm, but not as obviously wide as a 25mm or 21mm. Here, a wider lens would have required moving in much closer and angling the camera up, more, making the tree lean over backwards and causing the far tree to diminish in size. It would also have forced more sky into the image, and I wanted the context of the fresh spring growth in this harsh area.
f9 @ 1/5 sec, ISO 100; 2016-06-08 20:16:35
Zeiss 28mm f/2 Distagon
35mm for natural effect
The relatively narrow angle of view of a 35mm lens yields a mild wide angle effect that is useful in keeping the relative size of objects not too different; it looks natural without exaggerated perspective and is close to a 'normal' lens. While a 35mm is considered a wide angle, to my eye it is just as natural as a 50mm, if “natural” is something akin to what the human eye sees.
One of a select group of my all-time favorites, the Zeiss ZM 35mm f/1.4 Distagon (a rangefinder lens for Leica M and Leica SL cameras) delivers gorgeous images with an exceptional true to life feel. DSLR users have the Zeiss Milvus 35/2 and Zeiss ZE / ZF.2 35/1.4 Distagon options (I prefer the 35/1.4 for its exceptional painterly imaging style and f/1.4 option). Images at 35mm tends to feel calm by comparison to wider lenses, with no overt wide angle effect to distract from the subject.
Using a wider lens here would have distorted the shape of the cash register too much, and shrunk the bottles at right and the background elements. The context here carries more importance, so diminishing it with, say, a 25 lens did not seem appropriate.
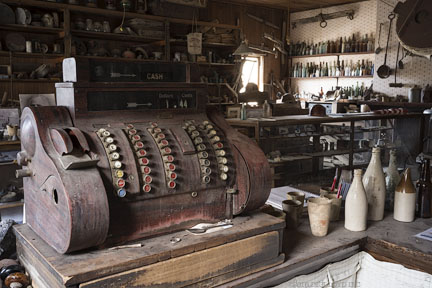
LEICA SL (Typ 601) + Zeiss ZM 35mm f/1.4 Distagon
[low-res image for bot]
Here the context is an important aspect; I did not want to the background house too small, nor would warping the shape of the restroom shed have been desirable, yet a closeup of the restroom alone was not the goal either, so a 35mm lens was ideal.
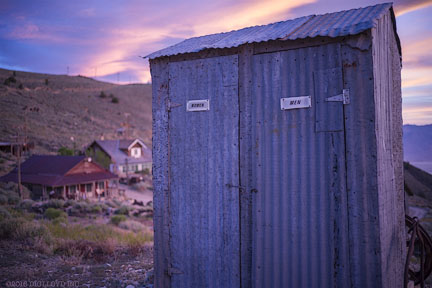
LEICA SL (Typ 601) + Zeiss ZM 35mm f/1.4 Distagon
[low-res image for bot]
Here, object sizes needed to feel entirely normal and in proportion to each other, so a 35mm lens was perfect. A 50mm would have not worked to capture enough context. A 28mm would have included more than desired and reduced the size of the window as well, throwing off the balance I wanted.
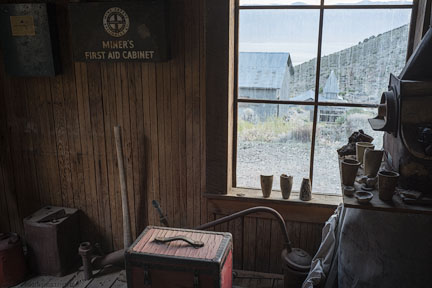
LEICA SL (Typ 601) + Zeiss ZM 35mm f/1.4 Distagon
[low-res image for bot]
At close range, keeping proportions relatively consistent avoids a distorted look. The ZM 35/1.4 Distagon includes the bonus of extremely low optical distortion.
LEICA M (Typ 240) + Zeiss ZM 35mm f/1.4 Distagon
[low-res image for bot]
A 35mm f/1.4 offers pronounced figure-ground potential at f/1.4, as seen below with the Zeiss ZE 35mm f/1.4 Distagon. Yet there is no exaggerated stretching of near-far relationships as with wider lenses. The net result is a calm feel to the image, appropriate for late dusk as here.

Canon EOS 5DS R + Zeiss Distagon T* 1.4/35 ZE @ 35mm
[low-res image for bot]
The size relationships in a landscape scene with a 35mm lens have a weighted emphasis relative to each other. Using a 21mm or similar would have emphasized some brush or similar, with tiny trees and mountains. When a relatively large foreground needs to be mainly context, the longer focal length works well.
NIKON D3X + 35.0 mm f/1.4 @ 35mm
[low-res image for bot]
People with wide angle lenses
Reviewing my own images taken over some decades, I’ve found that while I enjoy conventional portraits too, as time passes the most interesting images are those with people in them, and particularly those taken that show enough context so that time and place and activity are recorded. As years go by, that preference only grows. The narrow field of view of a classic 85mm portrait lens usually results in little contextual information. Even a 50mm is often too narrow.
Thus the justification for a wide angle lens is not just for dramatic effect in size relationships, but for increased context, for meaning. And that is ironically the challenge: using a wide angle lens well means excluding as much as possible, but not too much. The wider the angle of view, the more difficult this becomes. A portrait becomes a story when the right amount of environment is included.
Consider for example a father/daughter backpacking trip: years later, which image at a memorable site will be more meaningful? The head and shoulders portrait showing little context, or a wide-angle portrait capturing the campsite, the view from within the tent to the vista below, or (as below) father/daughter perched on a boulder? I also think that it makes sense for commercial photography: leaf through the advertisements in a magazine like Vanity Fair, making note of wide vs narrow field of view and which images attract attention and which ones are quickly dismissed as concretized “templates”. Or just which ones have more of a story and thus more interest.
Even an ultra-wide field of can be appropriate for contextual information, as in this example below. An 85mm or 50mm lens would have been no good here for what I wanted to capture, though a 21mm or 28mm would have worked well enough.
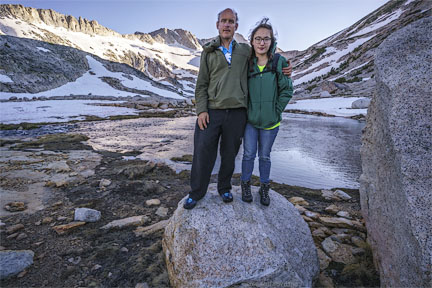
Sony A7R II + Zeiss Batis 18mm f/2.8
[low-res image for bot]
Many portraits are made with a telephoto perspective at 85/100/135mm lens (full frame sensor). The flat perspective and narrow field of view is recognizable at a glance as a template, a creative weakness that is hard to avoid in many genres of photography. While such portraits are an essential form of photography, so much context is lost that it is fair to ask whether alternative forms might be preferable, that is, portraits that include or suggest the when/where/what/why/how aspects. For that, the wide angle lens fits the bill.
To my eyes, the most interesting portraits are those in which the subject has surrounding context. This can mean “street photography” in which the subjects are of relatively small size in the frame, but it also means an opportunity for close range portraits or environmental portraits in which the person is dominant by being at relatively close range. The 28mm and 35mm focal lengths work very well for that, but the idea extends down to 25mm and even 18mm.
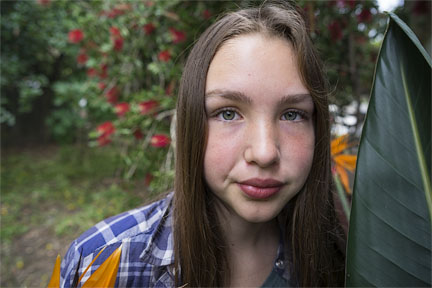
Below, shooting distance is only about 2 feet, but sufficient distance has been maintained so that the facial features remain relatively natural. Also, distortion on the face is kept low by its near centering within the frame. The background adds color and context. Had the image been made with the classic 85mm focal length, most of the surround would be cropped and blurred away, for a very different image. The empty space at left is both a flaw and a tension; good and bad perhaps.
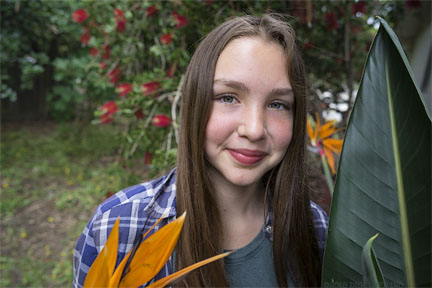
f3.5 @ 1/200 sec, ISO 200
Sony A7R + Zeiss Batis 25mm f/2 Distagon
Moving in close to a distance of 14 inches or so, the close range starts to distort perspective: the nose and mouth are overly large since they are closer to the camera; the face has the wide angle bulge to it. This is not optical distortion or indeed true distortion of any kind; it is physics, the inverse square law aka perspective distortion.
f3.5 @ 1/200 sec, ISO 200
Sony A7R + Zeiss Batis 25mm f/2 Distagon
Even an 18mm lens can work for environmental portraits, used suitably. While it may be unwise to get too close or to put a face or body in the outer areas, here the eye accepts the unusually large forearm within the context of this picture (and its emphasis has some synergy with the facial expression). A 50mm or 85mm lens would lose most of what this image conveys.
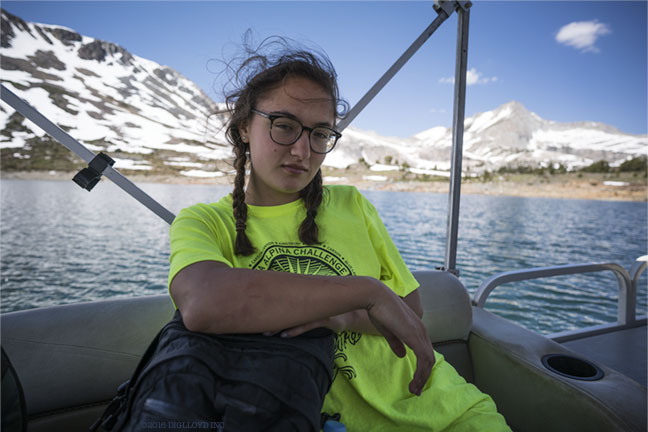
Sony A7R II + Zeiss Batis 18mm f/2.8
[low-res image for bot]
Summary tips for shooting wide angles lenses
- Simplify: remove as much as possible from the composition, but not too much aka make the algorithm as simple as possible, but no simpler. Easier said than done! Watch corners and edges, use leading lines, and watch for large undifferentiated areas except when they are needed to balance-out other areas.
- Exposure: because wide angle lenses take in so much, take extra care not to blow out clouds or snow. The camera’s auto exposure is prone to getting it wrong, so bracket and/or use manual exposure, checking the histogram to be sure that highlights are not blown to pure white (or blue sky turned purple by blowing out the blue channel!).
- Flare: whenever possible, shield the lens from non-image-forming light. For example, if the sun is not in the picture, make sure that sunlight does not strike the front lens element, such as by shielding the lens with one hand.
- Distance: get closer, then get even closer, then get down on hands and knees! This is good practice for old age anyway, that is, looking around for something else to do while there.
- Angle: shoot higher, shoot lower, shoot straight-on, shoot obliquely. Small changes in position and angle have big effects, so explore: walk 360° around a subject, shooting variations.
- Level: watch for converging verticals: level the camera unless the subject calls for off-level, or convergence effects are a positive (use the effect for emphasis, when it works).
- Subject: consider relative importance of elements. To emphasize a nearby subject, go with a wider angle lens and/or go closer. To group items more closely go with a less-wide lens and/or back away.
- Portraits: avoid group portraits wider than about 28mm; people look stretched out in the outer zones. Ditto for placing a face or body near the edge or corner. Exception: break all these rules, particularly for environmental portraits and particularly with small children or outdoors images.
- Depth of field: no better with wide angle lenses for same magnification; DoF is strictly limited for deep near-far compositions; consider focus stacking. But beware of depth of field “welding” together disparate elements (the classic telephone pole growing from a person’s head).
- Depth of field: increase subject separation into distinct planes by shooting at f/1.4 or f/2 or f/2.8 and/or by moving closer. Take care to not overlap objects that should not overlap. Or overlap intentionally to fool the eye.
- Lens type: rectilinear vs curvilinear—a fisheye is a great choice, sometimes.
- Polarization: often a bad idea when sky is included, particularly at 25mm and wider. Sometimes it can work, depending on angle and degree of polarization.
- Lens choice: high performance is rewarding in a wide angle lens. Real depth of field is often notably higher and at wider apertures with a high performance lens.
Focusing for best depth of field, choice of aperture
The “1/3 in and stop down” rule can work for some subjects, but the reality of high resolution digital cameras is that rules like that can ensure mediocrity for image quality: bias focus to the most important elements(s) in a landscape scene, but when maximum depth of field is desired, focus stacking delivers sharpness unachievable by any other means, and with a little care can be done even handheld.
Depth of field and zone of sharpness
Depth of field means near/far range of “acceptably sharp” detail in an image, but “acceptable” is an amorphous metric until the context is specified. See the discussion in Depth of Field Challenges: Bypass the Limits with Focus Stacking, Near or Far, Macro or Landscape. Ignore those theoretical DoF tables, since actual lens performance including field curvature are dominating factors—better to use Live View and just zoom in and look.
It is a fallacy that wide angle lenses have “huge depth of field”. Rather, magnification is the differentiating factor. Because near-far compositions tend to be very common with wide angle lenses, depth of field is often just as challenging with a wide angle lens, and arguably more so, since visually the expectation is sharpness over the full distance range.
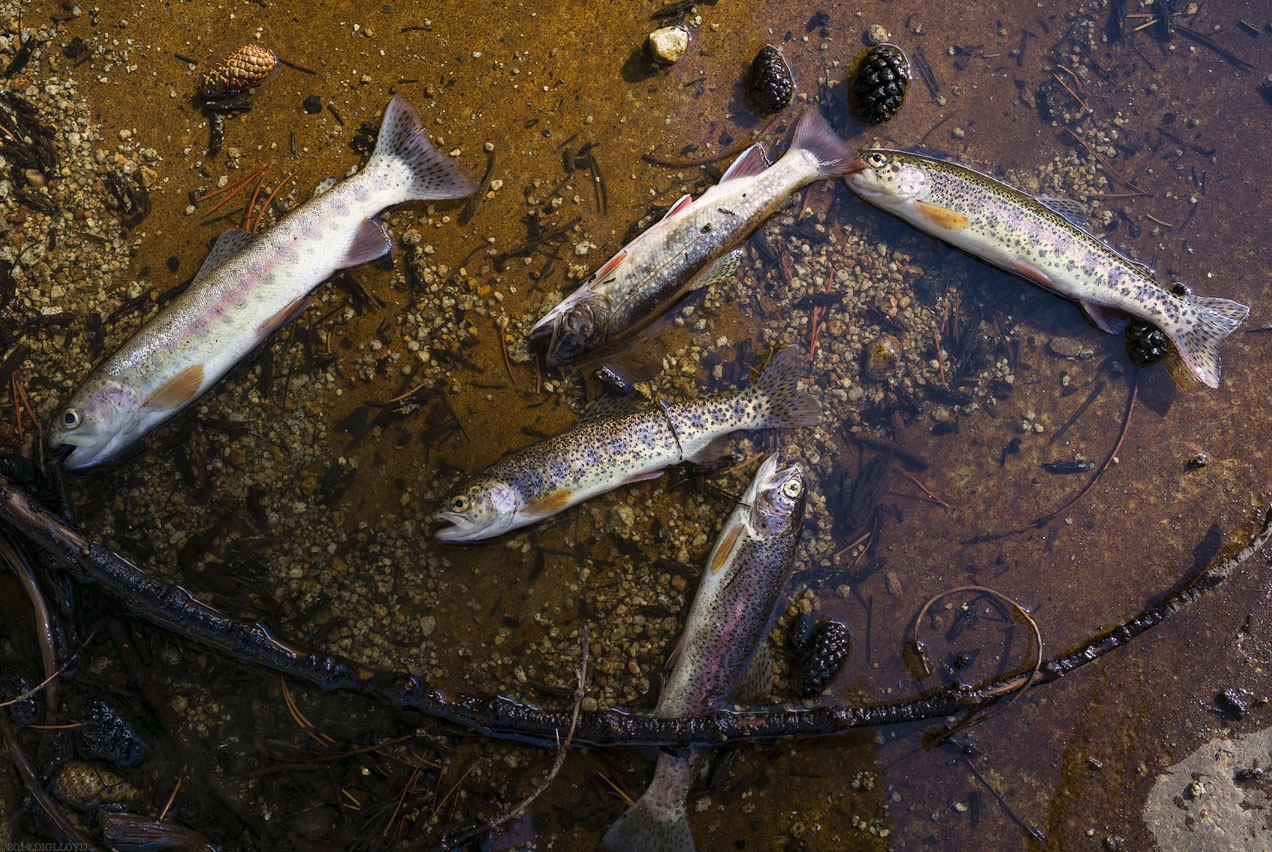
Consider focusing on a flower or rock 1/2 meter away, and desiring sharpness all the way to the horizon: even a 15mm lens at f/16 cannot reach that goal. Wind conditions made anything but f/2.8 prohibitive in Yellow on Violet, yet even f/16 would not have rendered the background crisply.
Depth of field remains a challenge with wide angle lenses, as this shot at 21mm at f/2.8 shows: it is little different in depth of field had a 50mm lens used the same framing of the flowers. Depth of field has everything to do with magnification, not focal length (some non-linearity with focal length occurs at macro distances).
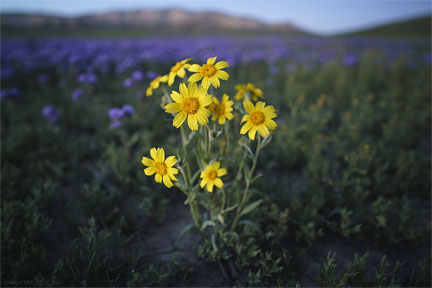
Sony A7R II + Zeiss Loxia 21mm f/2.8 Distagon
[low-res image for bot]
Conclusions and recommendations
My recommendation to anyone looking to master wide angle photography is to leave the zoom lens at home, and instead choose a high quality prime lens (fixed focal length). By shooting one or two fixed focal lengths, an appreciation of its properties is gained more rapidly. Using a zoom lens means it is all too easy to plant one’s feet and zoom the lens instead of changing position to change perspective. [It is possible to pretend that a zoom lens has only 1 or two focal lengths, bring gaffer’s tape @AMAZON tape along!].
Out in the field, I find that two focal lengths work best for creativity, so long as they are far enough apart to offer distinctly different results, such as 18mm or 21mm + 25mm or 28mm. A 35mm focal length works well with such pairings because it does not compete with the effects of the wider lenses.
Most difficult to master are 15mm and 18mm focal lengths, and these often have less general utility, so my recommendation is to start with a 28mm or 25mm, the choice being partly decided by the preferred type of shooting. Going to 15/18/21mm is worthwhile when a dramatic viewpoint is desired, but these focal lengths are generally much less useful if wishing to photograph people also, such as on hikes in the outdoors, simply because people become too small in the picture.
The best all-arounder wide angle for me is 28mm, because it works well for people, street shooting and landscape. The best 28mm of all and by far is the Zeiss Otus 28mm f/1.4 APO-Distagon. For Sony mirrorless shooters, the Zeiss Batis 18mm f/2.8 is fantastic, but as an 18mm it will take time to learn to use well and it is less flexible when shooting people in the landscape, such as on hikes. As an all-arounder, the Zeiss Batis 25mm f/2 is excellent. The Zeiss Loxia 21mm f/2.8 is a personal favorite, but I find that 25mm is better for hiking when I want shots of people along the way (a question of size and scale). Regrettably, Zeiss makes no 28mm Batis or Loxia, but the Zeiss Loxia 35mm f/2 offers compelling imagery.
Even if one has all the focal lengths, I find that carrying 15/18/21/25/28/35mm lenses all at the same time tends to confuse my efforts (hence the “avoid zoom lenses” suggestion); better to pick two focal lengths at a time to shoot with, or at least no more than three, such as 18/25/35mm or 15/21/28mm. Results are likely to improve. However, in tight quarters (very steep areas), I do like to have 18/21/25 along because the focal length may have to be just-so at times.
Recommend reading:
- Perception and Imaging, by Richard D. Zakia @AMAZON
- Seeing the Light: Optics in Nature, Photography, Color Vision and Holography @AMAZON
- Color and Light in Nature @AMAZON
For more information, see the focus stacking section of diglloyd Making Sharp Images. Lloyd’s photography blog is found at diglloyd.com; it covers many brands, lenses, cameras. In-depth review coverage of the Zeiss DSLR lenses for Canon and Nikon is found in Guide to Zeiss and in Guide to Mirrorless for Sony. By subscription.

Seagate 22TB IronWolf Pro 7200 rpm SATA III 3.5" Internal NAS HDD (CMR)
SAVE $100