


|

$220 SAVE $130 = 37.0% Western Digital 16.0TB Western Digital Ultrastar DC HC550 3.5-in… in Storage: Hard Drives
|

|

|

|

|
Focusing Zeiss DSLR Lenses For Peak Performance PART TWO: Tips and Best Practices for Sharply Focused Images 📹
Related: depth of field, digital sensor, external articles by Lloyd, field curvature, focus, focusing, How-To, Live View, loupe, optical focus shift, OVF, swing and tilt, tripods and support, videos by Lloyd, Zeiss, Zeiss DSLR lenses, ZEISS Lenspire, zone of focus
See best Zeiss lenses wish list and Nikon wish list and Canon wish list at B&H Photo.
Search this site for: Zeiss Otus, Zeiss Milvus, Zeiss Loxia, Zeiss Batis
In part 1, the challenges of making sharp images were covered, with focus accuracy the primary variable. Here in part 2, best practices for addressing those challenges are presented.
Choose focus wisely
Choosing where to focus can be harder than it sounds. In general, focus on what must be critically sharp, letting everything else fall into place.
In scenes with pronounced near-to-far detail, some range of the scene is not going to be fully sharp, even at f/13 or so. Thus the choice of what to focus on depends on what is most important. The contextual elements usually need not be fully sharp; what matters is critically sharp focus on the key elements. Also, leaving some foreground and background separation via some level of blur offers a pleasing juxtaposition of sharp/unsharp, and some unsharp areas can make the sharp areas look even sharper by comparison.
The classic “1/3 into the scene and stop down” rule is marginal. While it works well in some average sense, it is often non-optimal in either depth of field or visual impact. Moreover, field curvature can be a significant factor particularly for near-infinity focus. It is usually better to bias focus at or close to the elements of the scene that need to be critically sharp: a blurred horizon is rarely pleasing if it is a strong part of the composition. As an obvious example of placing focus on what matters most, consider a portrait with trees in the background: the person’s eyes should be critically sharp; the ears and the trees don’t matter much.
Which brings us back to focus accuracy as a critical factor. One “solution” is stopping down for depth of field (a deeper zone of sharpness). But this has serious limits: conventional depth of field tables use a 30 micron dot size (circle of confusion), which is about 37X larger in area than a pixel on a 36-megapixel full-frame DSLR!
As a rule of thumb for very fine detail on a high-res DSLR, figure three (3) stops less leeway than a DoF table suggests. For example, if the DoF table claims that f/4 yields the desired DoF, then f/11 is the actual aperture for very fine details over that range—but beware diffraction from stopping down too far (as previously shown). Also, depth of field tables are a theoretical best, and often wildly overestimate real lens behavior. For example, with many wide angle lenses, minimal depth of field gains are seen for the first two or even three apertures, with various aberrations keeping actual depth of field far less than the theoretical, particularly in outer areas of the frame.
Video: Discussion of WHERE to Focus
Tips for focusing with the optical viewfinder
Live View (discussed further on) is a far more reliable approach than the optical viewfinder, but if the optical viewfinder must be be used, the tips in the video and below raise the odds for accurate focus.
Video: Tips for Focusing with the Optical Viewfinder
Tip #1: set the diopter adjustment on the viewfinder to correct for any minor acuity issues. This is very important, if only to avoid eye fatigue. To adjust, enable any available display items for your camera such as superimposed gridlines. Defocus the lens for a strongly blurred image, then adjust the diopter setting until the gridlines or similar markings on the focusing screen are crisp and clear. If necessary, tape down the diopter adjustment so it won’t move.
Tip #2: test yourself to set expectations: shoot ten identical frames wide open, refocusing for each frame (f/1.4 or f/2 lenses will be most revealing). Use a tripod to eliminate body movement as a factor. Shoot one reference frame focused using magnified Live View. Check the focus results in the resulting images. Try this both by eye and also using the camera Focus Assist feature.
Tip #3: focus bracket: take several shots, refocusing each time. Alternately, focus and shoot, then using the distance scale on the lens shoot two more frames, one closer and one farther, using the distance scale (using very small adjustments). One of these shots may be optimal. All this is avoided by using Live View, so use Live View when feasible.
Tip #4: use an eyepiece magnifier. Sometimes the focusing eye needs a little help. For full-frame Nikon, the Nikon 1.2X DK-17M Magnifying Eyepiece is excellent, and retains full view of the frame. Nikon APS-C cameras accept the 1.17X DK-21M magnifying eyepiece. Canon magnifying eyepieces seem to be only for APS-C models.
Tip #5: test for and adjust the Focus Assist feature with each manual focus lens. Focus from near to far distance for consistent behavior. Test the consistency and accuracy by refocusing for 10 frames or more, on several different subjects. If there is a consistent error in one direction (too close or too far), adjust the AF Fine Tune feature as found in current Canon and Nikon DSLRs. However, if a lens has focus shift, the adjustment can be optimized for one aperture only.
Tip #6: stop down slightly. It may be helpful to focus with the lens slightly stopped down by holding the depth of field preview button down while focusing. This is awkward, but it can improve crispness of the image for some lenses and make it easier to focus (as well as partially address focus shift). Try f/2 or f/2.8 for f/1.4 lenses.
Tip #7: swap the focusing screen for one better suited for manual focus, even if the camera vendor offers no options; see for example FocusingScreen.com. However, the replacement focusing screen might not appeal for general use (with autofocus lenses or having a split image or microprism obstruct the view). More problematic: unless the tolerances are perfect, the camera may also require adjustment (shimming) to make the light path distance match the distance to the sensor.
8-bay Thunderbolt 3
2.5 or 3.5 inch hard drives, NVMe SSD, USB-C, USB-A, DisplayPort 1.4, SD slot, PCIe slot, 500W power supply.
Non-RAID or RAID-0/1/4/5/10.
Capacities up to 128 Terabytes!

Best Practice: Focus Using Live View
Live View is best used on a tripod, but it is also feasible handheld (see video). A focusing loupe is all but essential, such as the Zacuto Z-Finder (highly recommended for stills or video). A loupe is invaluable for perceiving fine details, cutting glare on the rear LCD, and blocking sidelight from the eye itself.
Live View focusing delivers major benefits:
- The Live View image is from the imaging sensor, so there is no “dual path” discrepancy between the focusing sensor and the imaging sensor.
- Focusing can be at zoomed-in magnification for precise focus on a very small portion of the subject. This allows focusing on a very specific area, such as the stamen inside a flower, a particular small object among others, a leading or interior branch of a tree, etc.
- Focusing can be anywhere in the frame. Even field curvature can be dealt with by scrolling across the frame to assess the “balance” of sharpness. Depth of field can be checked as well.
- Focusing can be done at a suitable aperture, thus dealing directly with focus shift.
- Infinity focus can be determined precisely regardless of the lens or temperature or camera body, critical for astrophotography and similar applications.
Live View handheld too
Using Live View for tripod-based shooting is a given, but handheld use of Live View with a focusing loupe works well for pinpoint focus accuracy, as well as offering excellent shooting stability. And because the mirror is already up, there is no mirror slap vibration. Many shooting situations afford ample time to focus and expose in Live View.
Video: PERFECT focus using the rear LCD Live View + focusing loupe
Tips for using Live View
Cameras vary in settings (see the Canon and Nikon specific videos), but here are the things to do and to configure:
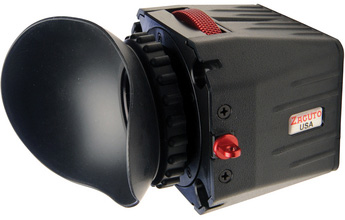
(Zacuto Z-Finder)
- Prefer magnified view for maximum accuracy—something around 10X or 12.5X—1 or 2 steps off maximum magnification is most useful in most cases.
- Especially for aging eyes (presbyopia), a high quality focusing loupe is essential for discerning fine detail. It also excludes stray light and improves contrast for easy focusing.
- Manual or Aperture priority are desirable, since controlling the aperture is a key consideration for focusing.
- With some cameras the JPEG settings affect the Live View rendering. Using more sharpening and contrast can be helpful for a more clear image in Live View.
- Some cameras have an option to auto-adjust brightness or to show the exposure as set on the camera.
- With many DSLRs, a button can be programmed that goes directly to some chosen level of magnification.
- For lenses with focus shift, focus at the shooting aperture (see details that follow).
- Some cameras have a focus peaking function that may be useful at times. However, too-eager focus peaking can sometimes obscure fine detail necessary for precision focus.
Using Live View for Nikon
Nikon’s approach to Live View is not consistent across the model line; with the Nikon D810 and most other full-frame models, the camera stops the lens down to the shooting aperture. For example, if the camera is set to f/8, then Live View is at f/8 (see video).
Tip: on the Nikon D810, the of field preview button (“Pv”) at camera front toggles between the shooting aperture and wide open (no need to hold down the button), useful for lenses that are best focused wide open (and when lighting conditions are not too bright).
Live View focusing procedure on the Nikon D810 and various other Nikon bodies:
- Set the aperture to the best focusing aperture* (usually wide open).
- Focus in magnified view using a high-quality focusing loupe.
- Set the lens to the desired shooting aperture, expose the image***.
With other Nikon models (Nikon APS-C DSLRs, certain others), the camera keeps the lens diaphragm fully open, similar to what Canon does. Focusing at a stopped-down aperture with these models thus requires holding down the depth of field preview button.
* Best focusing aperture for a high performance lens is wide open or one stop down, which assumes a freedom from focus shift. If focus shift is present, focus at the shooting aperture, up to f/4, as discussed.
** For tripod use, use the self timer or remote release to avoid disturbing the camera.
Video: Configuring Nikon DSLRs for Live View
Video: Step by Step Live View on Nikon D810
Using Live View for Canon
Canon DSLRs generally maintain the lens diaphragm wide open in Live View, but may unpredictably stop down the lens to an arbitrary aperture when the light is too bright (usually only an issue with f/1.4 or f/2 lenses). Focusing at a known aperture can thus require holding down the depth of field preview button, to force the lens to that aperture.
Live View focusing on Canon DSLRs is as follows:
- Focus* in magnified view using a high-quality focusing loupe.
- Expose the image**.
* If focus shift is present, focus at the shooting aperture, up to f/4, as discussed. This may require holding down the depth of field preview button to force a particular aperture.
** For tripod use, use the self timer or remote release to avoid disturbing the camera
Video: Configuring Canon DSLRs for Live View
Video: Using Live View on Canon DSLRs for manual focus lenses
Focusing a lens with focus shift
If focus is obtained with the lens stopped down to the shooting aperture, there can be no discrepancy, since focusing and shooting aperture are the same.
Focusing at the shooting aperture (using Live View) is the ideal solution through about f/4. Aperture f/4 tends to be the practical limit for focusing for these two reasons:
- Stopping down past f/4 can be too dark and grainy in dim conditions such as dusk. The lens will have to be opened up to a wider aperture.
- Beyond f/4, increasing depth of field makes discerning peak focus for a specific area more difficult. The risk is that the zone of focus is biased too far forward or too far back instead of being centered around the chosen area.
Focusing stopped down with some cameras can be awkward because the camera keeps the lens at full aperture unless the depth of field preview button is held down (applies to Canon DSLRs and certain Nikon models). With Nikon D810 Live View as shown in this video, the camera keeps the lens stopped down to the aperture set on the camera.
Video: Focus shift with the Zeiss 85mm f/1.4 Planar
Assessing field curvature, balancing focus
Field curvature with Zeiss DSLR lenses is well controlled, but with high-res DSLRs everything helps. Understanding the field curvature characteristics of a lens along with relatively small focus tweaks appropriate for the arrangement of subject matter in an image can provide an “upgrade” in total image sharpness, even stopped down. For example, with a distant landscape shot, more distant focus at center works well for a wide angle lens whose field curvature arcs focus closer in the outer areas. Examples include the Zeiss DSLR 18/3.5, 21/2.8 and 25/2 Distagons.
Live View can reveal field curvature: scroll across the (magnified) frame to detect sharpness variations at the same distance, using a scene with uniform subject matter such as a grassy hillside or the wall of a building. Effects are relatively subtle however, so shooting the range of apertures from wide open to f/11 and then examining the series on the computer is often more instructive. Even forgetting field curvature, examining various areas of the frame in Live View can be helpful in seeing how focus “cuts” through the subject, which may lead to a slightly better choice of focus for items of interest in a particular scene.
Field curvature can sometimes change with aperture in the outer areas of the frame via peripheral focus shift; the Zeiss Otus 28mm f/1.4 Distagon behaves this way in the outer zones, an optical design choice that comes from balancing aberrations.
Conclusion
Gaining skill and experience with manual focus opens up a whole new set of optical choices, namely the large selection of Zeiss DSLR lenses for Nikon and Canon. That skill set also applies to manual focus with autofocus lenses, which may be necessary or even preferred in some shooting situations.
Lloyd’s photography blog is found at diglloyd.com; it covers many brands, lenses, cameras. See diglloyd Making Sharp Images for much more. In-depth review coverage of the Zeiss DSLR lenses for Canon and Nikon is found in Guide to Zeiss. By subscription.

Seagate 22TB IronWolf Pro 7200 rpm SATA III 3.5" Internal NAS HDD (CMR)
SAVE $100