


$220 SAVE $130 = 37.0% Western Digital 16.0TB Western Digital Ultrastar DC HC550 3.5-in… in Storage: Hard Drives
|

|

|

|

|

|
Depth of Field Challenges: Bypass the Limits with Focus Stacking, Near or Far, Macro or Landscape
Related: 4K and 5K display, apochromatic, Carbon Copy Cloner, cloning, computer display, depth of field, diffraction, digital sensor, Eastern Sierra, external articles by Lloyd, focus stacking, focusing, How-To, Live View, Mt Dana area, peak bagging, Photoshop, Pothole Dome, Yosemite, Zeiss, Zeiss Batis, ZEISS Lenspire, Zeiss Otus, Zerene Stacker
Focus stacking is covered in more detail and with higher resolution examples in the focus stacking section of Making Sharp Images.
by Lloyd Chambers, diglloyd.com
This article is organized into 4 sections:
- Introduction to focus stacking using a close-range example, plus depth of field discussion.
- A series of “how it was done” field examples.
- Tips for shooting images for focus stacking
- Overview of the stacking process and software
1. Introduction
The range of sharp detail (depth of field) can be a major challenge with many subjects—more on that below. This article shows how focus stacking sidesteps the limitations of depth of field, making composite images having sharpness over a much deeper zone than is possible in a single frame. Let’s start by looking at a macro photography challenge: the impossibility of making a sharp image even when the lens is stopped down as far as it can go.
Below, a single frame taken at f/9 offers detail over the bicycle cassette for about the depth of a single cog—yet it is an 11-cog cassette. Use of f/13 instead of f/9 would extend sharpness to perhaps two of the cogs. but with some loss of brilliance for fine details (due to diffraction). Using f/22 would damage overall contrast and micro contrast substantially: stopping down is a non-solution for high quality and it still would not deliver a sharp image through all 11 cogs.
How to work around this apparent “brick wall” limit to sharpness with high quality?
Ideas come to mind: use of a tilt lens could sharpen the cogs along one side of the cassette, but that same tilt would blur the other side much more. Shooting farther away for greater depth of field (say at 1/2 the linear size) would help, but the image would then be reduced in pixels by a factor of 4.
The only viable solution to this apparent quandary is focus stacking: assembling multiple images focused at different distances into a composite image. Focus stacking worked beautifully here: the stacked image is razor sharp front to back, right down to the pixel level even at the full sensor resolution of the Nikon D810. See the full-res crop or view the comparison below at 50% (linear) of actual pixels. The focus-stacked result is right at the limits of sensor resolution and sensor technology (Bayer matrix instead of true RGB pixels).
Don’t be put off by a 15-frame stack because field shooting for landscape or similar often benefits hugely from as few as two frames and rarely requires more than six frames.
15 frames: 2 for leading edge area which was not full sharp across with only 1 frame, 13 more to cover the cogs, roughly 1 per cog using magnified Live View to place focus accurately on each cog, as viewed at f/1.4.

Focus-stacked image, 15 frames
NIKON D810 + Zeiss Apo Sonnar T* 2/135 ZF.2 @ 135mm
[low-res image for bot]
Depth of field, range and placement of the zone of sharpness
Depth of field means near/far range of “acceptably sharp” detail in an image, but the amorphous idea of “acceptable” is a non-concept unless and until the context is specified.
For example, what is “acceptable” for a magazine-size print or web image will be unacceptably blurred when displayed at large size, such as with a 4K or 8K television, or large print. Very large 4K displays are common, 8K displays exist, and 16K displays will arrive at some point. These are huge “prints” with exceptional resolving power and dynamic range. Already, 4K cinematography reveals the slightest technical errors, with focus errors “misses” and depth of field limitations readily evident. Ignoring electronic images, large prints are still a goal for some.
The traditional approach for more depth of field is to stop down the lens, say to f/8 or f/11 or f/16. But with high resolution digital cameras even f/11 is often insufficient depth of field, and the image as a whole rapidly degrades past f/8 due to the dulling effects of diffraction—the great equalizer of lenses. While a Zeiss Otus holds up better than most lenses with stopping down, the diffraction losses accelerate quickly starting around f/9. And while diffraction dulling can be mitigated with appropriate sharpening, that does not solve the insufficient depth of field challenge. Thus focus stacking presents itself as a solution, the tradeoff being shooting multiple frames and some post-processing work.
Zone of sharpness: maximizing depth of field is not always a goal, focus stacking or not. It may be better to maximize sharpness over a limited range so that a still-blurred background and/or foreground blur offer a compelling juxtaposition to and separation of a critically sharp subject. Hence focus stacking can sometimes be desirable at wide apertures like f/1.4 or f/2 or f/2.8. Ultra high performance lenses like the Zeiss Otus lineup are highly desirable because very high performance is available even wide open. Stacking at a wide aperture over a relatively shallow zone might be termed a “shallow stack”, as compared to a stacked image whose goal is sharpness over the entire range.
Focus stacking offers a compelling bonus feature: when a lens has field curvature or optical asymmetry (blur on one side or corner versus sharpness on opposite side), even a 2-shot focus stack can fill in the problem areas with sharper detail.
Up to 64TB @ 12500 MB/sec!
Mac or PC.
Ideal for Lightroom, Photoshop, 8K video, data analysis, etc.

2. Field examples
Field example #1 @ 28mm
The goal here was crisp detail from the nearest log all the way to the far corners, a range of about 1.5 meters to 20 meters. Full sharpness cannot be achieved by stopping down; see the near/far crops which show the challenge at f/9. The stacked image is razor sharp corner to corner. View at 50% of actual pixels.
Focus: five frames were shot, but 4 frames were adequate, focused at: (1) the closest log, (2) about half way between the two logs, (3) the center of the far log, (4) the far upper left are of the far log.
Focus-stacked image, 4 frames
NIKON D810 + Zeiss Otus 28mm f/1.4 APO-Distagon
[low-res image for bot]
Field example #2 @ 28mm
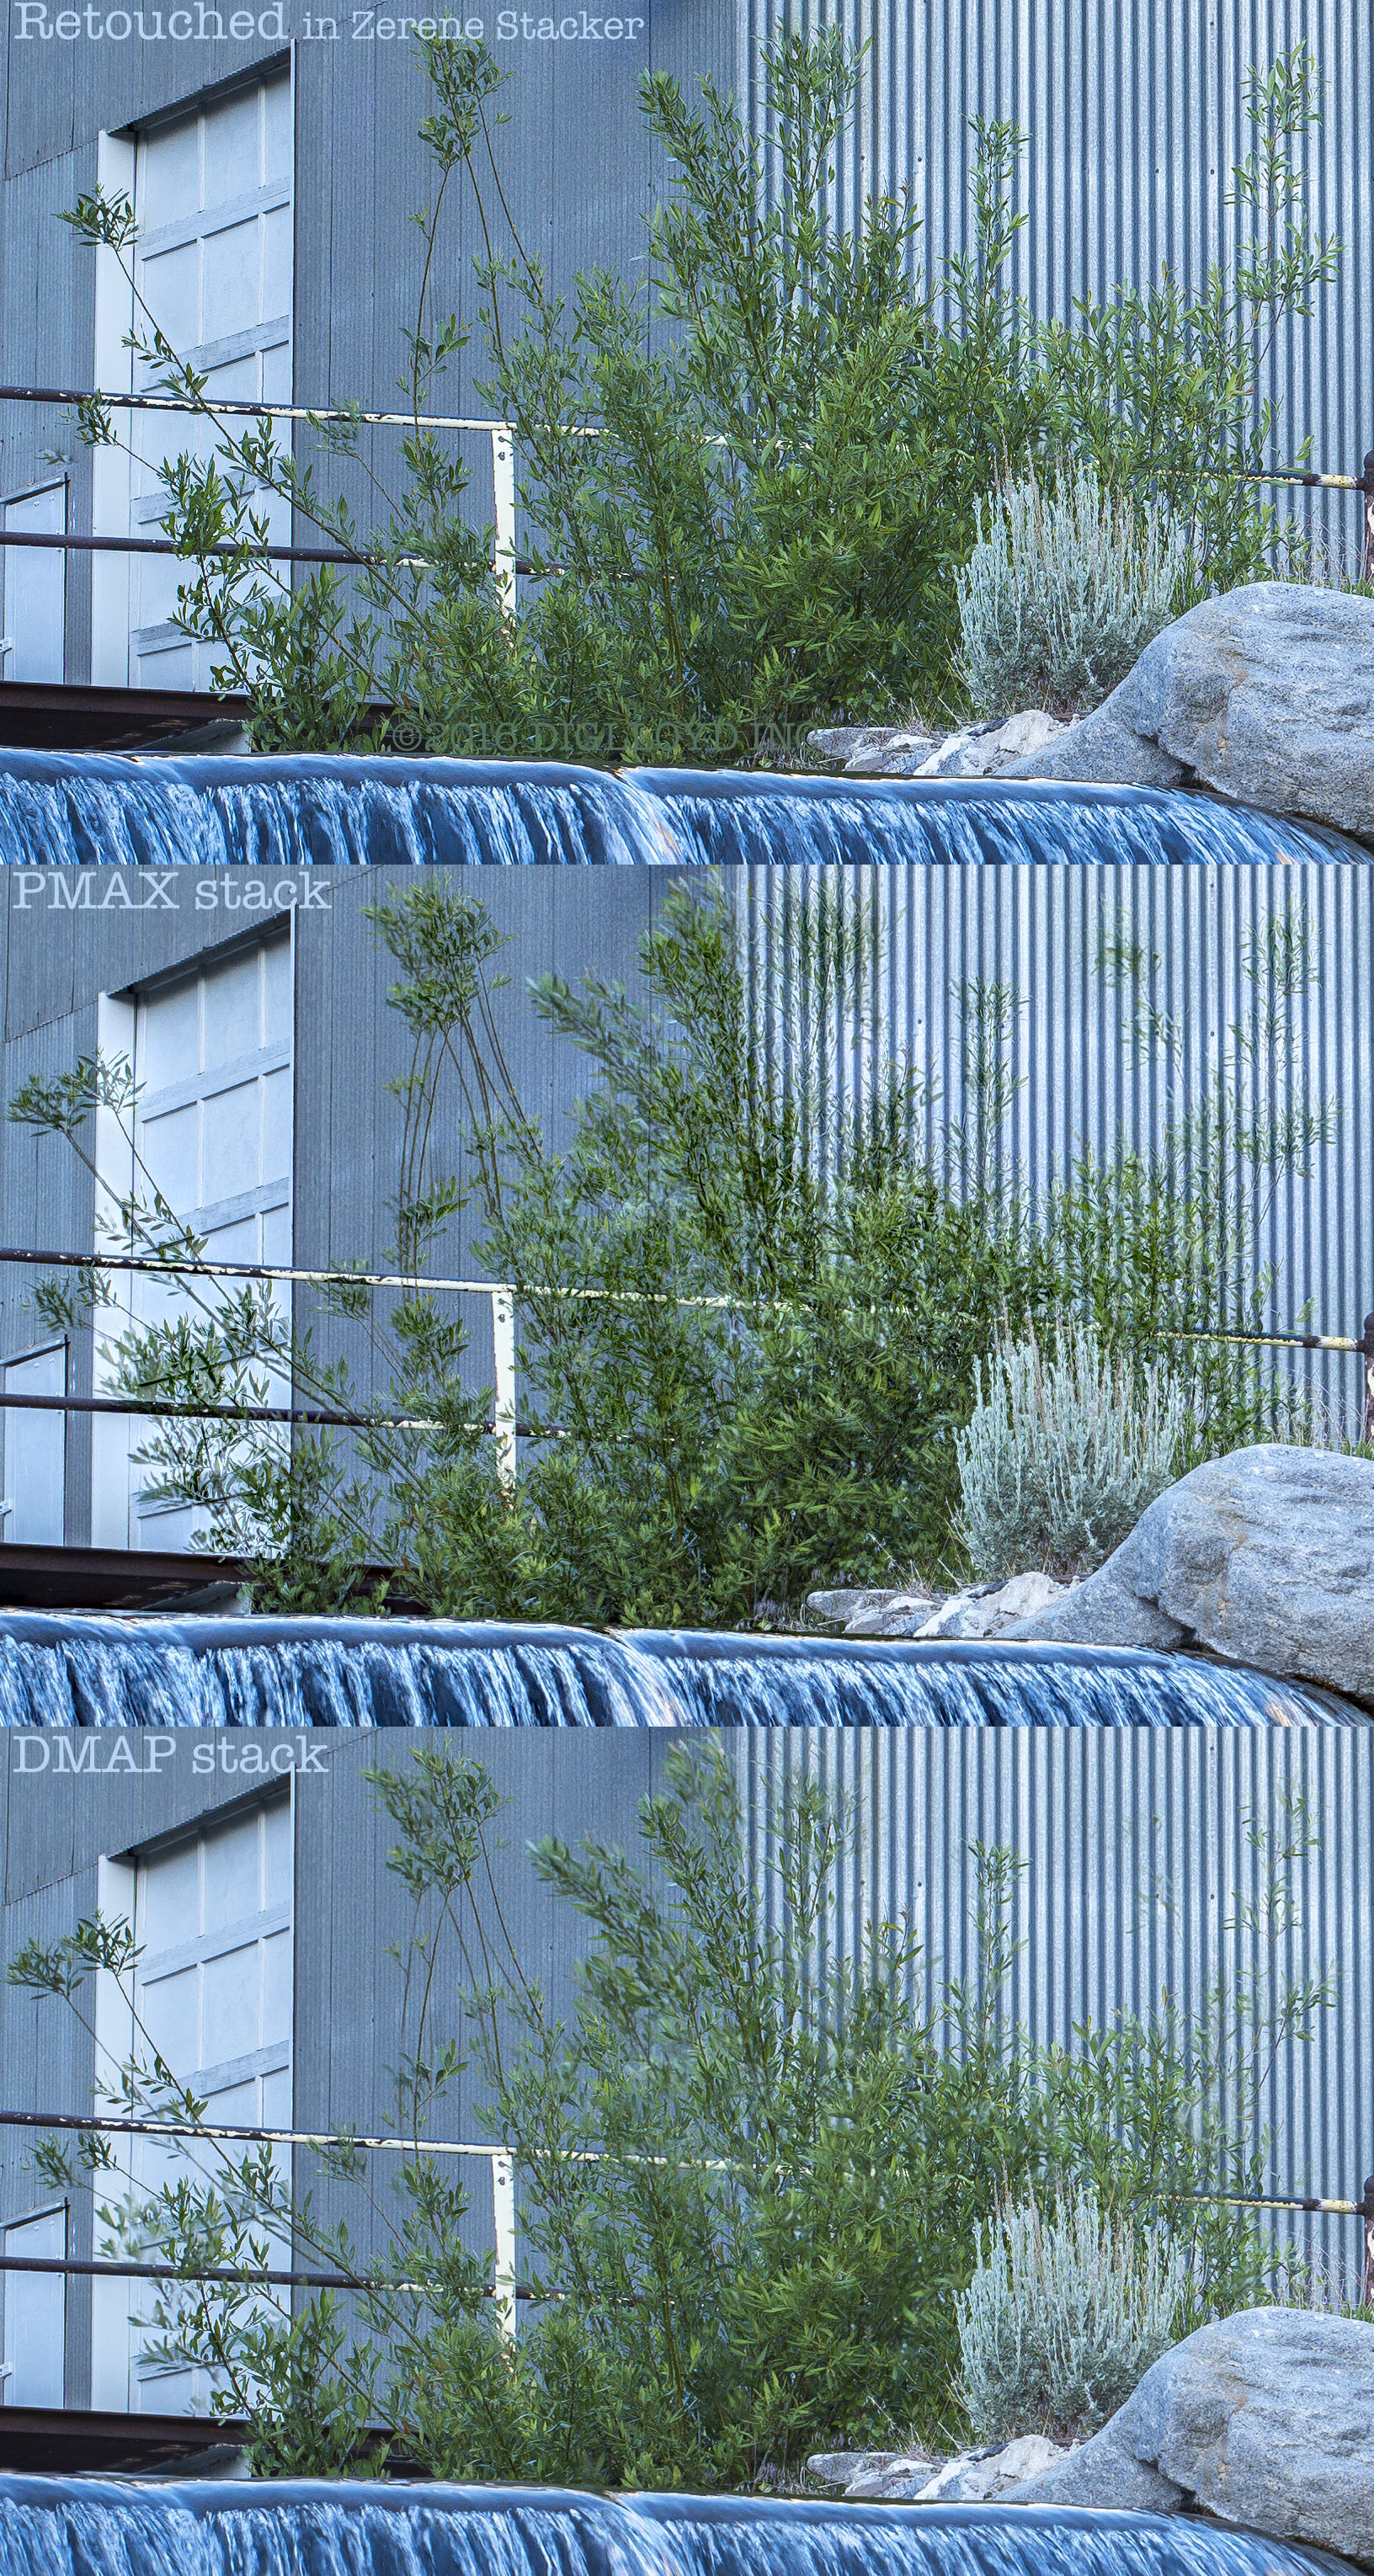
The composition benefits from having everything sharp near to far. At f/9, there are two unpalatable options: either the tree is badly blurred with focus in the distance, or the tree is sharp with blurred background: the range is too great for to achieve sharpness by stopping down. Stopping down to f/13 would only make a less blurred image, not a sharp one. In the full-res stacked image at actual pixels, a diamond-shaped road sign with a dark symbol inside it can be seen on the road far below along Tuolumne Meadows. View at 50% of actual pixels and see the actual pixels crops.
Zerene Stacker PMAX mode delivered a ready to use image with the command. No visible stacking artifacts are found (the halos in some areas of the tree branches are something from the ACR conversion algorithm, even with a single non-stacked frame).
Focus: 1st frame focused on the tree trunk at center, 2nd frame in far distance at center.
Focus-stacked image, 2 frames
NIKON D810 + Zeiss Otus 28mm f/1.4 APO-Distagon
[low-res image for bot]
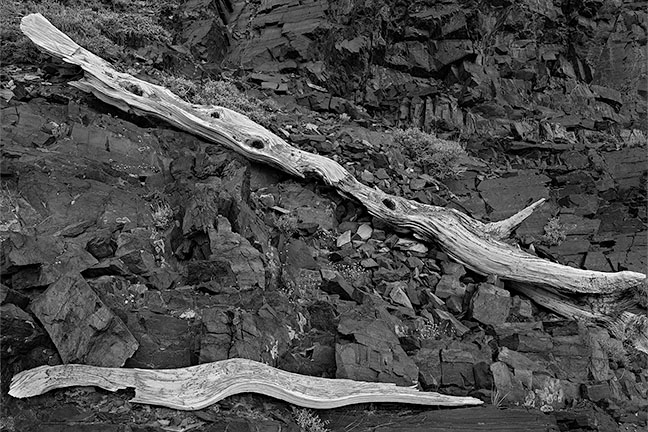
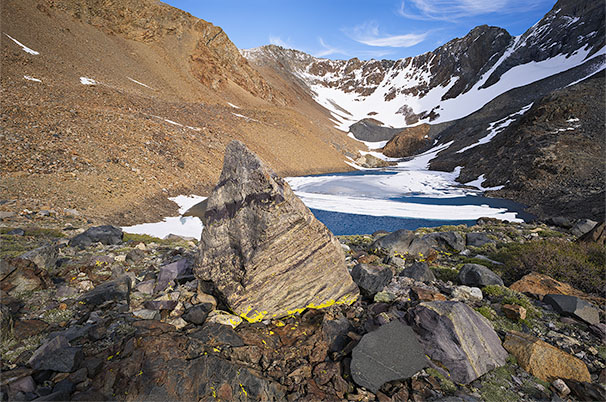
Field example #3 @ 28mm
The frustratingly dull lighting aside, this image is a tour de force of what focus stacking can do for depth of field when care is taken to optimize focus spacing. Six frames were used to render bitingly sharp detail from practically right under the camera to the far distance down this 30° loose talus slope. Nothing close to this level of sharpness could have been achieved at any aperture with a single frame, but every pixel is sharp in the stacked image, making the sensor the limiting factor.
Zerene Stacker PMAX mode delivered a ready to use image with the command. No visible stacking artifacts are seen even at full resolution—it’s just awesome to get results that easily. The still air (no movement of foliage) and careful focus spacing delivered a 1st class result. View at 50% of actual pixels.
Focus: 6 frames using magnified Live View used to confirm exact point of focus at f/1.4. (1) immediate foreground, (2) leading edge of bristlecone, (3) trailing edge of bristlecone, (4) leading edge of 2nd bristlecone, (5) distant bristlecone wood, (6) far distance.
Focus-stacked image, 6 frames
NIKON D810 + Zeiss Otus 28mm f/1.4 APO-Distagon
[low-res image for bot]
Field example #4 @ 55mm
The Zeiss Otus 55mm f/1.4 APO-Distagon is an outstanding lens for focus stacking. Here it yields a medium format feel as it often does. Three frames at f/5.6 deliver sharpness from the near foreground to the rear of the building, this being a “ shallow stack” of sorts in that the far background is intentionally left somewhat blurred, for the benefit of subject separation. Had it been desirable to sharpen the far background fully, a 4th frame could have been shot and/or f/9 could have been used instead of f/5.6.
A scene like this is a challenge for focus stacking because of subject movement: moving water, plus leaves and branches swaying wildly in a vigorous wind. Worse, the leaves on the left side are at close range and yet set against a distant background, which results in blur haloes which need retouching (the leaves at right are much farther away, and thus much easier to deal with). Complicating matters, the movement of leaves between frames results in conflicts such that there is no frame containing non-conflicting content that can be easily cloned in over problem areas. As well, the pattern of flowing water must not suddenly change direction near leaves that are in front of it! After about 40 minutes of retouching in Zerene Stacker, a very good image resulted. There are remaining defects that could be fixed with more patience, such as the leaf area in the upper right corner. In such cases it is wise to shoot a “backup image”, say something at f/9 or f/13 in case the stacking work proves too problematic or tedious.
View at 50% of actual pixels and the actual pixels crops.
Focus: (1) plants in foreground, (2) boulder at top right of waterfall, (3), middle of large building roof.
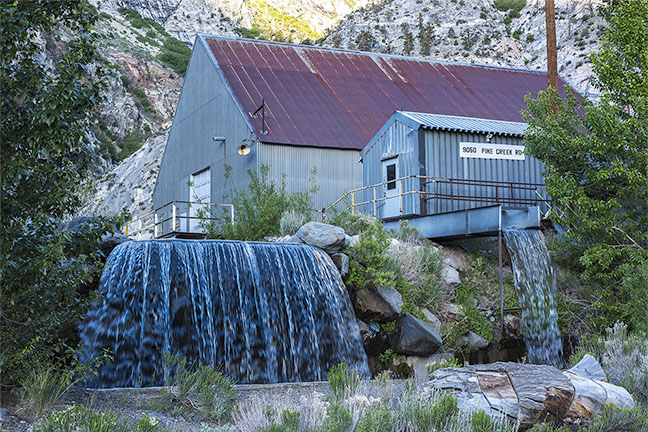
Focus-stacked image, 3 frames
NIKON D810 + Zeiss Otus 55mm f/1.4 APO-Distagon
[low-res image for bot]
Below, just some of the double-image issues for the image above (caused by subject motion), which had to be retouched. View at actual pixels.
Field example #5, handheld @ 21mm
Use of a tripod for focus stacking is all but essential for avoiding stacking issues, but here with a violent wind throwing me off balance (and an actual danger descending steep boulder fields), I could not even frame the subject accurately. A tripod might have blown over, and at the least it would have vibrated like crazy. But I was there and it would be another year for conditions in this combination. I was curious: could I make a focus stack handheld under extremely adverse shooting conditions?
This particular subject had always defeated me on a depth of field basis: making the foreground and the rock and the background sharp is not possible even at 21mm at this range, and so I wondered: could I focus stack with just two handheld shots for good results?
The composite image had some stacking artifacts, but with a bit of cloning to fix a few things, this 2-frame stack at f/5.6 delivers depth of field from the nearby foreground to the distant mountains. View at 50% of actual pixels to get a sense of how good the final result is.
Focus: leading edge of the boulder, 2nd frame where the hillside rolls off.
Focus-stacked image from 2 handheld frames
Sony A7R II + Zeiss Loxia 21mm f/2.8 Distagon
[low-res image for bot]
Field example #6 @ 85mm
When the weather does not deliver a colorful sunset for more than a week, shoot what it actually looks like—many a day in high country has subtle color well worth recording. This image is particularly beautiful on the late 2015 iMac 5K. It has been left true-to-life, rather than try to whack-out the true look of dusk.
Here, the Zeiss Otus 85mm f/1.4 APO-Planar was used. A single shot almost gets the job done at f/9, but in fact there is a moderate forward field curvature in the outer zones that results in less than optimal sharpness at the edges at medium distance. Moreover f/9 is not enough to deliver tack-sharp boulders in the foreground (when focused in the far distance), and tack sharp trees in the bottom right were desirable also. Two shot stack.
Zerene Stacker DMAP was used. Some touchup was needed: the clouds were moving and that generates blotchy blurs; the Retouch feature was used to paint in the far-focus frame to fix the clouds. Similarly, some of the trees were swaying in the wind causing double images from the stacking, so a few tree tops had to be retouched in using the closer-focus frame. View at 50% of actual pixels.
Focus: (1) boulder at center about 1/3 from bottom and (2) far distance at top/center.
Focus-stacked image from 2 frames
NIKON D810 + Zeiss Otus 85mm f/1.4 APO-Planar
[low-res image for bot]
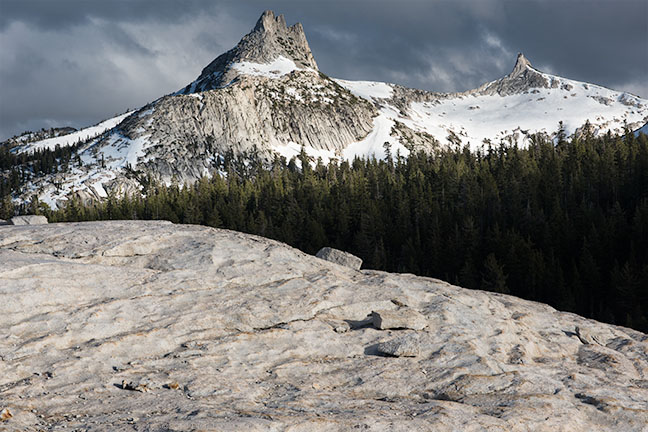
Field example #7a @ 135mm
I wanted to juxtapose these three glacial erratics against Unicorn and Cathedral Peaks using a 135mm lens to compress the perspective, but strong blur on the leading boulder would have made the image a distracting failure, even at f/16. The depth of field challenge was insurmountable without focus stacking. Three images at f/11 were just sufficient to deliver sharpness from the nearby boulder all the way to the peaks.
The challenge with longer focal lengths comes from the blur haloes for out of focus areas; these overlap edges that cause a halo zone, such as the edges of the boulders in this image. The Zerene Stacker retouch facility was used to “paint in” crisp edges of the boulders and some of the forest area over the DMAP stacked result, which had been blurred in the composite image: stacking algorithms can have trouble with low contrast areas. View at 50% of actual pixels.
Focus: (1) boulder at lower left, (2) round boulder at right, (3) far distance.
Focus-stacked image, 3 frames
NIKON D810 + Zeiss Apo Sonnar T* 2/135 ZF.2 @ 135mm
[low-res image for bot]
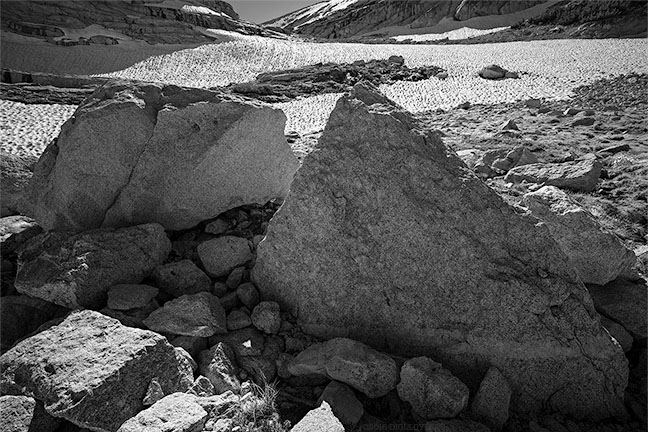
Field example #7b @ 135mm
This image was much easier to work with than the one above. Stacking was easy because the lip of the granite bedrock is cleanly separated from the background, with minimal retouching needed. Here at f/9 at 135mm, the foreground is bitingly sharp as is the distance—impossible even at f/16, and with far better micro contrast over the entire image. No visible stacking artifacts are perceived. View at 50% of actual pixels.
Focus: (1) on the granite about 1/3 from bottom and (2) far distance.
Focus-stacked image, 2 frames
NIKON D810 + Zeiss Apo Sonnar T* 2/135 ZF.2 @ 135mm
[low-res image for bot]
Field example #8 @ 18mm
The Zeiss Batis 18mm f/2.8 Distagon is an 18mm and thus has deep depth of field, but a deep zone of sharpness to far distance is a challenge with the foreground right under the camera. No retouching was needed (Zerene Stacker, DMAP). Three frames at f/6.3 are just enough to span the distance, but it could have been done with two frames at f/11. View at 50% of actual pixels.
Focus: (1) about 1/4 from bottom, (2) the far tip of the rock at center and (3) the far distance.
Focus-stacked image, 3 frames
Sony A7R II + Zeiss Batis 18mm f/2.8
[low-res image for bot]
Field example #9 @ 28mm
This close-range shot is difficult to make sharp even at f/13 because the projecting surfaces are just too far from the gauges area. It is a “shallow stack”, the goal being to make a sharp image across the front area of this engine only; it was undesirable to sharpen the background. It could have been made at f/4 or even f/1.4 for more background blur, but this would have required many more frames. At this close range, f/9 is useful in keeping the frame count at just 3 frames, yet leaving useful background blur. View at 50% of actual pixels.
Focus: 3 frames (1) leading edge of protruding cylinder at right, (2) lettered aluminum plate, (3) top gauge.
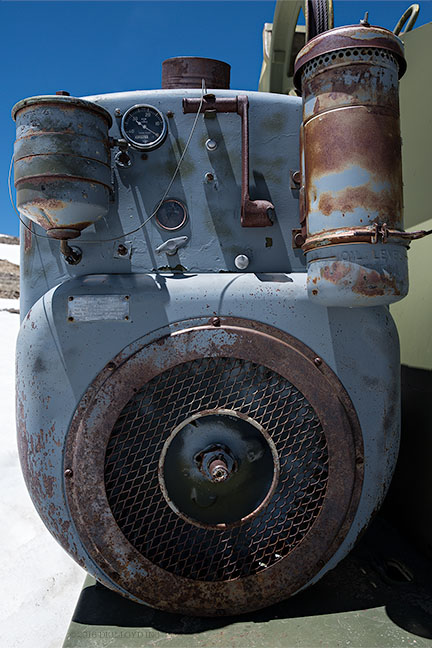
Focus-stacked image, 3 frames
NIKON D810 + Zeiss Otus 28mm f/1.4 APO-Distagon
[low-res image for bot]
3. Tips for shooting images for focus stacking
Keep it simple when possible: for shots in which the subject matter is in medium to far range: shoot 2 or 3 frames at f/9 or so. Shoot 2 or 3 frames for wide angle lenses at f/8 or so, 3 or 4 frames at f/9 - f/11 for a deeper range of focus and/or longer focal lengths.
Shoot an image stopped down conventionally as a backup image. Then shoot the stacked images. For example, if the stacked images are to be shot at f/5.6 or f/9, first shoot an extra image at f/9 or f/13 as a standalone image. If the stacked shots prove nettlesome, the single image is a fallback plan, and it can also be used as part of the stacked set.
- Use manual exposure or aperture priority for frame-to-frame consistency.
- Since motion such as moving leaves/branches/grass is problematic for focus stacking, always shoot a conventional frame to have “in the bag”, so it can be used if the stacked image proves to be problematic.
- Manual focus allows the best control over how focus slices through the scene for each frame. Autofocus can be troublesome since it requires subject matter at suitable distances for refocusing (and some cameras have significant errors!). A few cameras offer useful focus bracketing features that can be useful.
- Learn the focus spacing that tends to work well at any particular distance. For example, the focus spacing for f/9 for medium distance scenes versus closeup. Knowing what works can speed up the focusing process by allowing direct use of focusing distance marks.
- For maximizing depth of field and minimizing blur overlaps, choose an aperture like f/8 or f/9 for full frame cameras. This helps minimize blur haloes, thus keeping retouching hassles down as well as requiring fewer frames.
- Field of view and distortion can change with focus; zoom lenses tend to be troublesome. Choose high quality fixed focal length lenses that avoid changes in these behaviors with focus, particularly for close-range work.
- Better to shoot extra frames that than too few frames. Not all frames have to be used for the stacking process, but too few frames can make a real mess of things. Circular objects or wide gaps in distance require more frames to avoid troublesome overlapping blur haloes, which confuse the stacking software.
Focusing for focus stacking
A good “stack” requires images whose choice of focus plus depth of field renders full sharpness over the desired range: “blur gaps” create big problems for the stacking process. Using aperture f/8 or f/9 (full frame) is a good starting point that works well for most images. Use the magnified Live View feature of the camera to see what kind of focus spacing is needed for full sharpness at the chosen aperture. A good way to approach this is to focus for critical sharpness (wide open not stopped down!) on the one or two key areas, then space other frames around those “anchor points”. That way, if any focus spacing errors are made, at least the most important features will be critically sharp and blur gaps will be minimized, if any.
The choice of focus spacing is not a fixed quantity. For example, at a focus distance of 3 ft / 1m, the next more distant frame might be at 6 ft / 2m (depending on focal length or aperture it might be closer or farther of course). But at 21 feet / 7 meters out, the next spacing might be at infinity focus. It comes down to the relative difference in magnification, not a fixed distance figure. For macro work the spacing may be very fine with many frames required. Use of magnified Live View can be very helpful in determining the spacing; see the bicycle cassette example at the start of this article.
For macro and close-range work, consider a bellows system, which allows focusing to be done by changing the camera distance (instead of refocusing the lens), thus keeping the entrance pupil and focal length of the lens constant (same perspective and magnification). Examples include the Cambo Actus Mini View Camera and the Nikon PB-4, but the PB-4 is good for closeups/macro only because distant focus cannot be achieved. The Cambo system in particular allows mounting Zeiss lenses with Nikon and Canon DSLRs and Sony mirrorless as camera options, with Sony mirrorless being ideal because infinity focus is possible with DSLR lenses (but not possible with DSLRs). Note that a geared focusing rail is generally not a good choice for focus stacking because the gearing does not track well, which changes the camera/lens position noticeably with each shot.
Shooting aperture for focus stacking
Depending on the goal, the choice of aperture may vary:
- A “shallow stack” with the goal of sharpness over a relatively narrow range may be shot at f/2 or f/2.8 or even f/1.4 so as to retain background blur—for example a macro shot of a flower in which one wishes all the background to be pleasingly blurred. This will necessarily increase the number of frames (and thus the work factor).
- For classic landscape images and similar, the typical goal is sharpness from a few feet away to the far distance. The use of f/9 or so is a good choice for full-frame cameras, depending on focal length and the distance range; see the various examples.
Diffraction robs an image of overall contrast and micro contrast starting at around f/8 or f/9 on full frame cameras with high performance lenses; the image will look dull and relatively lifeless with more stopping down. Thus working apertures in the f/5.6 to f/9 range should be preferred over f/11, f/13, f/16 when using a full frame camera (f/4 to f/6.3 on APS-C cameras). However, stopping down one more stop may be preferred for situations where the near/far range is large and/or the focal length is long: too wide an aperture tends to generate troublesome blur haloes for focus stacking: if the subject has a wide distance gap between subject matter, stopping down along with more frames more will minimize these haloes. Also, any subject in which focus cuts through obliquely will require tighter focusing spacing and/or stopping down a bit more.
For outdoor images, wind can move leaves, grass, branches and so on; stop down a bit more to allow 2 or 3-frame stacks to reduce ghost image problems when stacking.
Lens recommendations
Otus lenses are deal for focus stacking
A high quality stacked image starts with the best possible image quality for each of the frames. This matters even more than with a single image: the stacking process must combine images and any lens aberrations confuse the stacking process, particularly since some aberrations can change shape as the focus changes.
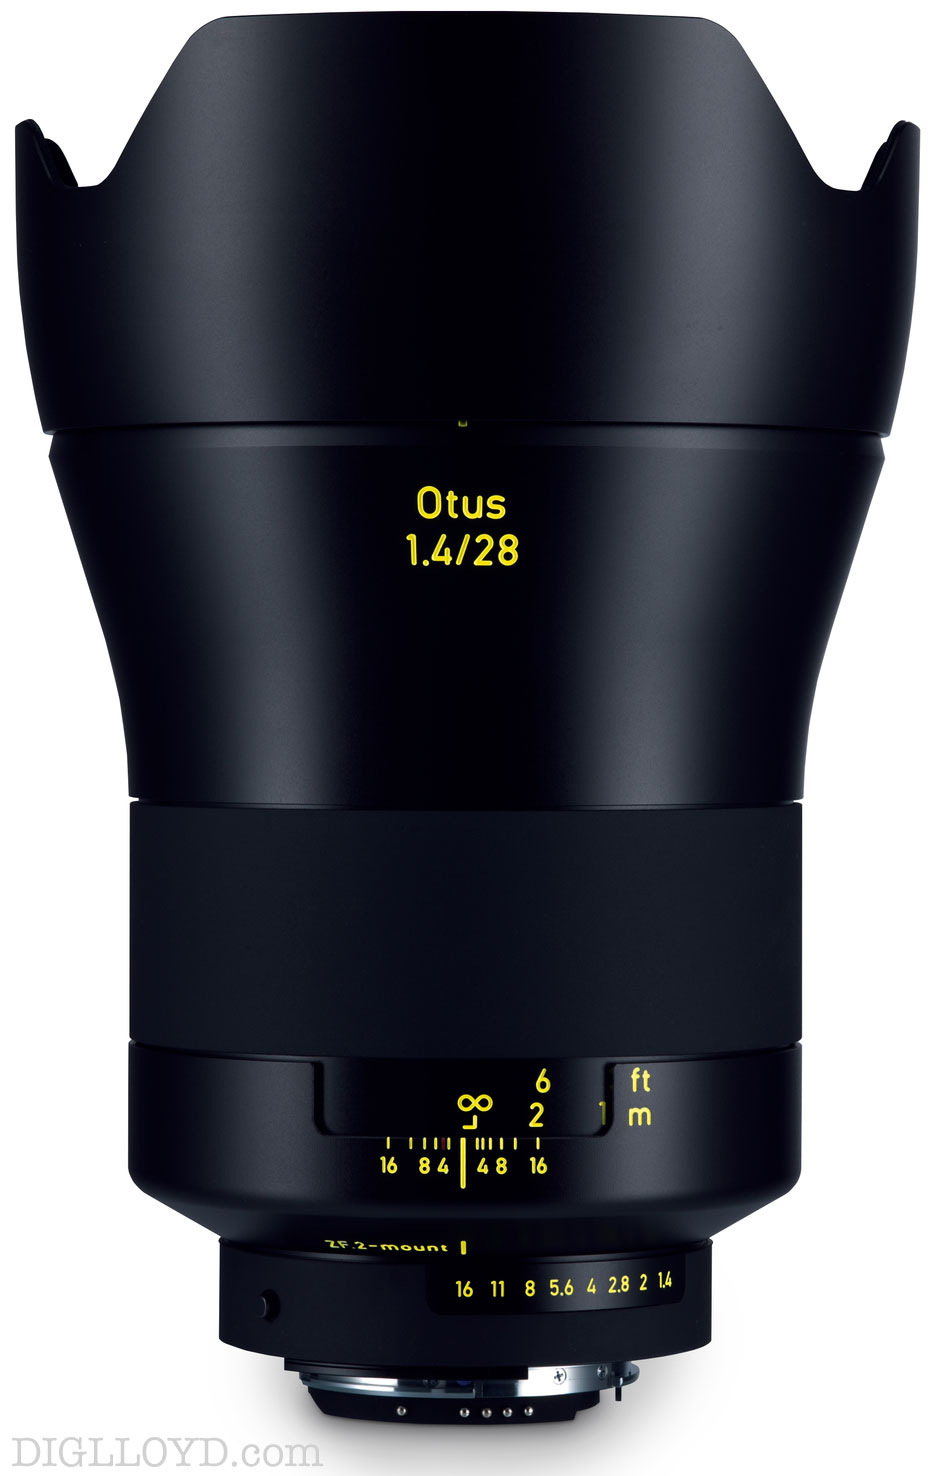
High performance lenses not only keep lens aberrations at a minimum, they afford the option of a very high quality “shallow stack” at wide apertures. The Zeiss Otus family offers outstanding performance at f/1.4, including APO performance which minimizes color blurs in out of focus areas. Thus the Otus lenses are strongly preferred for “shallow stacks” at f/1.4, f/2, f/2.8, f/4. Most of the lenses in the Zeiss Milvus and Zeiss Loxia and Zeiss Batis lineups are also strong performers for focus stacking.
Certain lens behaviors affect focus stacking:
- Manual focus lenses are ideal for precise control over focus increments.
- Lenses that minimize changes in focal length and distortion with focusing are strongly preferred (zoom lenses are prone to both types of changes, particularly at close range).
- Lenses with excellent color correction are best, such as “APO” lenses. These minimize differential focus by color (wavelength) in out of focus areas. This can be particularly important for specular blurs.
- Many macro lenses change focal length with changes in focus, some greatly. A change in focal length when focusing changes the image size (magnification), which makes for more of a mismatch for the stacking software to correct. As well, the entrance pupil position changes, which changes perspective. Zeiss DSLR macro lenses Milvus 50/2 (view graph) and 100/2 (view graph) minimize these changes but nonetheless change their focal lengths slightly at close range. They are relatively consistent within a reasonable range of focus. Consider a bellows system such as the Cambo Actus Mini View Camera for critical work as it allows focusing by moving the rear standard (no change in lens focus).
Ideal for any Mac with Thunderbolt 3
Dual Thunderbolt 3 ports
USB 3 • USB-C
Gigabit Ethernet
5K and 4K display support plus Mini Display Port
Analog sound in/out and Optical sound out
Works on any Mac with Thunderbolt 3
4. Overview of the stacking process and software
Plan on investing time in learning how to use your choice of stacking software. Start with 2 or 3 frame stacks of something simple (no motion, no extreme close/far content). The examples in this article should give a good idea of what will work well.
via Edit => Auto Blend Layers
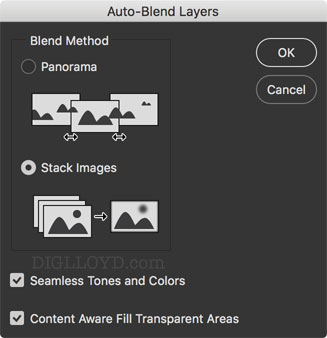
There are various software packages that perform focus stacking, including Zerene Stacker, Helicon Focus, Adobe Photoshop, and others. I’ve gravitated to Zerene Stacker. While the built-in + commands in Photoshop work well in many circumstances, there is no choice of algorithm or parameters for doing the stack. Still, it is a quick way to try focus stacking for anyone already using Photoshop.
In Zerene Stacker, I use both the DMAP (depth map) and PMAX algorithms; which is better depends on the subject matter, focus spacing, etc. Sometimes the result for one algorithm is clearly better than the other; with Zerene Stacker one command can calculate both results for a quick look at what might be the best starting point. There are also parameters which control the way each algorithms work.
Some images will be hassle free right after stacking—superb results with very little effort—but other images will need retouching. Don’t expect stacking perfection, because subject movement and/or overlapping blurs can create haloes on edges in some areas. In general, shorter focal lengths and stopping down more are easier to handle than longer focal lengths and/or wider apertures.
- Process the images with the same parameters. Ideally, shoot raw and process to 16-bit TIF. Most stacking software cannot work directly with RAW files.
- Eliminate excess images that overlap others more than necessary and/or have excess motion or similar problems.
- Import the images into the stacking program, then stack the images into a composite, using all the algorithms (if more than one is available).
- Save the stacked composite image(s) and examine critically. Make note of areas that are at issue. If necessary, add or remove images from the stack; the results might improve. The best image might be from one algorithm or the other, depending. In some cases, changing processing parameters might help.
- If the stacking program has a Retouch feature, fix up problem areas. Fine detail work can still be done later in Photoshop, Zerene Stacker’s in-app Retouch feature is ideal for most retouching; all examples in this article except one were retouched only in Zerene Stacker.
Zerene Stacker has built in functionality for retouching: cloning in any of the frames over a problem area and/or an alternative stacked image (DMAP or PMAX), so a finished image can be saved right out of the program after retouching. Retouching in Zerene Stacker is very convenient, since it syncs up the positions, allowing cloning from any source frame, including any stacked result or original frame.
If stacking is producing too many artifacts, evaluate the images: are they focus-bracketed so as to avoid “blur gaps”, is there subject movement, is too wide an aperture leaving blurs that overlap a “neighbor frame” that thus confuses the stacking software? Often, stopping down more (say f/11 instead of f/8) can help a great deal by minimizing the way out-of-focus blurs of some frames overlap in-focus areas of other frames. The types of things that cause issues will be a “negative feedback loop” to learn from—give yourself time to learn the types of subjects that work well with modest effort, and which are a chore for focus stacking.
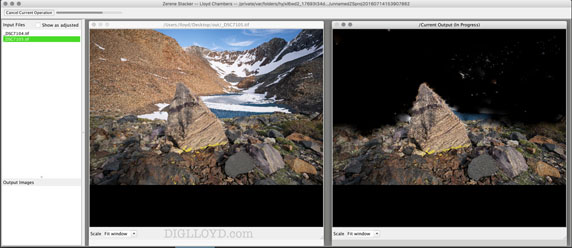
Shown below, 2 frames are in progress being stacked by Zerene Stacker. Even just two frames offers major gains in the depth of the zone of sharpness. Atypical, this image had issues with retouching due to movement of the camera between frames (parallax) and it turned out to be easier to use Photoshop to touch up problem areas via cloning along the triangle-shaped boulder as well as at the top of the frame.
Conclusions
More depth of field is not always better, but it is often a limiting factor for sharpness. Focus stacking sidesteps the limits on depth of field while also avoiding the dulling effects of diffraction. With a bit more effort than a single shot, even a 2-shot stack can hugely improve depth of field. Thus, focus stacking has a place in every advanced photographer’s toolkit, particularly for product photography and landscape shooting. Frequently, focus stacking is the only option can deliver the required depth of field. Ironically, one sees many shots of photography products that are blurred from inadequate depth of field!
A good way to put focus stacking to use is to think of it as an add-on bonus: first shoot a conventional frame as a “got it” shot. Then shoot frames that are suitable for stacking as their own group, or as shots that can be used in conjunction with the got-it shot.
Lens performance: in preparing this article, at times I shot the Zeiss Otus 28mm f/1.4 Distagon together with the classic Zeiss 28mm f/2 Distagon. Quickly apparent was the superiority of the Otus results even at f/9 and even in single frames, and this turns out to be compelling for focus stacking; the Otus images work extremely well for stacked images that are unbelievably sharp corner to corner, perhaps because aberrations are so tightly controlled. Clearly a much higher resolution sensor is warranted, preferably with SuperRes pixel shift mode. The photographer looking for the best possible results should be looking hard at Zeiss APO lenses, meaning the Zeiss Otus line and the 135mm f/2 APO-Sonnar (for me, the Otus 28/1.4 and 55/1.4 are the two most useful lenses). Quite a few other Zeiss lenses are excellent also, with the Zeiss Loxia and Zeiss Batis and Zeiss Milvus lineups all having excellent lenses, but the APO lenses seem to be best of all.
For more information, see the focus stacking section of diglloyd Making Sharp Images. Lloyd’s photography blog is found at diglloyd.com; it covers many brands, lenses, cameras. In-depth review coverage of the Zeiss DSLR lenses for Canon and Nikon is found in Guide to Zeiss and in Guide to Mirrorless for Sony. By subscription.

Seagate 22TB IronWolf Pro 7200 rpm SATA III 3.5" Internal NAS HDD (CMR)
SAVE $100