
Getting Started with Focus Stacking
Related: 4K and 5K display, computer display, depth of field, diffraction, digital sensor, Eastern Sierra, external articles by Lloyd, focus stacking, focusing, How-To, Mercedes Sprinter, Mt Dana area, peak bagging, Photoshop, shutter, tripods and support, Zeiss, ZEISS Lenspire, Zeiss Milvus, Zerene Stacker
by Lloyd Chambers, diglloyd.com
Images shown in this article were shot with the 45-megapixel Nikon D850, but the discussion applies equally to other Nikon DSLRs, Canon DSLRs, mirrorless or any type of digital camera.
For more detailed information on focus stacking, see the focus stacking section in Making Sharp Images.
This article is an introduction for photographers interested in focus stacking. It sets out a process to achieve more detailed images with modest effort, discusses ways to reduce mistakes when shooting, and touches on software for assembling a “stacked” image. It is organized as follows after this introduction:
- Two key ways in which focus stacking beats stopping down for depth of field.
- General guidelines for focus stacking.
- Shooting your first focus stack, examples of fast and easy stacking.
- More examples discussing challenging stacks, conclusions.
Focus stacking is the process of capturing more than one image of the same scene at different focusing distances in order to extend depth of field (keep more in focus) and thus increase total near-to-far sharpness. These “focus sliced” images are later “stacked” using software on a computer.
As of 2017, megapixels are “burned out” as a tool for more total detail, because depth of field and diffraction are the key limiting factors outside a thin zone of peak sharpness (this zone is relative to magnification, not a linear measurement). When the goal is maximizing sharpness over a near to far zone, more megapixels does not help outside that narrow zone of peak sharpness, which shrinks as the megapixels increase.
Focus stacking is the only approach that can consistently and substantially increase the captured detail with today’s high-resolution digital cameras. Subject matter right in front of the tripod can be razor sharp, along with features far away and everything in-between, as in this image.
Focus stacking has traditionally been thought of as a technique for close-up (macro) photography. But focus stacking actually has far wider general applicability for landscape and architecture photography and other similar applications. This article focuses on landscape photography and how focus stacking can create images impossible to make by other means.
Below, whether shooting with a 36 or 50 or 100 megapixel camera, the differences in resolution for a near-to-far scene will be found only in a narrow zone of critical sharpness (without the use of focus stacking) because the resolved dot size quickly becomes larger than the pixel size of the sensor. More on the making of this image towards the end.
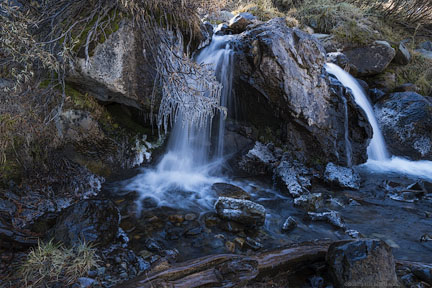
NIKON D850 + Zeiss Milvus 25mm f/1.4
[low-res image for bot]
1. Two key ways in which focus stacking beats stopping down for depth of field
Stopping down too far obliterates sharpness
A solid rationale is needed to justify the extra effort of shooting more frames and the effort of processing multiple images and stacking them.
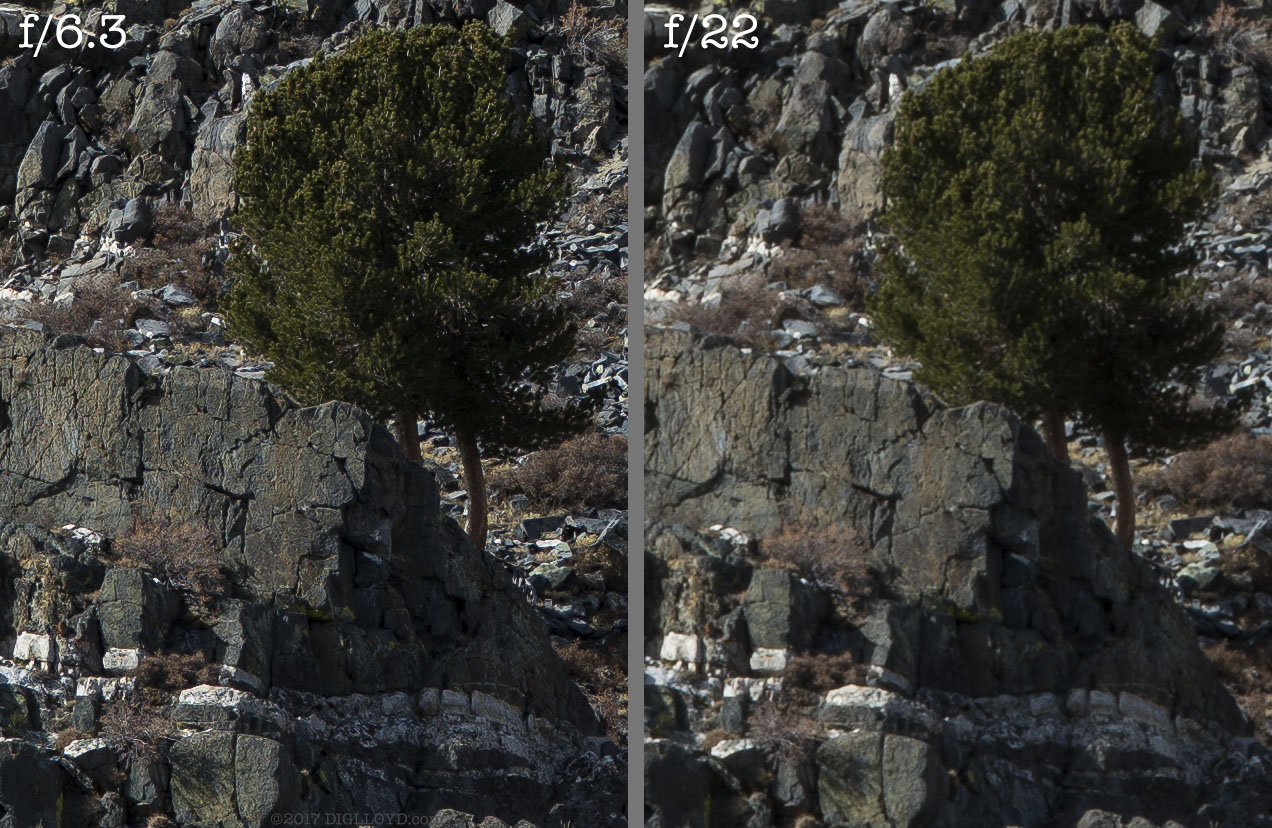
Why not just shoot at f/16 or f/22? The answer is best shown, which makes it obvious: stopping down too far makes your superb Zeiss lens (or any lens) into into a thoroughly blurry disappointment.
Below are compared crops at f/6.3 (optimal micro contrast) versus f/22. Using f/22 obliterates detail on a 45-megapixel camera (even on a 24 megapixel camera). See also the very large crops from f/6.3 through f/22. The lens has not been refocused here; the effects seen are purely from the choice of aperture.
To turn your 36 or 42 or 45 or 50 megapixel camera into one capturing about 16 megapixels of image data and storing it in 36/42/45/50 megapixels of file data, shoot at f/22. And that still will not be enough depth of field for many scenes. The detail gained in depth of field will be obliterated by diffraction at f/22 and the entire image will lose contrast at all levels. The higher the camera resolution, the greater the loss. Extremely aggressive sharpening can win back some contrast and coarse detail, but fine detail is gone forever when using f/22. Users of 24-megapixel APS-C cameras will see even greater losses.
For many images, no amount of stopping down is enough for full sharpness
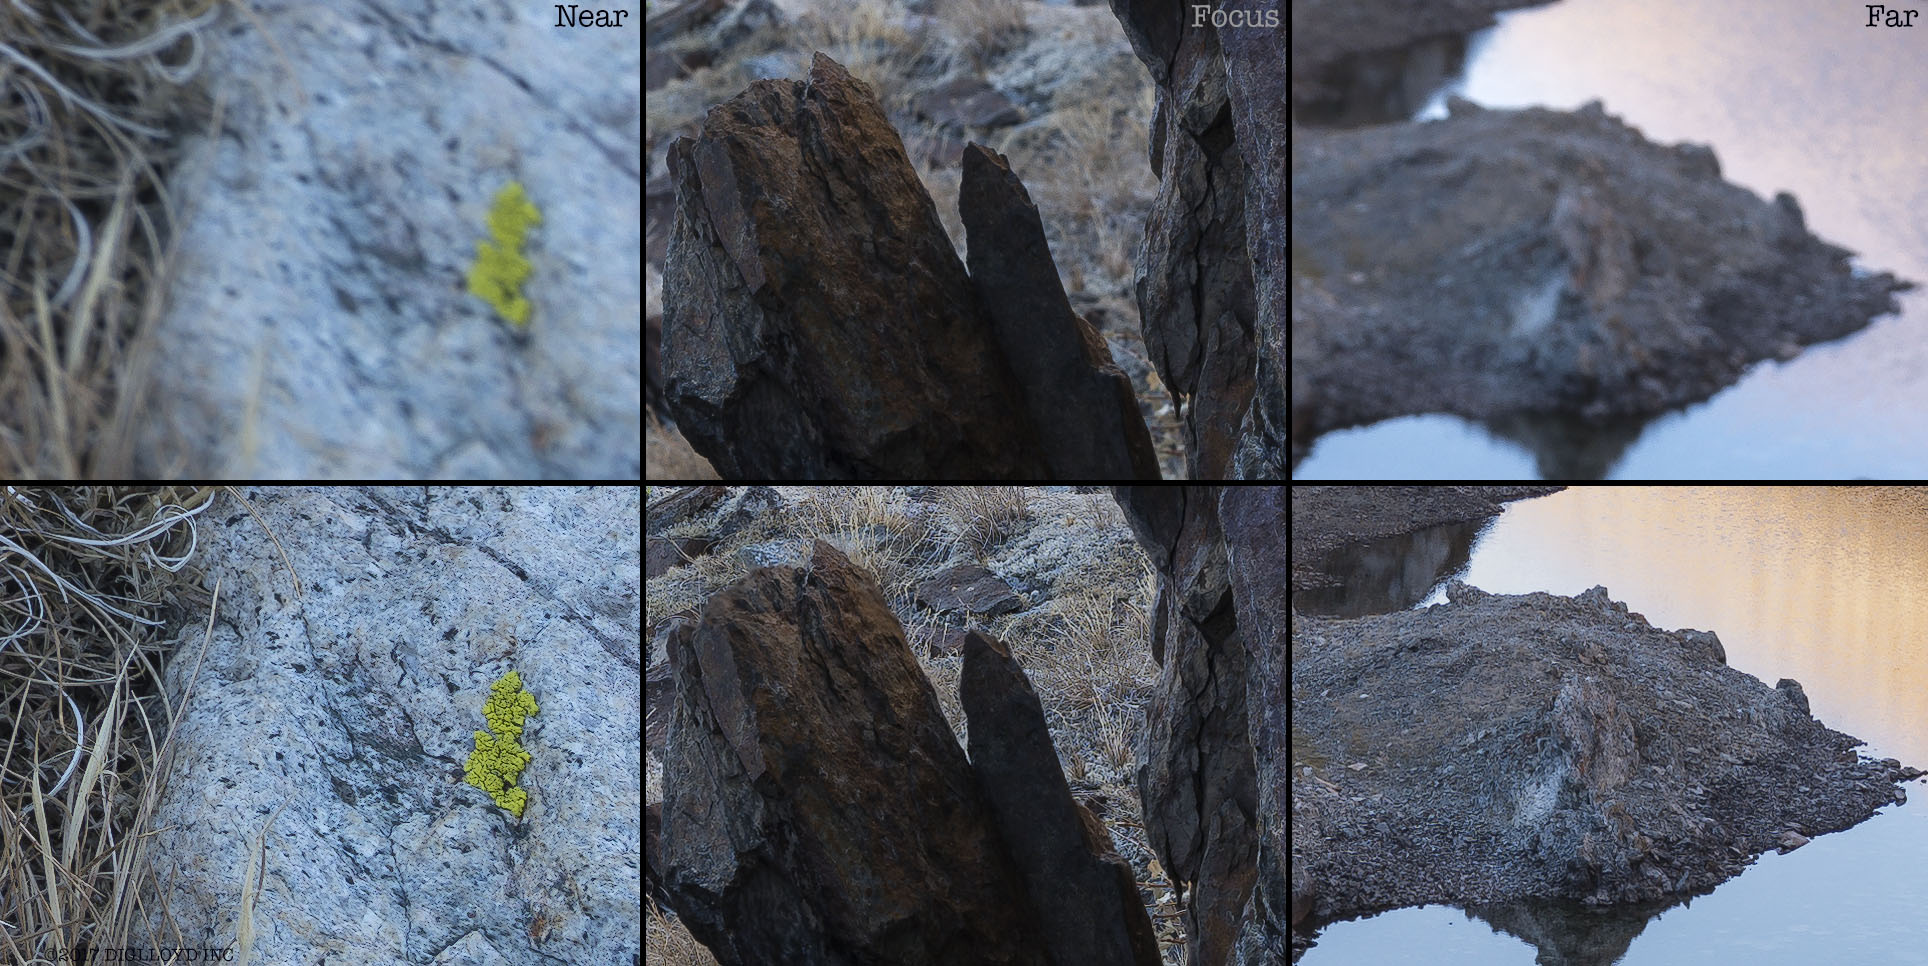
Let’s look first at gains from focus stacking. Below, crops from a focus stacked image shows the dramatic gains in near-to-far-sharpness with this image. Shooting at f/13 instead of f/9 would help the single frame image a little bit, but it would still fall far short on total sharpness. Going to f/16 would destroy fine detail, with f/22 far worse, and the entire image would start losing detail from diffraction.
2. General guidelines for focus stacking
The challenge revolves around depth of field: how much is “in focus” from near to far. To be truly sharp, the detail level must be as good as the sensor resolution, and that means a razor-thin zone of truly sharp focus.
Consider a 45-megapixel camera such as the Nikon D850. It might commonly capture an image in which 30 of those 45 megapixels are blurred with little or minimal detail. Or 10 or 40 megapixels are blurry, or whatever the case might be depending on the subject matter—even at f/11. Compare that to 45 megapixels of which 45 megapixels are critically sharp or close to it.
Whether it be a large print or a 5K or soon-to-arrive 8K displays, focus stacking could be called “hyper realistic photography”. Often, I have found that more detail than the eye can take in while viewing the actual scene can be captured in the final stacked image, at least with cameras in the 36+ megapixel range and/or with telephoto lenses. This makes focus-stacked images fascinating to view.
1. Depth of field
Depth of field is all about magnification: higher magnification shrinks depth of field. A longer focal length and/or closer shooting increase magnification and thus shrink depth of field. Even with an 18mm lens or wider, magnification a foot away is very high, with very shallow depth of field.
The lens aperture controls the thickness of the zone of critically sharp focus (full sensor resolution). Small numbers like f/2 have extremely thin depth of field; larger numbers like f/11 have much more. The wider the aperture (less depth of field) the more frames that must be shot for a seamless stack. Read more on suggestions for making a first attempt further down.
A “short stack” is usually not only easier to shoot and assemble, it may be preferable: having everything sharp can be highly desirable, but in some cases this eliminates separation of foreground from background. A short stack aims to produce maximum sharpness over a limited zone.
2. Focusing and shooting
Focusing with an optical (DSLR) viewfinder is too inaccurate to be reliably used for focus stacking. As well, cameras often have a significant discrepancy between the optical path to the sensor versus the optical path to the focusing screen.
Use the camera’s Live View at 100% magnification to ensure that focus is not being “gapped” from frame to frame. If in doubt shoot more intermediate frames (tighter spacing)—too wide and there will be a blur zone which cannot be fixed.
Use an aperture in the f/5.6 to f/11 range for best results. Wider apertures like f/5.6 will require many more frames than f/11, and bring a greater risk of “gapping” focus too widely.
Shoot as quickly as feasible without making focusing errors. Lighting can change (changing shadows and/or lighting can cause issues), wind can be start and stop, etc. The goal is to have the frame record the same scene, just with different focus points. Shooting tightly-spaced enough is critical, otherwise blur zones will appear and look awful.
3. Stability
Stability matters because it can cause problems in assembling the stack in the stacking software—at the least a loss of sharpness, at worst irreparable blur areas. Each frame should not deviate from the others so they “match up”. Although stacking software can compensate to some extent, movement of the camera increases the odds of stacking issues (blurs and double images).
- Use a tripod that resists transmitting vibration. Plant it firmly on as a solid a surface as can be found.
- The tripod head can be a source of movement; make sure it is solidly locked down.
- Avoid cantilevered designs of tripods or tripod heads as these can be extremely prone to small vibrations or changes in position.
- Use the camera’s vibration-free electronic shutter if it has one, otherwise mirror lockup with at least a 2-second delay after pressing the shutter.
- Shield the camera and tripod from wind.
- Lock everything down securely before shooting.
5. When focus stacking is difficult or inappropriate
Focus stacking can be challenging to quite difficult to practically unusable for some types of images:
- Sports or action or other movement.
- Rapid movement of overlapping subject matter, e.g., high winds causing leaves, branches, whole trees, grasses, etc to move around in ways that are virtually impossible to stack without double images or blurs.
- Portraiture in general (though see one exception that follows)
- Extreme focusing ranges in which the subject matter moves or changes illumination.
There are exceptions to the above, but the post-processing retouching work escalates the more the subject matter changes (movement, shadows, lighting, etc).
6a. Focus stacking software in Photoshop
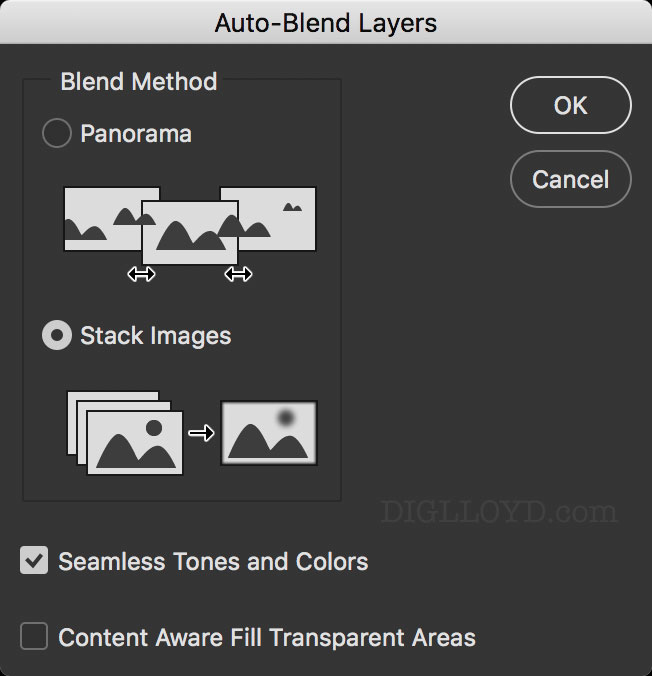
Focus stacking can be done right in Adobe Photoshop. This is a good way to start if you already have Photoshop, and it will show the basic promise of the technique. However, in my experience the results end up with far too many blur areas to make it a viable choice. Still, it’s a simple and easy way just to get a sense of the potential.
- Put all the frames into layers in one file (process to TIF ideally, though JPEG can be used).
- Select all the layers.
- Choose , like this.
- Choose , like this.
6b. Dedicated focus stacking software
Discussion of how to use these programs is beyond the scope of this article.
I use dedicated software, at present, Zerene Stacker. Helicon Focus is more polished in its user interface and on my to-do list to evaluate versus Zerene Stacker. Heliconsoft also has a remote control app and hardware option.
Both have demo versions, both have more than one stacking method, and both support retouching (painting in areas with issues)—far more powerful than what can be done in Photoshop layers. Plan on spending significant time to become adept at either.


3. Shooting your first focus stack, examples of fast and easy stacking
First, review the Overview of focus stacking section discussed previously.
Shooting a challenging focus stack on your first attempt will likely result in frustration, so I suggest keeping these attempts to 2 or 3 frames by not trying to do extreme near-to-far efforts and by using a wide angle lens and shooting at f/11.
- Start with a wide angle lens to minimize the number of frames needed, such as something in the 14mm to 28mm range. Lenses 50mm and longer require more frames and are thus not a good choice for the learning process.
- Shoot at f/11 in order to minimize the number of frames needed. Use f/8 for APS-C cameras.
- Choose a scene free of moving objects on a calm day.
- For a 25mm lens, focus the first frame about 3 feet way, and the 2nd frame about 15 feet away (and if ambitious), a 3rd frame at the farthest distance with meaningful subject matter.
- Shoot a single frame at the same aperture to later compare to the stacked result, focusing where you would normally focus for a single frame (different from the focusing points for stacking).
- Assemble the frames into a finished image; see discussion that follow.
The stacked result should be obviously superior in total near-to-far detail. If not, a mistake was made, generally on focus position.
Below is an ideal first attempt subject: nothing is moving and there are no overlapping near/far items. Using the Zeiss Milvus 25mm f/1.4 at f/9, only two frames were needed for sharpness right in front of the tripod all the way to half dome. Focus points were about 3 feet out and about 20 feet out for the two frames.
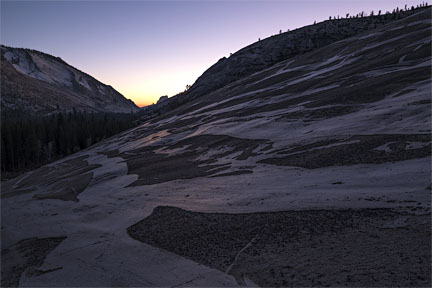
NIKON D850 + Zeiss Milvus 25mm f/1.4
[low-res image for bot]
The 2-frame stack below was quick and easy and it delivers far more detail than a single frame can, with sharp detail from right in front of the tripod to the far horizon. I focused on the leading edge of the tree at center for the first frame, and about 12 feet away for the 2nd frame—done in half a minute, which was a boon at 28°F. With no wind, stacking (assembling) took only a few minutes. This is the “modest effort high reward” that makes focus stacking so appealing. Had I focused on the tree, the background would have been blurred, even at f/11 (I checked in Live View).
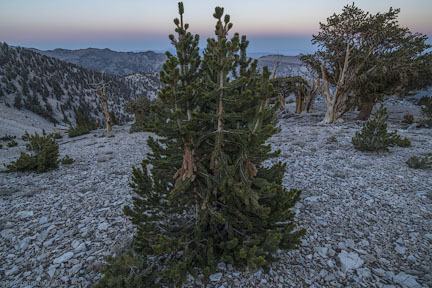
The earth shadow rises (visible only at high altitude like here) behind a young bristlecone, which might see 1.8 million more if it lives to the 5000+ years that a few do.
NIKON D850 + Zeiss Milvus 18mm f/2.8
[low-res image for bot]
Below, another 2-frame stack, this one at f/11. It delivers sharpness from right in front of the tripod all the way to the distant horizon. With no wind, there was no issue with movement when stacking the images—quick and painless. I focused on the leading tree trunk at left for the first frame, and about 10 feet out for the 2nd frame.
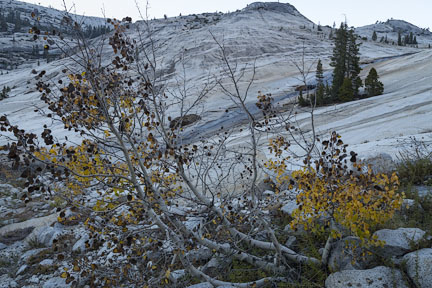
NIKON D850 + Zeiss Milvus 25mm f/1.4
[low-res image for bot]
Round Hole in Tenaya Bowl
Here I felt that have a critically sharp immediate foreground was important, but also the waterfall and distant trees. Focus stacking was the only answer.
Two frames along with the outstanding sharpness of the Milvus 25/1.4 yielded sharpness from the branch at bottom right to the trees at far distance. I focused half-way through the branch, and then on the waterfall area. Retouching was trivial, just foreground with the first frame, background and the pool of water. with the 2nd frame.
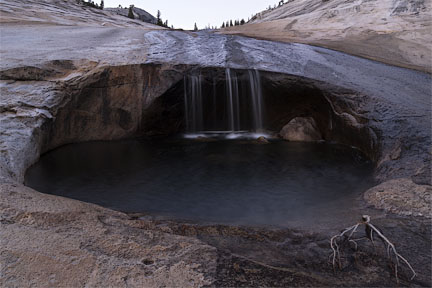
NIKON D850 + Zeiss Milvus 25mm f/1.4
[low-res image for bot]
4. More challenging examples
Examples with brief commentary follow. These examples range from easy to shoot and process to challenging and time consuming, so as to give an idea of how involved the process can be.
Gnarled stump with green lichen
I had seen wood like this over many years, but I could never capture the detail present; no amount of stopping down could do it and deliver the extremely fine wood grain that I was after.
I used 7 focusing positions and intentionally did not do the background because I wanted the wood separated from that background (a “short stack”). I started at the projecting knob at far left, and follow the contour of the wood to the rearward-curving wood at right. I used f/8 because I felt that retaining high micro contrast was important for the very fine wood grain.
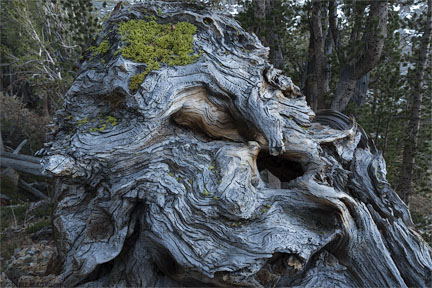
NIKON D850 + Zeiss Milvus 25mm f/1.4
[low-res image for bot]
Mercedes Sprinter photography adventure van (selfie)
I do much of my field work processing and publishing from inside this Mercedes Sprinter van, which is written up in detail at WindInMyFace.com, in the Sprinter section.
Stacking can even be used for selfies, as here, though I deem the picture unlovely. But it serves to show that even a selfie can be done with focus stacking. My goal here was to render the van fully sharp, but to leave the background somewhat unsharp. Two frame were used: one focused on the van where I stand and the other to the far right of the radiator grill.
To shoot a stacked selfie, it is is important to shoot two frames without refocusing, one with yourself, and the other without. Then shoot the additional desired frames for depth of field.
Shadows are not your friend when focus stacking, and astute readers will notice a startling error in this finished image.
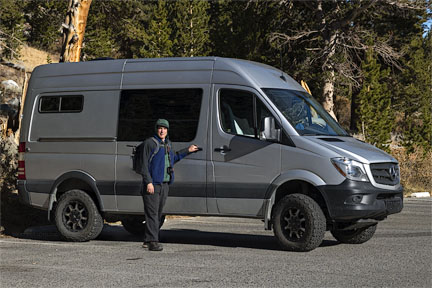
NIKON D850 + Zeiss Milvus 100mm f/2M
[low-res image for bot]
Creek, Mountains, Moon
Compositions like this typically require 3 frames for full sharpness with a 25mm lens, where the closest subject matter is 2-3 feet distant. Two frames at f/11 would be a reasonable alternative to 3 frames at f/9.
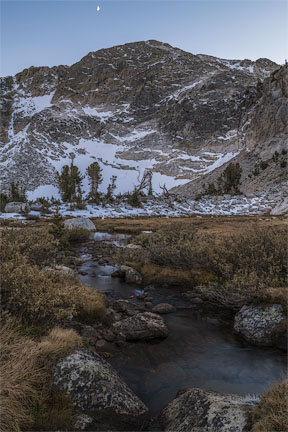
NIKON D850 + Zeiss Milvus 25mm f/1.4
[low-res image for bot]
To finish: two challenging stacks
I finish this article with what turned out to be two unusually challenging focus stacking examples. I would not recommend attempting a total-sharpness scene like this until solid experience is gained. Or, simply compromise with 2 or 3 frames for a large but incomplete gain in near-to-far sharpness.
Waterfall Icicles
Below, Waterfall Icicles is a 7-frame focus stack which is sharp from right in front of the tripod to the brush at top right 40 feet or so away. The full 45-megapixel result is jaw-dropping in its detail, particularly viewed on an Apple iMac 5K—it is sharp everywhere in the frame (except for a few moving leaves due to slow shutter speed).
It took about 3 hours of retouching work, which is highly unusual. The reason for the extensive retouching is that almost everything is changing frame to frame: flowing water, light reflections, wind moving leaves and branches, trickles of water under ice, sheen changing on smooth surfaces, very close focus in the immediate foreground, and so on. All those issues meant that the stacking software produced something that looks lovely at first glance, but was chock full of numerous issues, including many blurry areas added by the stacking software itself.
NIKON D850 + Zeiss Milvus 25mm f/1.4
[low-res image for bot]
Dead pine by Lake — close range shooting
The front element of the Zeiss Milvus 25mm f/1.4 was only about 10 inches from this tree. It maintains extremely high performance at close range. This 20-frame focus stack is a “short stack” meaning it does not attempt to sharpen the background, intentionally.
View large image in color and/or view large image in black and white.
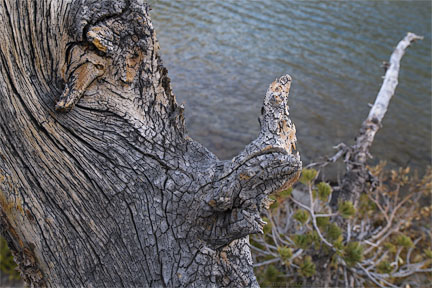
NIKON D850 + Zeiss Milvus 25mm f/1.4
[low-res image for bot]
Mineralized Rock — macro shooting
Shot at a 1:5 reproduction ratio, this is close range shooting and required 18 frames—quite a chore to shoot what with lighting changes, variable and slanted subject surface, shooting on a 25° rocky slope made this challenging to shoot well. But I like geology, and I wondered if I could capture the detail in this mineralized rock.
This example goes beyond what I generally like to do, as it is a lot of work to retouch. Specular out of focus highlights were a huge issue that confused the stacking software causing hundreds of pinpricks of light surrounded by blur circles, and requiring extensive retouching to deal with. Plus eighteen frames was not quite tight enough enough, and I made the mistake of shooting the stacking frames at f/9: I should have shot at f/11 for fewer frames and better overlap between frames. Stacking takes experience to judge the best choice of aperture, and I still sometimes make mistakes in the field. One thing I’ve learned is this: it is better to lose some contrast from diffraction by shooting to f/11 or f/13 than to “miss” at f/9. I forgot that lesson here!
Compare this 18 frame stack at f/9 to the single frame at f/11, below (the lighting changed for the f/11 frame). The stack has some flaws in it, but it contains far more detail than the single-frame shot. In retrospect, I might have considered not attempting to stack in the background rock, but only to stack through the mineralized foreground rock (a “short stack”)—total sharpness is not always the best goal. In retrospect, seeing the single f/11 frame, I should have shot the stacked frames at f/11, for fewer frames and less risk of “focus gapping” as occurred on the far right side—no way to fix it.
View large stacked image at f/9 and view large single-frame f/11 (non stacked) image.

NIKON D850 + Zeiss Milvus 100mm f/2M
[low-res image for bot]
Conclusions
Focus stacking can add tremendous detail that stopping down cannot achieve. Sometimes it can be trivially easy (see the glacial polish example) and generally the choice is easy: shoot for the “low hanging fruit” when starting out (or in general), reaping the benefits with modest extra effort.
Every photographer should at least consider acquiring some moderate skill with relatively simple two to four frame focus stacks for the situations in which the detail makes it all worthwhile. This will become increasingly important for detailed images as sensors gain in megapixels.
Lenses—since I shoot landscape a lot, I tend to prefer wide angles and these make focus stacking very easy to do, often with only 2 or 3 frames. In my experience with the 45-megapixel Nikon D850, the Zeiss Milvus 18mm f/2.8, 25mm f/1.4 (my most-used favorite) and 35mm f/1.4 are all are superb choices for focus stacking for landscape shooting with performance more than up to the sensor resolution.
Lloyd’s photography blog is found at diglloyd.com; it covers many brands, lenses, cameras. Focus stacking os covered in detail in Making Sharp Images. In-depth review coverage of the Zeiss DSLR lenses for Canon and Nikon is found in Guide to Zeiss DSLR Lenses. By subscription.