


|

|

$220 SAVE $130 = 37.0% Western Digital 16.0TB Western Digital Ultrastar DC HC550 3.5-in… in Storage: Hard Drives
|

|

|

|

|
DynamicRange
Related: Adobe Camera Raw, dynamic range, exposure, image scaling, Nikon, Nikon APS_C, Nikon D200, Nikon D2X, Nikon DSLR, noise, pattern noise, raw file processing

This page is shown with a darker background to enhance viewing of the images on it.
The dynamic range of a digital camera or film is the greatest difference in tonal range from pure white to pure black that can be maintained while still retaining detail. As a practical matter, detail must also not suffer unduly from artifacts such as noise or streaking. For example, very dark areas should appear as black or near black without showing streaks or speckles.
The shot above includes a Macbeth ColorChecker card and the Stouffer R2110 step wedge, consisting of 21 steps of 1/3 EV each, for a total range of 6 and 2/3 stops. The scene was illuminated using four 50-watt 4700K Solux bulbs, and was gray balanced using the 4th patch from the left. Solux bulbs have highly-accurate color rendition very close to sunlight. The Gossen Color Pro IIIf color meter read 4100K at the target with no magenta/green color cast (lower than expected for unknown reasons, perhaps bulb variation).
To eliminate error due to lens light transmission and actual-vs-marked aperture values, the same manual lens was used on both cameras: the Nikon 85mm/f2.8 PC-Micro Nikkor. The lens features a manual stop-down lever so it can be stopped down to exactly the same aperture each time, on both the Nikon and Canon bodies.
Identical exposure was used for both cameras. The chosen reference exposure was 1/8 second at f8, which yielded a suitable range on the step-wedge.
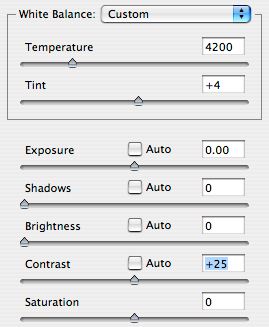
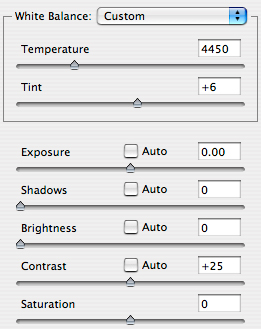
The raw files were processed as described on the Raw File Processing page, except Tone=Low and Sharpening=Low was used. Click on each image below to see a larger actual-pixels crop:
| Reference Frame: 1/6 sec @ f8, ISO 100 | |
| Nikon D2X | Nikon D200 |
|
 |
In a print
The 21 steps of the gray scale wedge may be readily distinguished on the author’s color-calibrated Apple Cinema Display, provided a black background is used. Click on either of the wedges below to see both at full size in a black window.
Full step wedge |
 |
 |
A print was made on Epson Premium Glossy on the Epson R2400 (using Perceptual rendering, no black point compression). Steps 19, 20 and 21 cannot be distinguished. Step 19 has a luminance value of 3 (roughly equal to an RGB value of 20, depending on color space).
ISO response
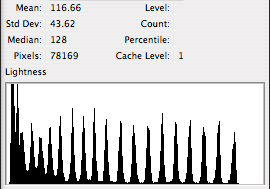
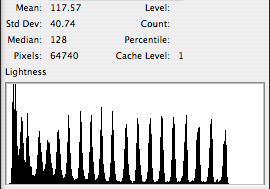
Let’s first see if the cameras are in agreement. Because they were both shot at ISO 100, using the same lens and same exposure, and processed identically, we should see close agreement in the luminance values from each camera. The first thing to notice is that the luminance histograms are different, with the D2X showing just a bit more contrast. This was also seen in the Resolution Chart test. Thus, we might expect the D2X to have slightly less dynamic range.
| Luminance histograms—21 gray step-wedge | |
| Nikon D2X | Nikon D200 |
 |
 |
 |
 |
21...14: 2, 3, 4, 5, 9, 13, 17, 20... 13...1: 25, 29, 34, 39, 44, 49, 55, 60, 66 71, 77, 83, 89 |
21...14: 2, 3, 5, 8, 12, 15, 20, 24... 13...1: 29, 33, 37, 41, 47, 51, 56, 60, 65, 70, 74, 80, 85 |
Overexposure
We now assess the dynamic range; the maximum usable range from dark to light that the cameras are capable of handling. The “headroom” of each camera is considered—how much overexposure could be tolerated. We’ll also look at how far an underexposed image could be “pushed” and still yield a usable image.
Overexposure headroom
How much additional exposure can be tolerated before the first two steps of the Stouffer R2110 step wedge became indistinguishable?
With the D2X, we see the ability to overexpose by +2/3 stop and still distinguish the “1” and “2” patches (though patch “1” has lost detail). This step wedge is in 1/3 EV increments, and we see that with each increase of the exposure by 1/3 stop, another step of the wedge is forced to pure white.
| Overexposure headroom Nikon D2X, Nikon Capture |
|
| +0 |
 |
| +1/3 |
 |
| +2/3 |
 |
| +1 |
 |
| +4/3 |
 |
| +5/3 |
 |
| +2 |
 |
With the D200 (below), we see the ability to overexpose by +1 stop and still distinguish the #1 and #2 patches (though detail in #1 is lost).
While darkest values of the D200 and D2X step wedges are extremely close, the D200 patches are ever so slightly lighter (see the step-wedge table—but you’ll need a well--calibrated monitor to see the distinction).
In addition, the brightest values on the D200 step wedge are darker than the D2X values. With slightly lighter dark values, and slightly darker light values, we can conclude that the D200 has lower contrast eg a higher dynamic range. It seems reasonable to conclude that the D200 has at least as good a dynamic range as the D2X, about 1/3 stop better based on seeing +2/3 stop headroom from the D2X, and +1 stop headroom on the D200.
| Overexposure headroom Nikon D200, Nikon Capture |
|
| +0 |  |
| +1/3 |  |
| +2/3 |  |
| +1 |  |
| +4/3 |  |
| +5/3 |  |
| +2 |  |
High capacity, high-performance fault-tolerant storage for photography and video.
Non-RAID or RAID-0/1/4/5/10.
Capacities up to 72 Terabytes!

Highlight recovery
Nikon Capture does a so-so job recovering highlights, pinning blown areas to gray. Adobe Camera Raw is more intelligent in this regard. Still, we’ll stick to Nikon Capture to see how much detail can be recovered with the D2X as compared with the D200.
For each overexposed frame, a negative exposure compensation was entered, of the same magnitude as the overexposure. For example, the +1 stop overexposure received -1 stops adjustment. We won’t use the step wedge for this excercise, because a more interesting and varied subject shows the effect better.
This example is a relative comparison—not an absolute—it cannot be compared on a numerical basis to any other setup (with an EOS body, for example). Our straw friend was positioned in the frame such that he received direct lighting, thus becoming a high-key component of the image.
The results seen in the table below confirm what is seen in the step wedge: the D200 has 1/3 stop more overexposure headroom. To see full-size crops, including before/after for the D2X and D200, view the large tables.
Highlight Recovery—doll's face |
||
| exp | D2X | D200 |
| +0 |  |
 |
| +1/3 |  |
 |
| +2/3 |  |
 |
| +1 |  |
 |
| +4/3 |  |
 |
Underexposure—push processing
Let’s first look at a 2-stop “push” using Nikon Capture. Two stops is the maximum “push” it offers. In this case, this means a shutter speed of 1/30 second, instead of 1/8 second.
Nikon D2X
Click on any individual image to see it at actual-pixels, or view the large table, which includes both the Nikon Capture and Adobe Camera Raw results.
push |
Nikon D2X processed using Nikon Capture [see all] downsized |
| +0 |  |
| +2 |  |
| The two stop push yields nearly identical gray-scale results, but with increased noise. Click on each image to see the actual-pixels version. | |
Now let’s see how Adobe Camera Raw fares. Here are the settings used (Exposure varied appropriately):
| push | Nikon D2X processed using Adobe Camera Raw [see all] downsized |
| +0 |  |
| +2 |  |
| +3 |  |
| +4 |  |
Nikon Capture does a better job on the 2 stop push.
It’s easier to get a sense of what’s going on with larger images than with boring step wedges. Click on any of the reduced-size images below to see larger versions, or see the actual pixels versions all at once in a large table. Unless you have unrealistic expectations, you’ll likely be very impressed with the latent potential a greatly underexposed image holds.
| Nikon D2X pushed large crops—Nikon Capture [see all] | |
| +0 |  |
| +2 |  |
| Nikon D2X pushed large crops—Adobe Camera Raw | |
| +0 |  |
| +2 |  |
| +3 |  |
| +4 |  |
If the image contains completely black tones (luminance values of 0-3 or so), you’re going to see various types of banding and/or streaking if you push those values higher, since there’s nothing there to begin with. This can hardly be a basis for criticism; it would be like complaining that unexposed film showed excessive grain when pushed! Here’s an example from the 4-stop Adobe Camera Raw push; if your monitor is capable, and is calibrated, you’ll just be able to see a reddish band at the top half of the image. It should be of no concern however, since it’s simply not visible in a print.
| Nikon D2X colored banding in extremely dark areas |
 |
Perfection would be nice, but realistically this is pretty incredible peformance.
Click on any individual image to see it at actual-pixels, or view the large table, which includes both the Nikon Capture and Adobe Camera Raw results.
push |
Nikon D200 processed using Nikon Capture [see all] downsized |
| +0 |  |
| +2 |  |
| The two stop push yields nearly identical gray-scale results, but with increased noise. Click on each image to see the actual-pixels version. | |
Now let’s see how Adobe Camera Raw fares. Here are the settings used (Exposure varied appropriately):
| push | Nikon D200 processed using Adobe Camera Raw [see all] downsized |
| +0 |  |
| +2 |  |
| +3 |  |
| +4 |  |
It’s easier to see what’s going on with larger images than with boring step wedges. Click on any of the reduced-size images below to see larger versions, or see the actual pixels versions all at once in a large table. Unless you have unrealistic expectations, you’ll likely be very impressed with the latent potential a greatly underexposed image holds.
| Nikon D200 pushed large crops—Nikon Capture [see all] | |
| +0 |  |
| +2 |  |
| Nikon D200 pushed large crops—Adobe Camera Raw [see all] | |
| +0 |  |
| +2 |  |
| +3 |  |
| +4 |  |
Comparing the cameras
Shown below are crops from the cameras, side-by-side, sized to match (but very close to actual-pixels).
| Camera | +3 stop push, Adobe Camera Raw [see all] |
| D2X | |
| D200 | |
| Camera | +4 stop push, Adobe Camera Raw [see all] |
| D2X | |
| D200 | |
Making prints
Using the Epson R2400, prints were made of the Nikon Capture +0 and the ACR +4 push frames on Epson Premium Glossy paper (print was of the image shown at the top of this page). Since the image is cropped, the print size was equivalent to a 13.4 X 9 inch full-frame print. Another print of a smaller crop was made at twice the linear size, equivalent to a 26.8 X 18 inch print.
The D200 prints look slightly grainy, with faint streaks in the near-black areas. No one would mistake it for an ISO 100 image. On the other hand, even at a 4-stop push, no obvious noise is visible, and overall tonality, color saturation and detail is very good.
The D2X prints look very similar to the D200 print. There is significantly more chroma (color) noise evident in the print. However, the noise pattern of the D2X print looks slightly tighter, presumably due to its higher resolution and the lower magnification when printed at the same size as a D200 file.
Now here’s the kicker—even at the 26.8 X 18 inch print size, the prints are quite acceptable, especially the D200 print, which has less prominent noise. In other words, underexposure of even 4 stops should not automatically relegate the exposure to trash bin.
A field shot
To confirm the studio findings, a field comparison was done.
Click on the image below to see whether field results confirm the studio results.
Another example
The Color—Crayons page shows another example of the reduced dynamic range of the D2x as compared with the D200.
Conclusions
Dynamic range
Based on studio and field shots, dynamic range of the D200 is about 7 stops versus about 6 1/2 stops for the D2X. In practice, noise and streaking at black and near-black values means that the usable dynamic range will be somewhat less than that.
Underexposure and “pushing”
The D2X and D200 both offer an excellent potential to retrieve severely underexposed images by “pushing” the exposure, with the caveat that for areas in which pure-black or near-black exists, pushing too far can result in wide bands of overall discoloration. The D200 fares slightly better than the D2x, which can be expected due to its 22% larger pixels.
Whether the distinctions in “pushing” an exposure matter are likely image and printer-dependent, since few printers can produce distinctions between pure black and near black (under RGB values of 20 or so). However, with enough of a “push”, the streaking and noise patterns can become bright enough to be an issue.

Seagate 22TB IronWolf Pro 7200 rpm SATA III 3.5" Internal NAS HDD (CMR)
SAVE $100